Saturday, March 26, 2022

The Ultimate Keto Grilled Cheese Egg in a Nest

Ultimate Keto Grilled Cheese Egg In a Nest
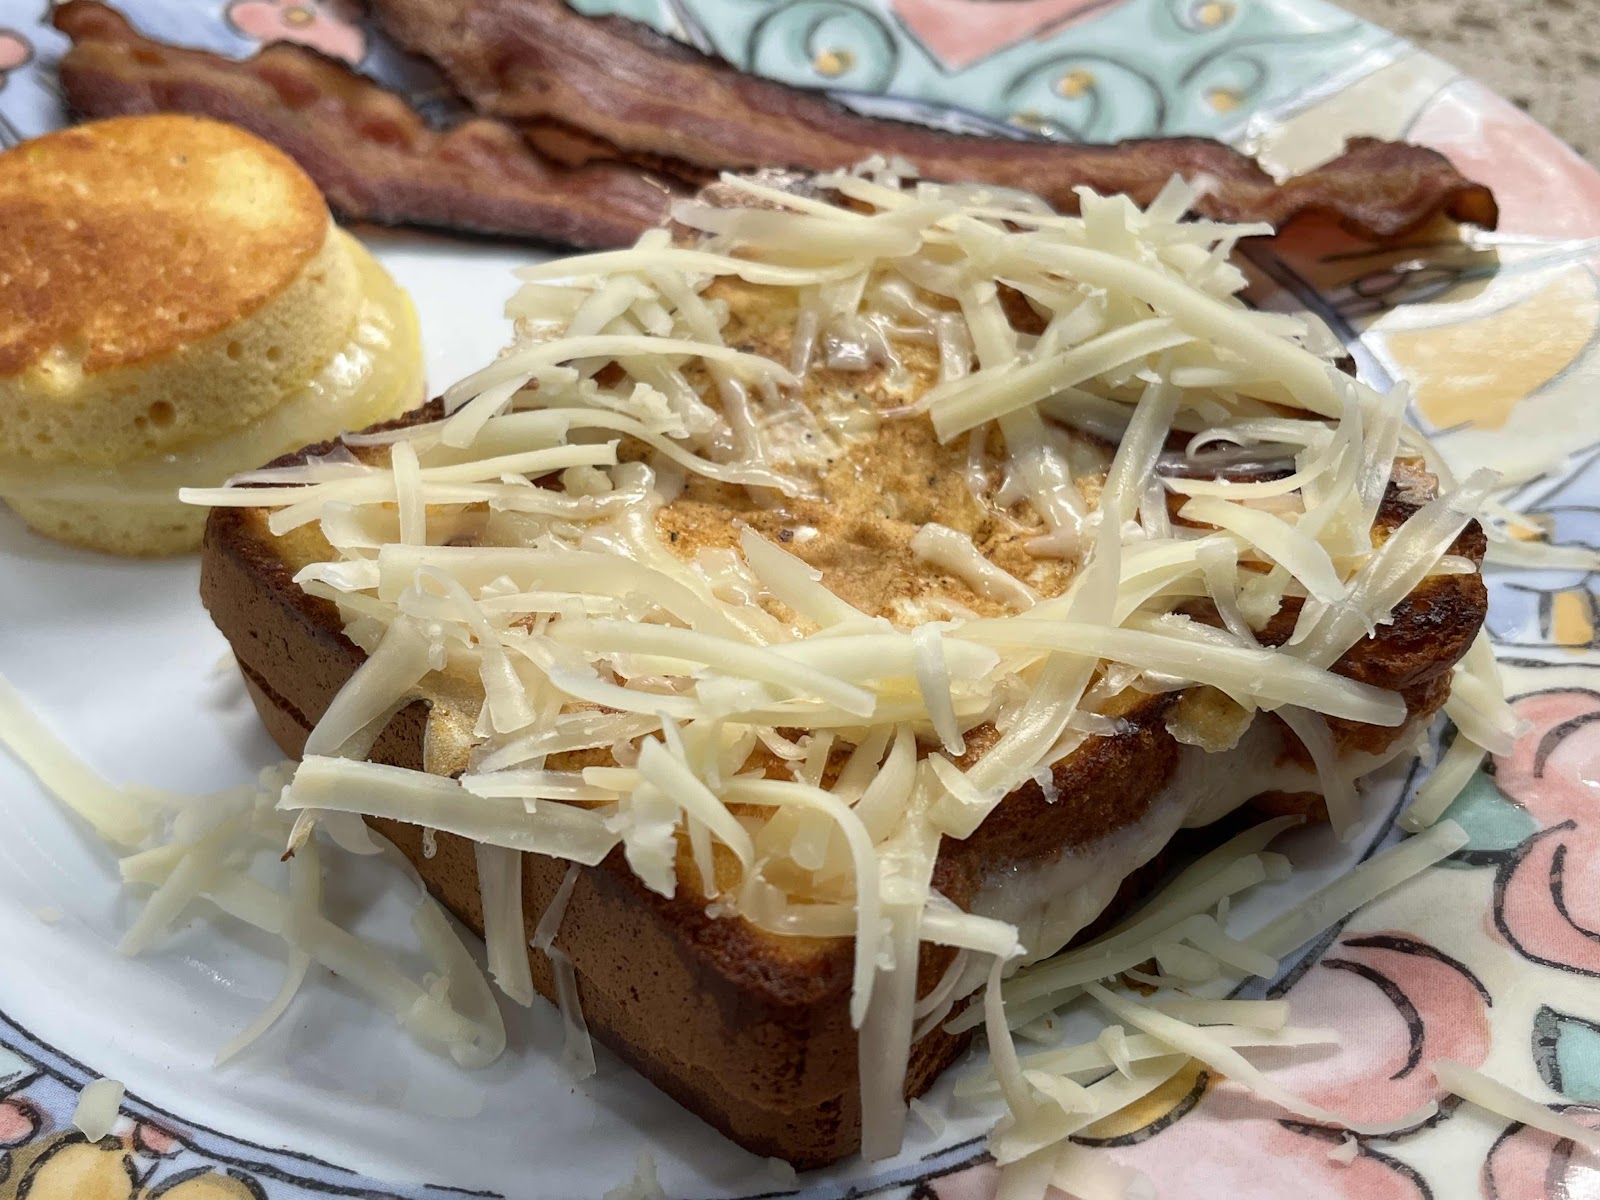
I have recently discovered the best keto bread recipe I’ve ever tried! (Click here for the recipe.) Now, I have real bread that I can use in a variety of ways in my meals. I have always loved Egg In a Nest, but this recipe takes it a step further. It has all the best flavors of a grilled cheese and tomato sandwich with Egg In a Nest! By itself, it makes a great quick and easy meal. Of course, you can use any keto bread that you like in place of homemade, but be aware the nutritional information may change depending on the bread you use.

The Ultimate Keto Grilled Cheese Egg In a Nest
Makes 1 serving

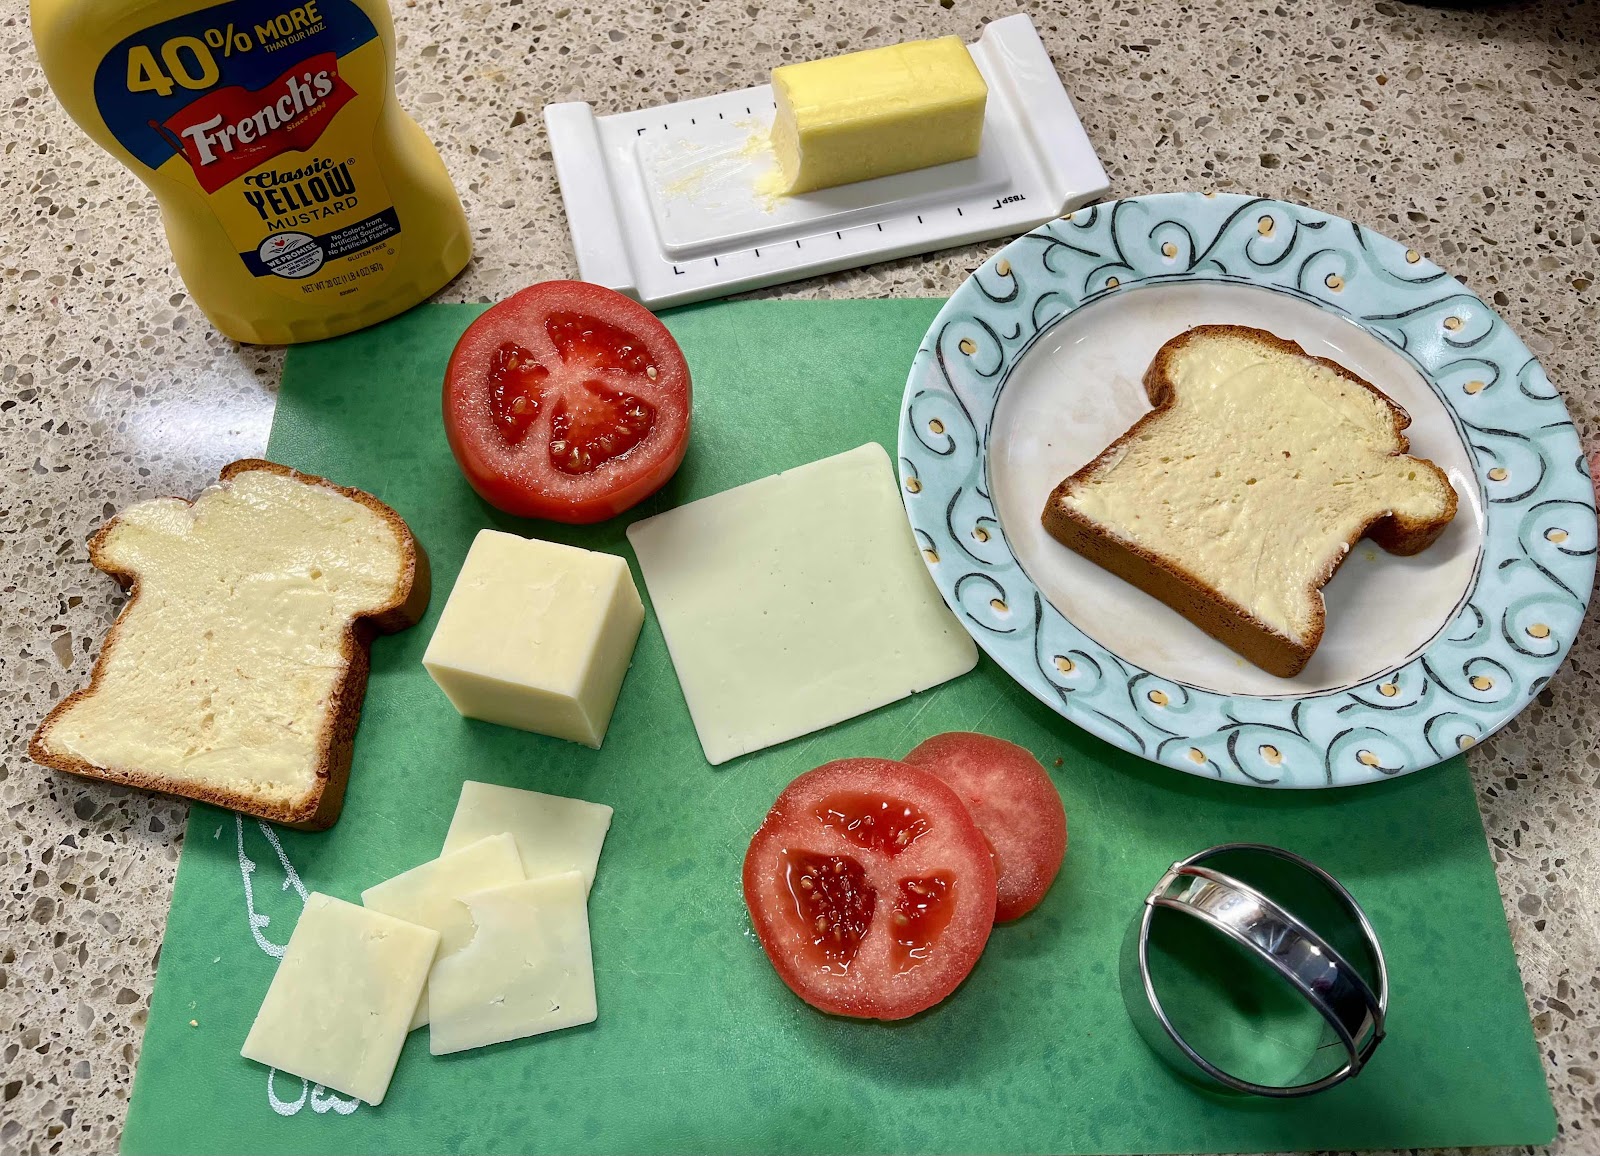
2 slices of keto bread (I used this recipe for Cloud Bread Loaf)
1 teaspoon yellow mustard
2 teaspoons butter, softened (I prefer salted butter)
1 slice tomato
1 ounce sliced cheese (I prefer sharp cheddar)
1/2 teaspoon olive or avocado oil
1 egg
Salt and pepper to taste
1 ounce shredded cheddar cheese

Equipment Needed: small biscuit cutter

Ingredients needed
1. Spread the mustard on both slices of the bread, on the side that will become the inside of the grilled cheese sandwich. Spread the softened butter on both sides of the bread, on the sides that will become the outside of the grilled cheese sandwich.

Make cheese sandwich
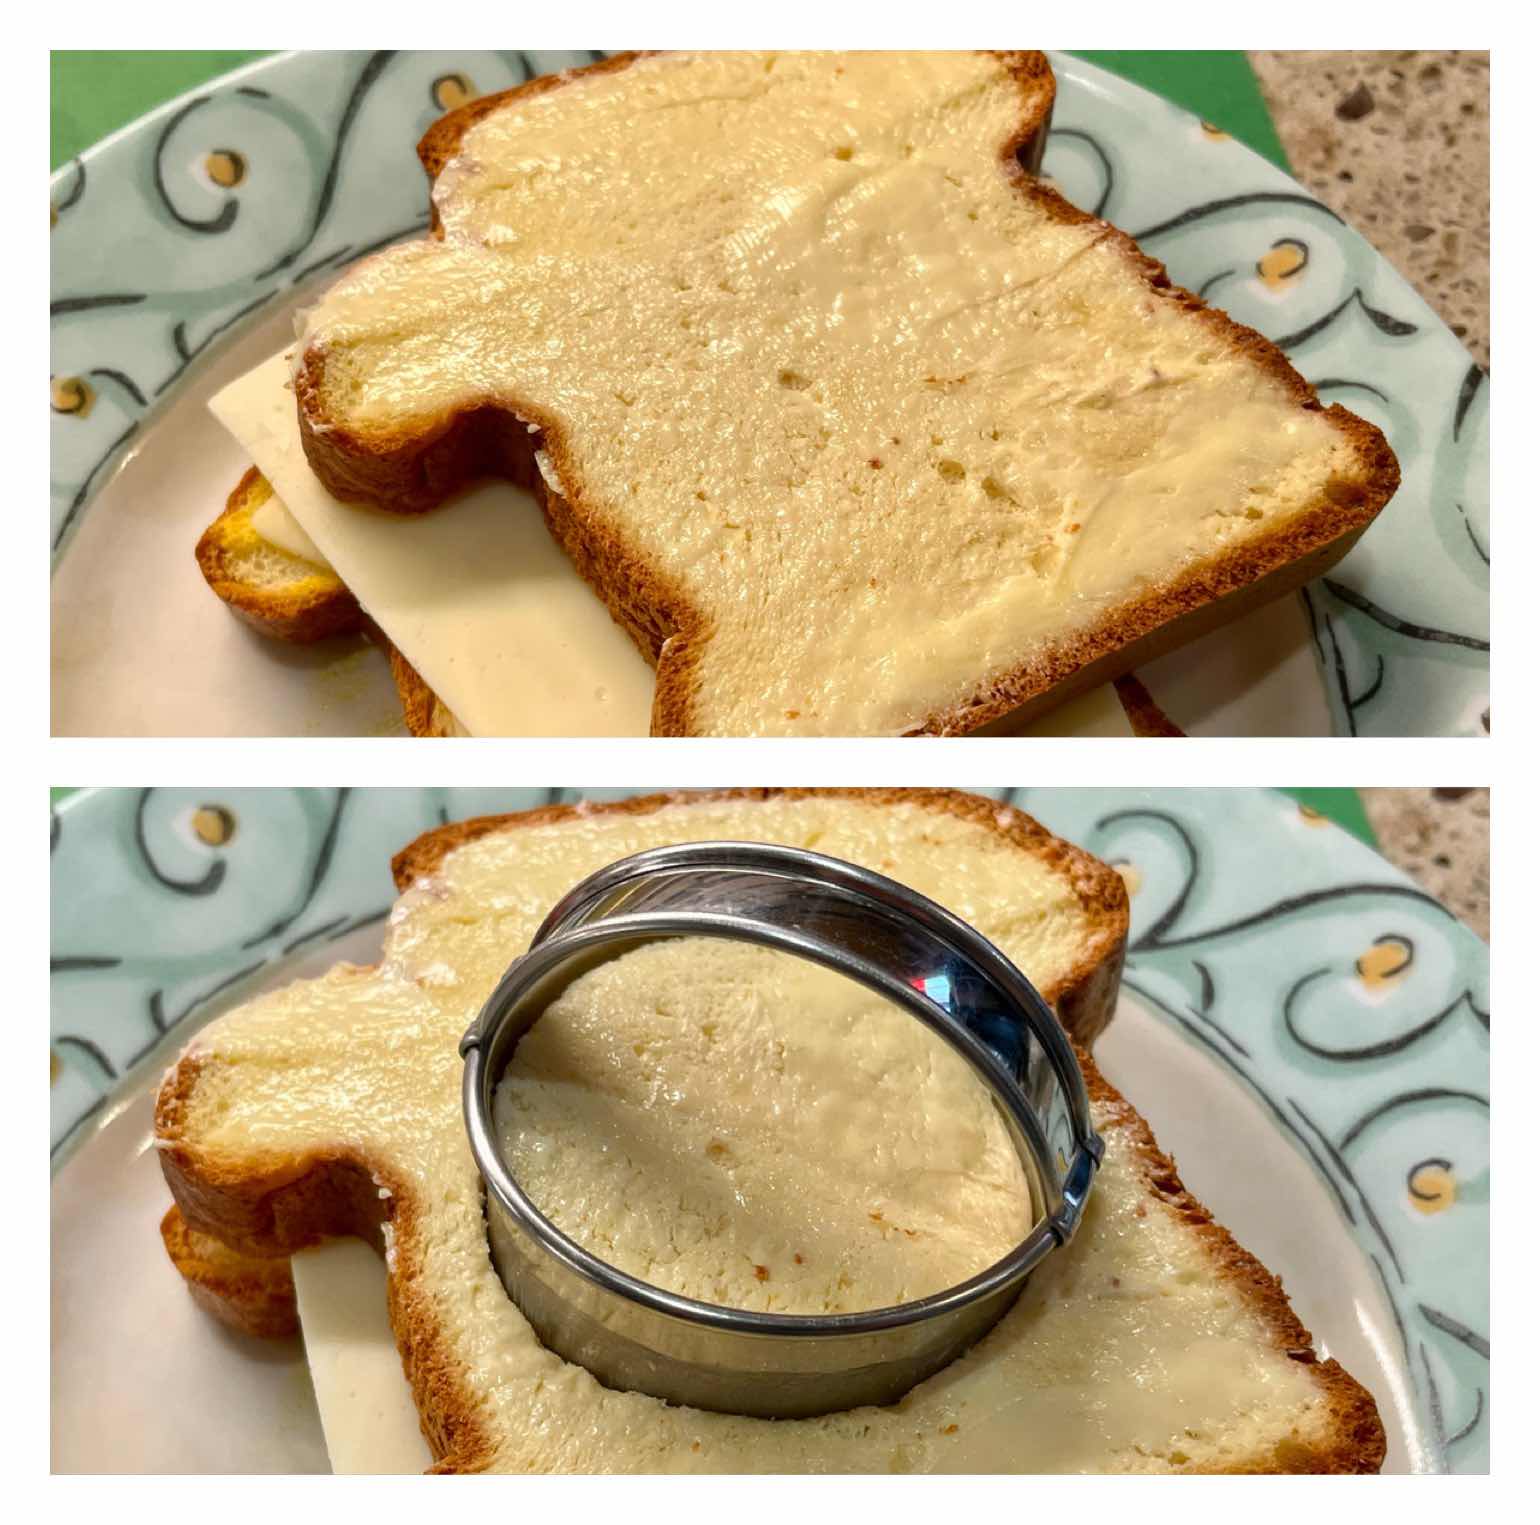
2. Place one slice of bread, butter side down, on a small plate or cutting board. Top with cheese and place the remaining slice of bread, butter side up, onto the cheese. Use the small biscuit cutter to cut a hole in the center of the cheese sandwich. Save the center circle to be grilled along side the Egg in a Nest.

Cut tomato to fit hole
3. If your tomato slice is larger than the hole you created, use the biscuit cutter to make it the correct size. You want it to fit inside the circle.

Place tomato in hole and top with egg
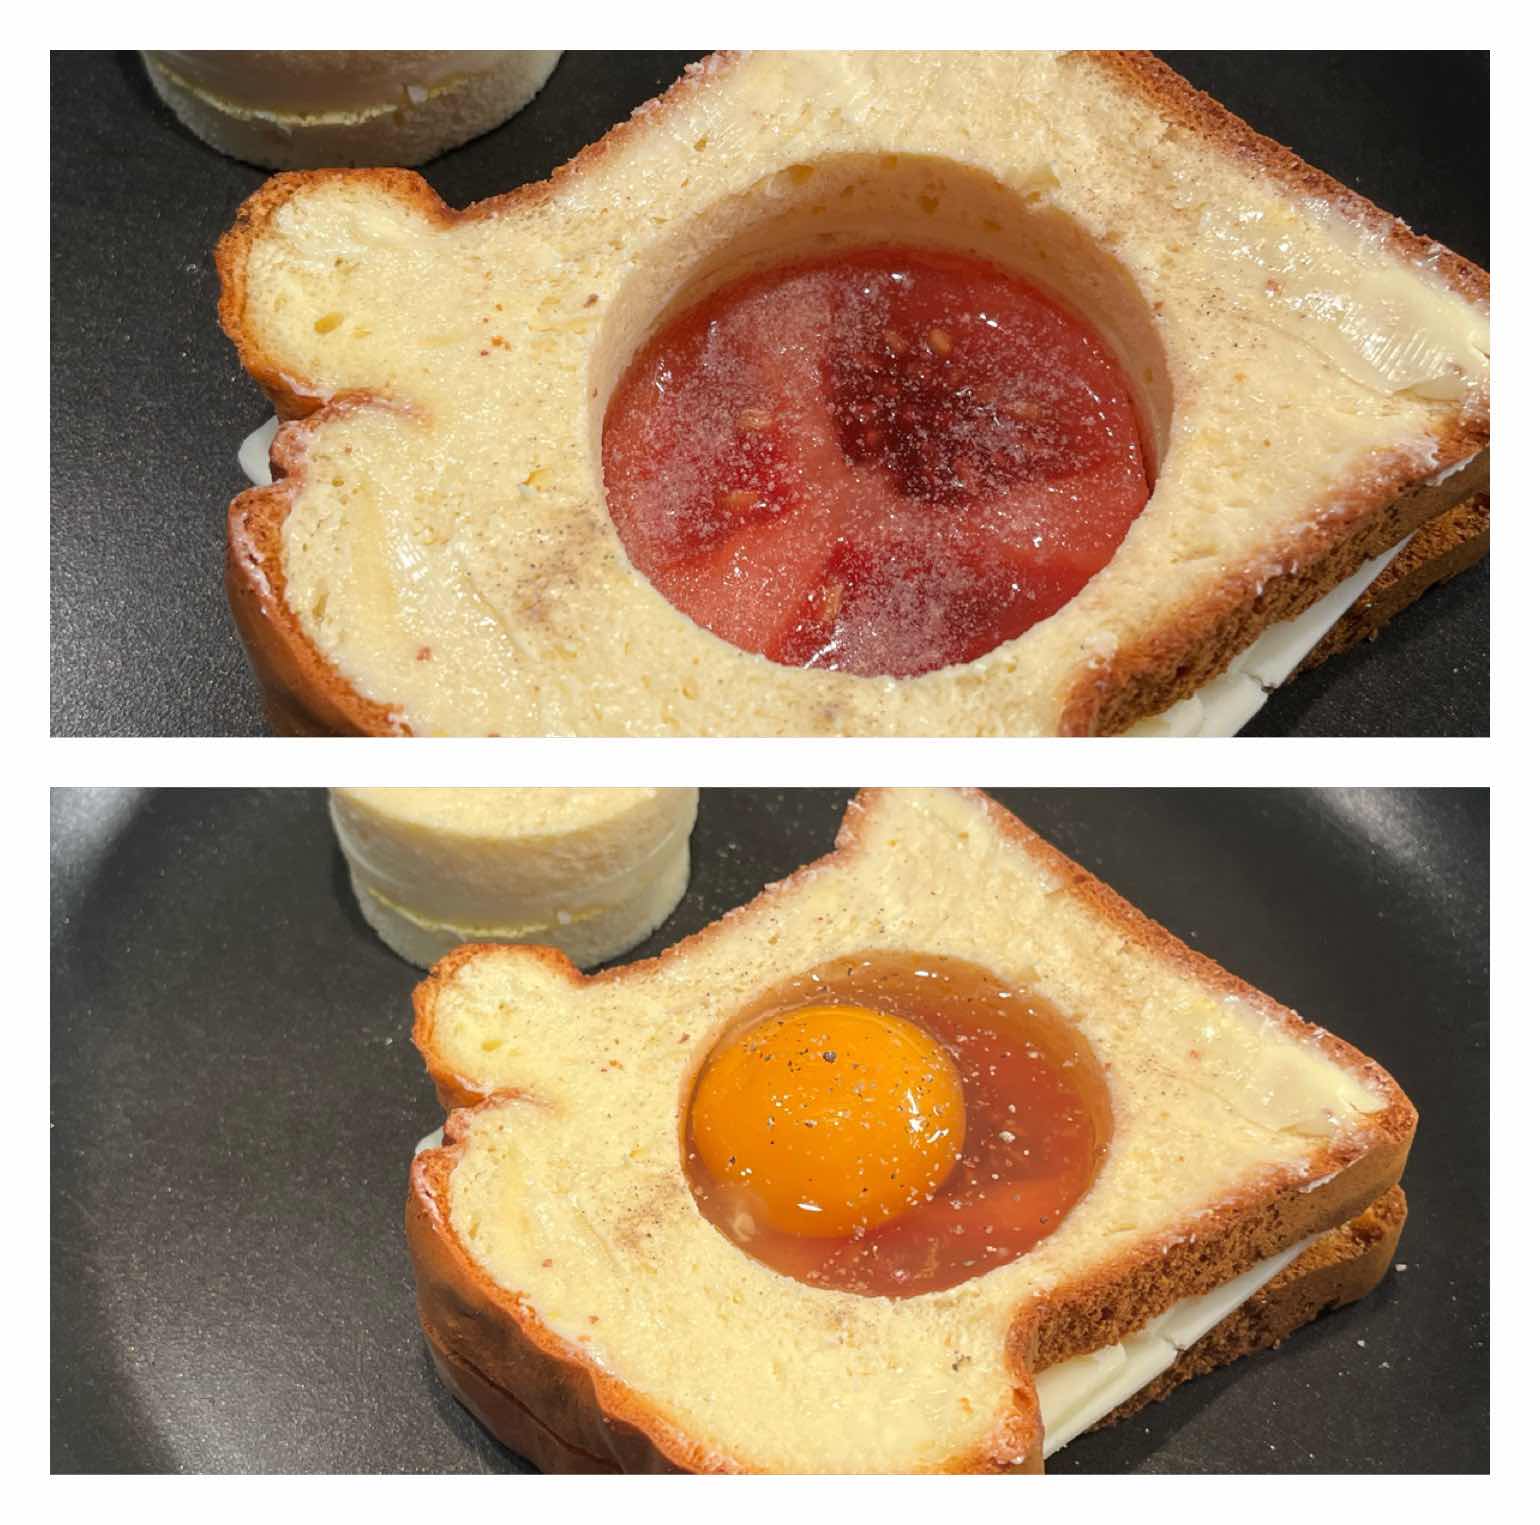
4. Place the cheese sandwich, with the hole in it, into a non-stick skillet (I start with a cold skillet). Drizzle 1/2 teaspoon of oil into the hole, then insert the tomato slice into the hole. Season with salt and pepper to taste. Crack an egg over the tomato slice and again season the egg with salt and pepper. Turn the heat to low (or medium-low). Cover the skillet with a lid to trap the heat and help melt the cheese. Grill until the bread has browned nicely. At the same time, grill the round cheese sandwich that you cut from the center.

Flip Egg In a Nest
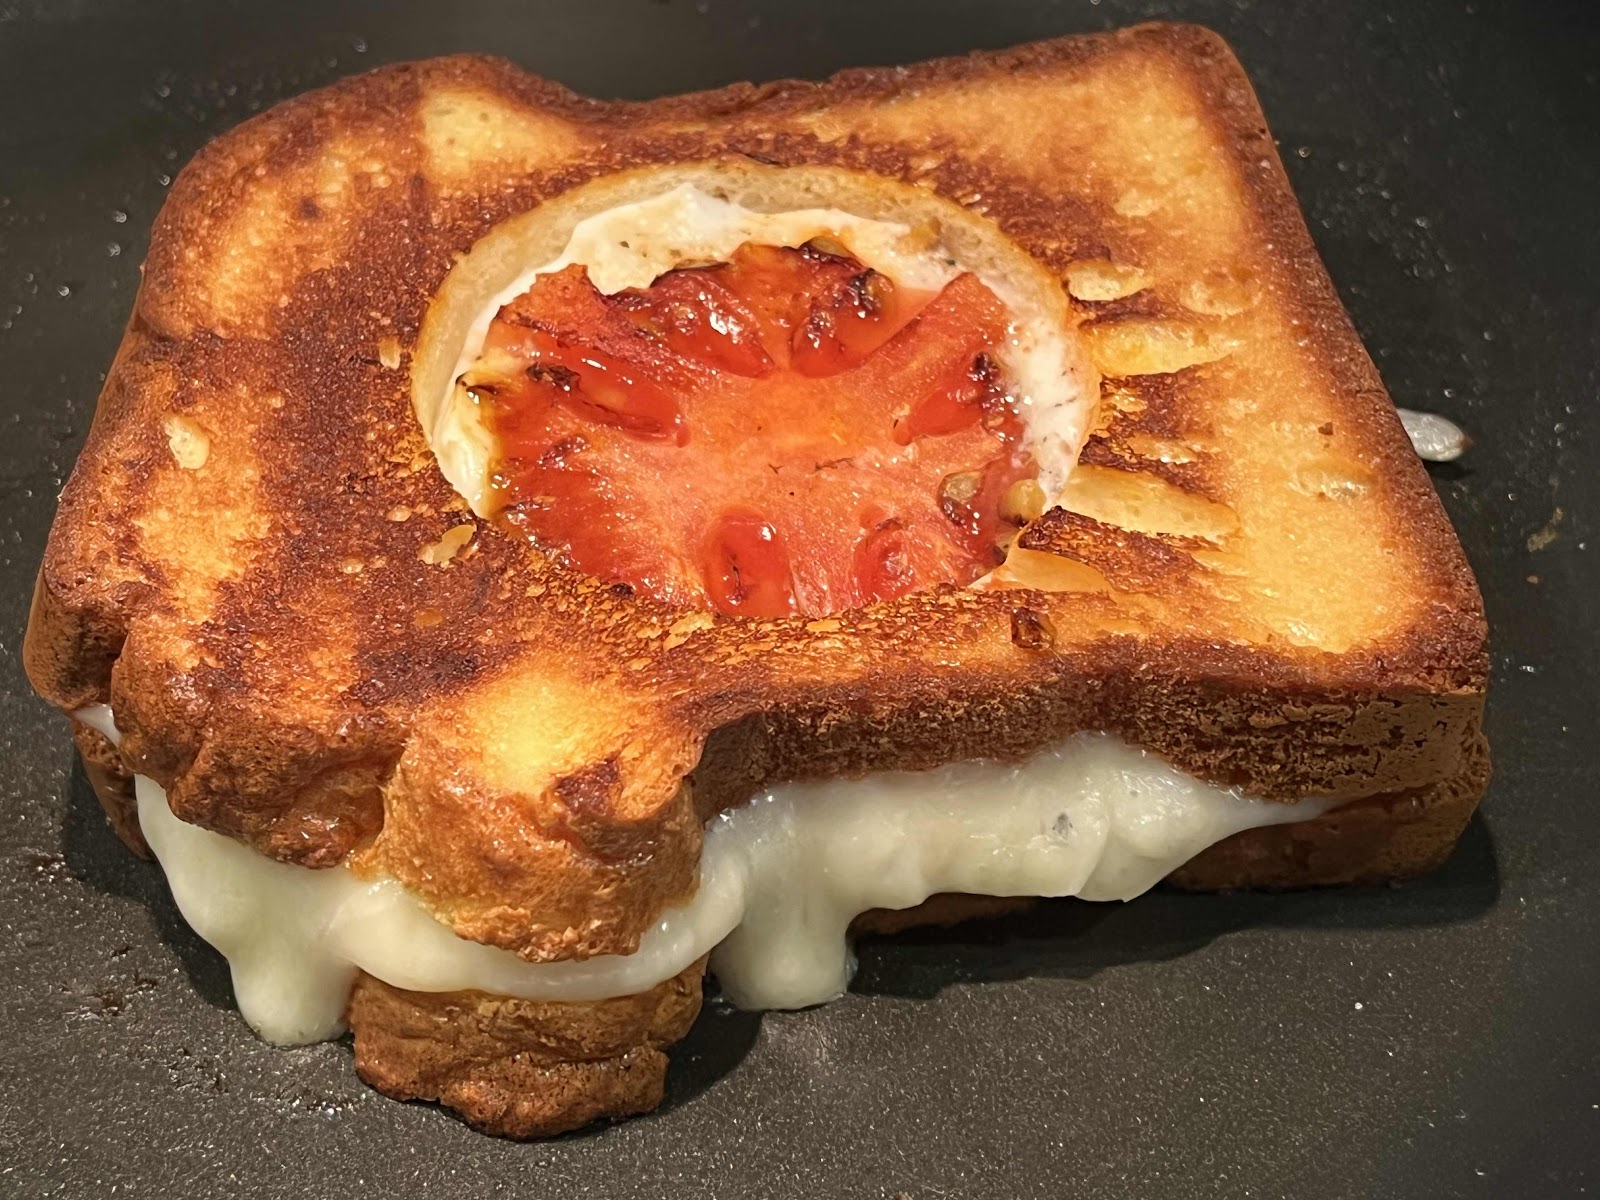
5. With a spatula, carefully flip the sandwich and continue grilling on the second side until the bread has browned and the egg is done to your liking. (Again, I like to cover the skillet to trap the heat.) Flip the small round cheese sandwich and brown the second side, as well.

Grilled Cheese Egg In a Nest
6. Remove the Egg In a Nest and the round grilled cheese sandwich to a serving plate. Sprinkle the shredded cheese over the Egg In a Nest and serve! YUM!

Nutritional Information per serving (made with 2 slices Cloud Bread Loaf): 603 calories, 3.6 g carbohydrate (2.4 g dietary fiber, 2.9 g sugars), 49.8 g total fat (20 g saturated fat, 0 g trans fat), 428 mg cholesterol, 690 mg sodium, 466.9 mg calcium, 254 mg potassium, 533 IU Vit A, 3 mg Vit C, 3 mg iron, 36.7 g protein. Net carbs per serving: 1.2 grams

Photos and recipe by Kathy Sheehan, copyright 2022
All rights reserved. Please do not duplicate without the author’s permission.

Saturday, March 19, 2022

Strawberry and Mascarpone Cream Cake

Strawberry Mascarpone Cream Cake
Last month, my mother celebrated her 86th birthday! It was my privilege to make her birthday cake so, of course, I wanted it to be extra special. This cake is not only delicious, it is extraordinarily beautiful being topped with sliced strawberries arranged in a flower design. I know you will WOW your family and guests whenever you serve this spectacular dessert! Mascarpone cream makes a wonderful frosting for any cake but, paired with strawberries, it is especially bright and refreshing. Perfect for a spring occasion!

Strawberry and Mascarpone Cream Cake
Makes one 8” cake (8 servings)

Cake:
48 grams coconut flour (about 7 tablespoons, lightly scooped and leveled)
6 tablespoons granulated erythritol sweetener (I like LaKanto Monkfruit Classic)
2-1/2 tablespoons unflavored whey protein powder 
1-1/2 teaspoons baking powder
1/8 teaspoon salt
3 large eggs
1/4 cup unsalted butter, melted and cooled
1/4 cup unsweetened coconut or almond milk
1 teaspoon vanilla extract

Mascarpone Cream Filling:
1-1/4 cups heavy whipping cream, cold
1/2 cup powdered erythritol sweetener 
1 teaspoon vanilla extract
8 oz. Plain, unsweetened mascarpone cheese, softened but still chilled

Topping:
About 1 quart fresh strawberries, leaves removed and sliced thinly lengthwise

1. Make the Cake: Preheat the oven to 325°F. Grease an 8 inch* cake pan well. Line the bottom with parchment paper and grease the paper.

2. In a medium bowl, sift together the coconut flour, sweetener, whey protein powder, baking powder and salt or whisk until no lumps remain. In a large bowl and using an electric mixer, beat the eggs, melted butter, coconut milk and vanilla extract until well combined. Add the dry ingredients and beat just until there are no lumps and the batter is smooth.

3. Pour the batter into the prepared pan and spread to the edges. Smooth the top. Bake about 30 minutes or until lightly browned around the edges, the top is slightly firm to the touch and a toothpick comes out clean. Do not over bake.

4. Remove from the oven and let cool in the pan for 10 minutes, then run a sharp knife around the inside of the pan and flip the cake out onto a wire rack to cool completely before frosting.

5. Make the Mascarpone Cream: Add the heavy whipping cream, powdered sweetener and vanilla extract to a large mixer bowl and whip on high speed until soft peaks form. Add the mascarpone cheese to the whipped cream and whip until stiff peaks form. It will happen fairly quickly.

6. Assemble the Cake: Spread or pipe the mascarpone cream thickly onto the cake. Arrange the strawberry slices on top of the mascarpone cream, starting from the outside edge and working to the center, overlapping slightly to create a flower pattern.

Flower Design with strawberries
7. Cover loosely with plastic wrap and refrigerate. About 30 to 40 minutes before you plan to serve, remove the cake from the refrigerator and allow to sit at room temperature. Slice with a large, sharp knife. For a clean, pretty slices, wipe your knife between each cut.

Slice of Strawberry Mascarpone Cream Cake
*Notes: It’s important to use an 8 inch cake pan to achieve the proper height to your cake layer. If you use a 9 inch pan, bake for a shorter period of time. The result will be a thinner cake, resembling a tart more than a cake.

Nutritional Information per serving (1/8th cake): 376 calories, 10.7 g carbohydrates (3 g dietary fiber, 2 g sugars, 3.5 g sugar alcohols), 36.3 g total fat (21.8 g saturated fat, 0 g trans fat), 163 mg cholesterol, 174 mg sodium, 91.2 mg calcium, 97 mg potassium, 237 IU Vit A, 1 mg iron, 6.4 g protein. Net carbs per serving: 5.2 grams

Photos and recipe by Kathy Sheehan, copyright 2022
All rights reserved. Please do not duplicate without the author’s permission. 

Thursday, March 10, 2022

Keto Carbonara (Made with Egglife Wrap Noodles)

Keto Carbonara (Made with Egglife Wrap Noodles)
I recently made Carbonara using three Egglife wraps that I cut into thin strips using a pizza cutter. The result was very good! I have to admit that this idea of using Egglife wraps as noodles is not my own. I saw a post on Facebook that inspired me. I thought it was ingenious! So, I tried it with my homemade carbonara recipe and I like the way it turned out. The Egglife wraps, by themselves, are pretty plain. They do not impart much flavor, so using them as a wrap in anything other than a breakfast burrito is not appealing to me. But when cut into thin strips, I think they make a pretty good egg noodle substitute. I will definitely be trying this again in other recipes that call for egg noodles, such as stroganoff. This recipe is convenient and quick to throw together anytime you need a “fast food” dinner. (To find out where you can buy Egglife Wraps in your area, check out the Store Locator on their website here.)

Keto Carbonara (Made with Egglife Wrap “Noodles”)
Makes 1 generous serving (or two side dish servings)

3 plain Egglife Wraps, cut into thin strips
2 ounces pancetta, cut into small cubes (or bacon)
2 cloves garlic, minced
1 egg
6 tablespoons grated Parmesan cheese
Ground black pepper to taste

1. In a small, heavy saucepan, boil some water. Cut three plain Egglife wraps into thin strips using a pizza cutter or sharp knife, about the width of fettuccine noodles; set aside. In a small bowl, whisk together one egg and 6 tablespoons of grated Parmesan cheese. Add pepper to taste; set aside.

Egglife Wraps
2. In a skillet, sauté 2 ounces of cubed pancetta until it has rendered its fat and is beginning to brown. Add two finely chopped or minced cloves of garlic and stir until fragrant. Remove from heat.

3. Once the water has boiled, drop the Egglife ”noodles” into the water for 15 seconds. Reserve about 1/4 cup of the boiling water. Drain the noodles and set aside.

4. To the now empty, but still hot saucepan, add the sautéed pancetta, including any rendered fat. Add the egg/Parmesan mixture and a little bit of the reserved hot water and whisk into a sauce. (Only add enough water to create a smooth, but still slightly thick sauce.) Add the drained Egglife noodles and toss until the noodles are well coated. Serve immediately.

Nutritional Information per entire recipe (1 generous serving): 521 calories, 3.5 g carbohydrate (0.2 g dietary fiber, 0.2 g sugars), 35 g total fat (14.8 g saturated fat, 0 g trans fat), 258 mg cholesterol, 1761 mg sodium, 446 mg calcium, 336 mg potassium, 1 mg iron, 139. IU Vit A, 43 g protein. Net carbs per serving: 3.3 grams

Photo and recipe by Kathy Sheehan, copyright 2022
All rights reserved. Please do not duplicate without the author’s permission. 

Wednesday, March 2, 2022

Keto Creme Brûlée

Keto Creme Brûlée
Creme Brûlée is one of my all-time favorite desserts! Before going keto, every time I’d see it on a menu, I just had to order it. I thought it was too complicated to make at home, so I never even tried. I am delighted to tell you that it is very simple, really! This elegant dessert will impress your family and friends. I suggest that if you’re making it for a mixed crowd (some low carbers and some guests that are not), go ahead and make the custards sugar free for everyone. No one will be able to tell the difference, I promise! Then, when it’s time to torch or broil the sugar topping, use LaKanto or another erythritol-based sweetener for your low carb, keto guests and regular sugar for those that do not follow a sugar free diet. Admittedly, the burnt sugar topping made with an erythritol-based sweetener doesn’t have the “hard crack” that is classic. It has a softer crack, but trust me, the burnt sugar flavor combined with the velvety custard is just as delightful and satisfying as a brûlée made in the traditional way. I worked for weeks perfecting this recipe, experimenting and testing. I had to eat a lot of brûlées until I got it just right…but someone had to do it! Enjoy the brûlée of my labors; I think you’ll be pleased.

Keto Creme Brûlée
Makes 6-8 servings (depending on the size of your ramekins)

Custard:
3 cups heavy cream, divided
1/2 cup allulose (*see notes, if you can’t find allulose)
A pinch of salt
4 egg yolks
1 whole large egg
8 drops monkfruit extract or stevia drops
2 teaspoons vanilla bean paste (or 3 teaspoons pure vanilla extract, not imitation)

Sugar topping:
6-8 teaspoons erythritol-based granulated sweetener (do not use allulose for topping, it doesn’t harden)

1. Boil about 1 to 2 quarts of water, depending on the size of your baking pan, and have it ready to use for the water bath.

2. Preheat oven to 300°F. Adjust the rack to the lower middle position.

3. Add half of the heavy cream (1 and 1/2 cups), allulose and a pinch of salt to a heavy saucepan and turn to medium high. Heat, stirring to dissolve the allulose until you see tiny bubbles forming around the edges and just beginning to simmer. While you are heating the cream mixture, place the remaining 1 and 1/2 cups of cream in the refrigerator to stay chilled.

4. As the cream is heating up, place the egg yolks, egg and monkfruit extract or stevia drops to a bowl or large glass measuring cup and whisk vigorously until well combined. (If you do not have vanilla bean paste, add 3 teaspoons of vanilla extract to the eggs and whisk.)

5. Once the cream is heated, remove from the heat and slowly pour into the egg mixture, whisking the eggs the entire time as you add the hot cream. This will temper the eggs so the custards do not “break” or scramble when baked. Add the chilled 1 and 1/2 cups of cream you set aside in the refrigerator and whisk well. Add the vanilla bean paste, if using and, once combined, pour into 6 to 8 ramekins and set inside an oven-safe baking dish. I like to use a 13” x 9” glass Pyrex baking pan but, if you don’t have one, use whatever high-sided baking pan that you have, even a roasting pan will do. Arrange the ramekins so that they are not touching and have a little space between each other.

6. Carefully pour the boiling water in the pan, about halfway up the sides of the ramekins. Place the baking pan in the preheated oven and bake for 25 to 30 minutes, or until the internal temperature reaches between 170 to 175°F. (If you are using shallow ramekins or small ramekins, the baking time should be reduced to 20 to 25 minutes.) The custard will slightly jiggle in the center when shaken. Remove the ramekins from the water bath and place on a wire rack. Leave at room temperature for 15 minutes. Place in the refrigerator for at least four hours or overnight. Once the custards are cooled sufficiently, you may cover them loosely with plastic wrap and return them to the refrigerator, until they are quite chilled and the custard is set.

Torched Creme Brûlée
7. Once ready to serve, sprinkle 1 teaspoon of the erythritol-based sweetener evenly over the top of each ramekin, tilting it from side to side, until a thin layer covers the entire surface. Using a kitchen torch, caramelize the erythritol until browned and bubbly. Return the dessert to the refrigerator, uncovered, for 30 minutes until the sweetener has hardened. (If you do not have a kitchen torch, you may broil the brûlées in the oven for a few minutes until the sweetener is browned and caramelized. Because the broiling method heats the entire custard, you may need to cool the ramekins in the refrigerator for longer until the topping hardens and the custard is cool again.)

*Notes: Allulose or Bocha Sweet are the best sweeteners to use in the custard because they do not have the “cooling effect” of erythritol and they will not recrystalize when cooled. If you cannot find either of these products, you may use a powdered erythritol-based sweetener instead, such as Swerve Confectioners or Powdered LaKanto Monkfruit Sweetener. The cooled custard may not be as creamy, but the taste will be similar.

Butane Torch from Hardware store
You can purchase a Butane Torch online or at a hardware store (look in the electrical or plumbing section). Follow the directions that come with your torch to fill with butane, which usually must be purchased separately. I bought a small torch at the hardware store (see photo above). It works just as well as a larger Kitchen Torch, although I have to refill it more often if I plan to caramelize more than 3-4 desserts at a time. If you have a large family or guest list, you might be happier with a larger torch. But, since it’s just me and my husband most of the time, the small torch works fine.

Creamy Custard of the Creme Brûlée
Nutritional Information per serving (based on recipe making 6 servings): 446 calories, 4.6g carbohydrate (0 g fiber, 0.3 g sugars, 4 g sugar alcohols), 51 g total fat (29 g saturated fat, 0 g trans fat), 329 mg cholesterol, 76 mg sodium, 19.4 mg calcium, 26 mg potassium, 536 IU Vit A, 2.8 g protein. Net carbs per serving: 0.6 grams

Photos and recipe by Kathy Sheehan, copyright 2022
All rights reserved. Please do not duplicate without the author’s permission.