Showing posts with label raspberries. Show all posts

Wednesday, December 20, 2023

Keto Raspberry Almond Mini Breads with Streusel Topping (or Muffins)

Keto Raspberry Almond Mini Breads

Looking for a last minute gift to share with friends or family? These healthier, sugar free mini bread loaves will be enjoyed by anyone, whether they are low carb or not! They’re easy to make because you start with a boxed keto muffin mix!

Raspberry Almond Mini Breads with Streusel Topping (or Muffins)
Makes about 4 mini breads (depending on pan size) or 12 muffins

5 eggs, room temperature 
½ cup neutral oil, such as avocado oil
1 cup low carb milk of choice (non-dairy is fine)
1 teaspoon vanilla extract
½ teaspoon almond extract
8 drops Monkfruit extract (or 2 tablespoons zero carb granulated sweetener)
1 pint fresh raspberries
1 box of King Arthur’s Keto All Purpose Muffin Mix

Streusel Topping:
1/4 cup almond flour
1/4 cup erythritol-based sweetener (I like LaKanto Classic Monkfruit sweetener)
2 tablespoons unsalted butter

King Arthur’s Keto Muffin Mix

1. Using a pastry cutter, mix together the streusel topping ingredients until pea-size crumbles form. Set aside. Spray a muffin tin or mini loaves pan with nonstick spray; set aside. Preheat oven to 350°F.

2. In a standing mixer (using a paddle attachment) or using an electric mixer, mix together the eggs, oil, milk, and extracts. Blend well.

3. Add the muffin mix and mix until combined. Fold in the raspberries and divide the batter evenly between the mini bread pans or muffin cups. Sprinkle streusel topping on top of each loaf or muffin.

4. Bake for about 28 minutes for muffins or 38 to 40 minutes for mini loaves. Bake until the internal temperature reaches 206°F.

Baked Mini Breads

5. Remove from oven and allow the muffins or loaves to cool in the pan for about 15 minutes. Turn out the muffins or loaves onto a wire rack to cool completely before serving. These breads or muffins freeze beautifully. Allow to cool completely, then wrap with plastic wrap and freeze for up to 2 months. Thaw to room temperature before serving.

Slice and enjoy!

Nutritional Information per serving (1/12th of recipe or 1 muffin): 97 calories, 12.5 g total carbohydrates (2.7 g dietary fiber, 2.3 g sugars, 6 g sugar alcohols), 5.5 g total fat (2.9 g saturated fat, 0 g trans fat), 83 mg cholesterol, 99.5 mg calcium, 164 mg potassium, 2 mg iron, 7 mg Vit C, 54 IU Vit A, 4.1 g protein. Net carbs per serving: 3.8 grams

Photos and recipe by Kathy Sheehan, copyright 2023
All rights reserved. Please do not duplicate without the author’s permission.

Monday, September 5, 2022

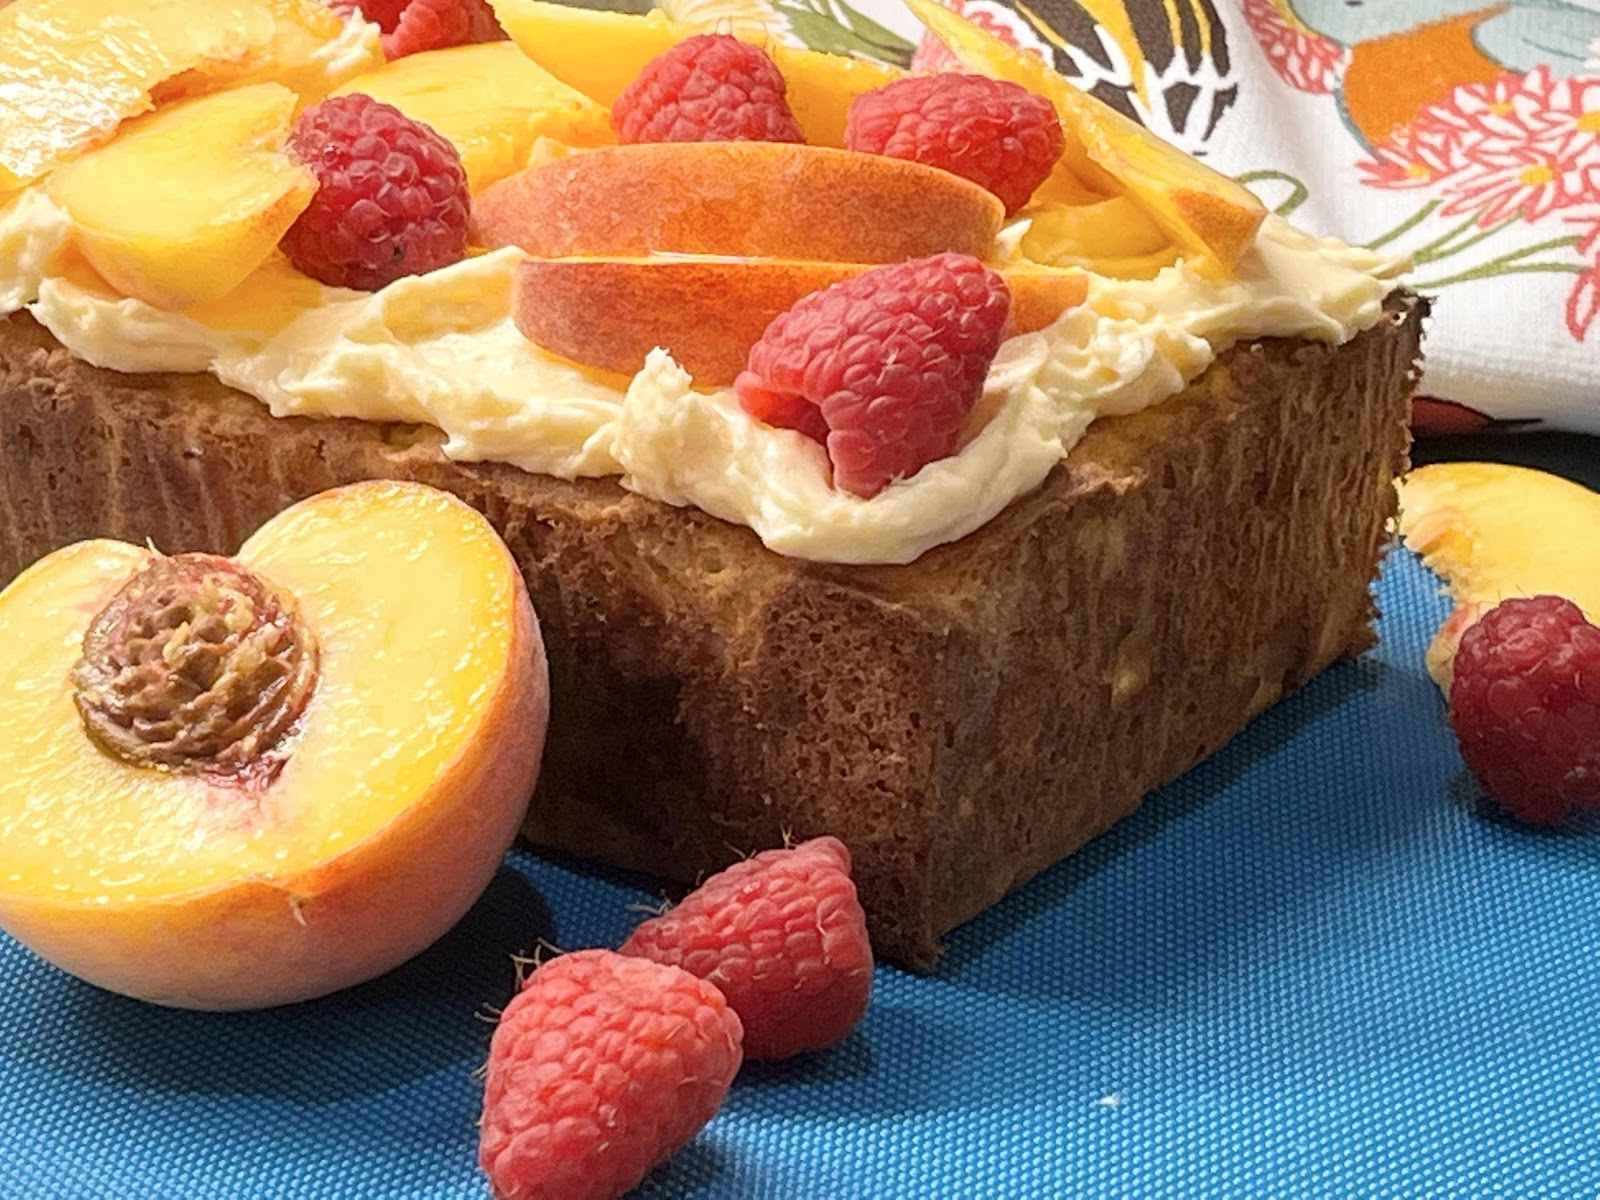
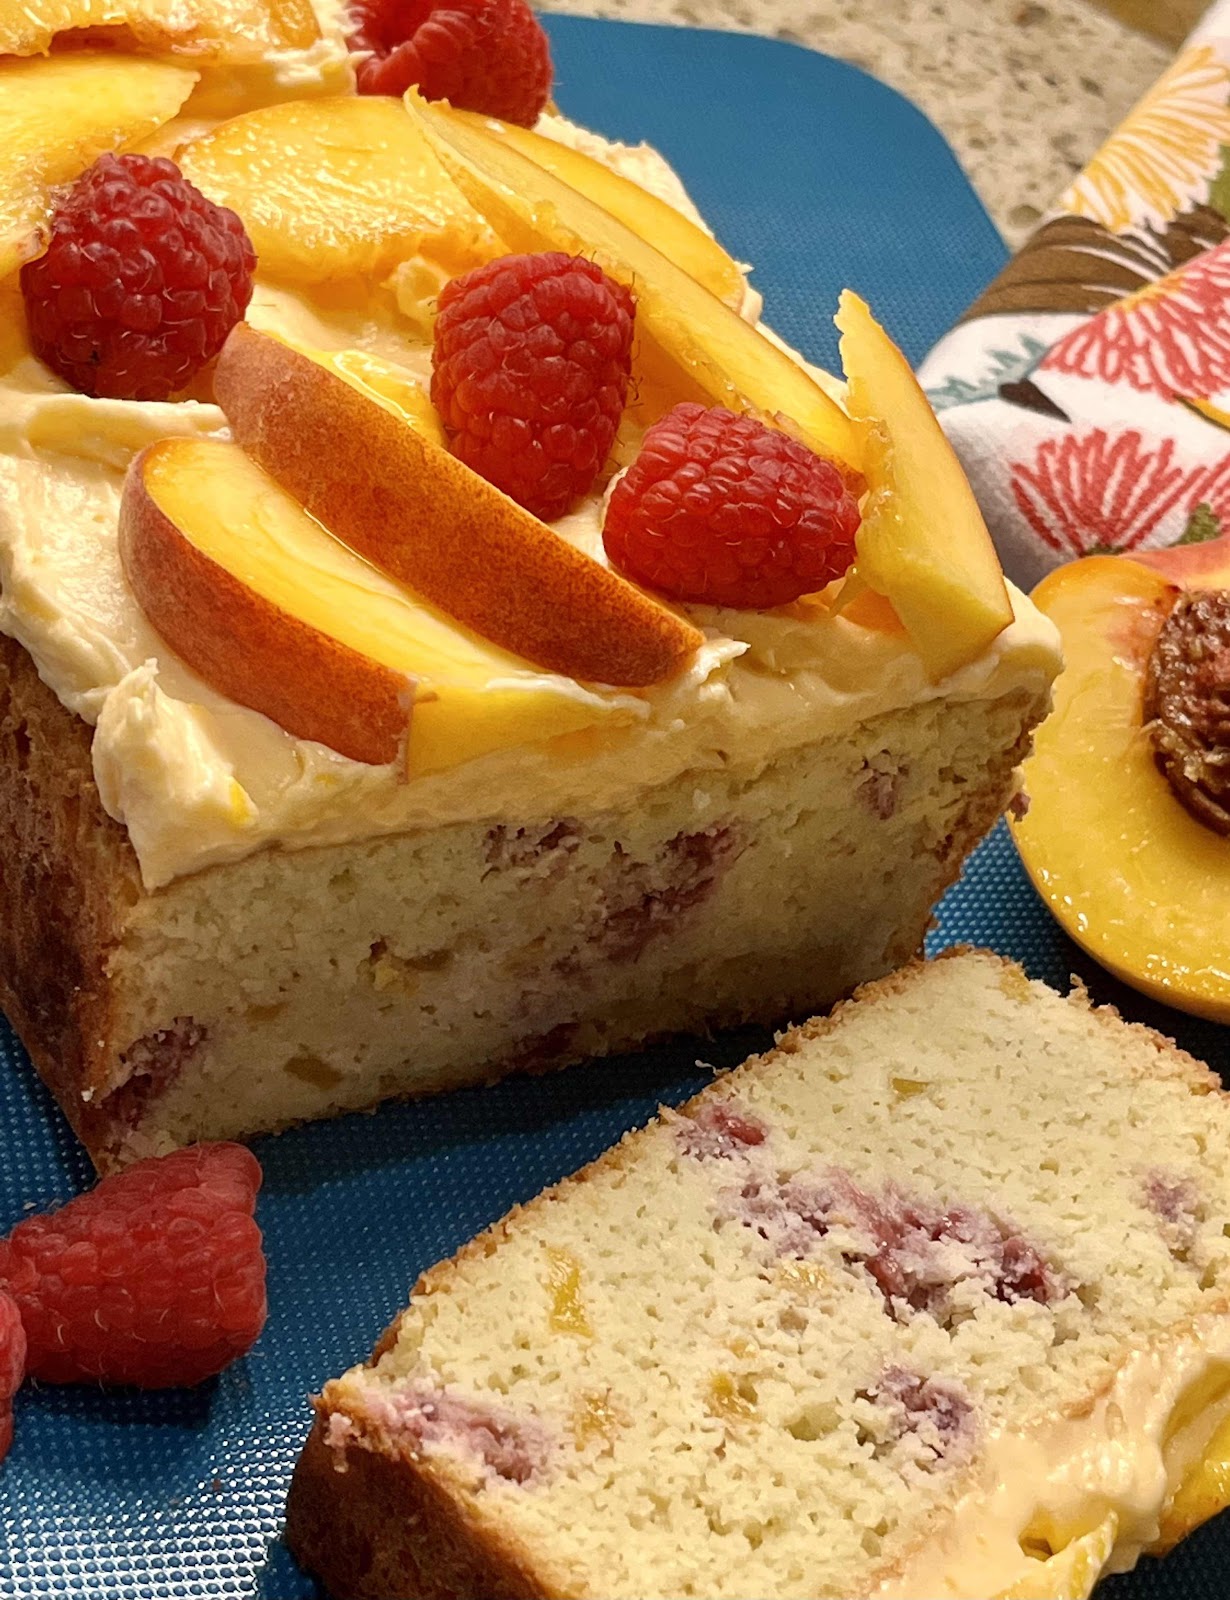
Keto Peach Melba Loaf Cake

Keto Peach Melba Loaf Cake
With my birthday coming up, I wanted to create a cake that highlighted my favorite seasonal fruits: peaches and raspberries! This cake is so easy to make and decorate. No need to fuss with layers. It is baked in a loaf pan, topped with a delicious peach buttercream frosting and then decorated with fresh fruit. What a beautiful and delicious way to end the summer!

Keto Peach Melba Loaf Cake
Makes 12 servings

Cake Ingredients:
3/4 cup + 2 tablespoons coconut flour (96 grams)
3/4 cup erythritol-based sweetener (I used LaKanto Monkfruit sweetener)
1/3 cup unflavored whey protein powder 
1 tablespoon baking powder
1/4 teaspoon salt
4 large eggs, room temperature 
4 large egg whites, room temperature 
1/2 cup unsalted butter, melted and cooled a bit
1/4 cup unsweetened coconut milk (or low carb milk of choice)
1 teaspoon vanilla extract
1 teaspoon almond extract
3/4 cup fresh peaches, skins removed and diced
1/3 cup fresh raspberries, cut into small pieces

Peach Buttercream Frosting:
4 tablespoons unsalted butter, room temperature 
1/2 cup erythritol-based confectioners sugar (either LaKanto Powdered or Swerve Confectioners)
4 ounces full-fat cream cheese, softened
2 tablespoons sugar free peach preserves (or apricot, if you can’t find peach)
1-2 drops yellow or orange food coloring (optional)

Garnish:
Raspberries and peach slices to decorate

Directions:

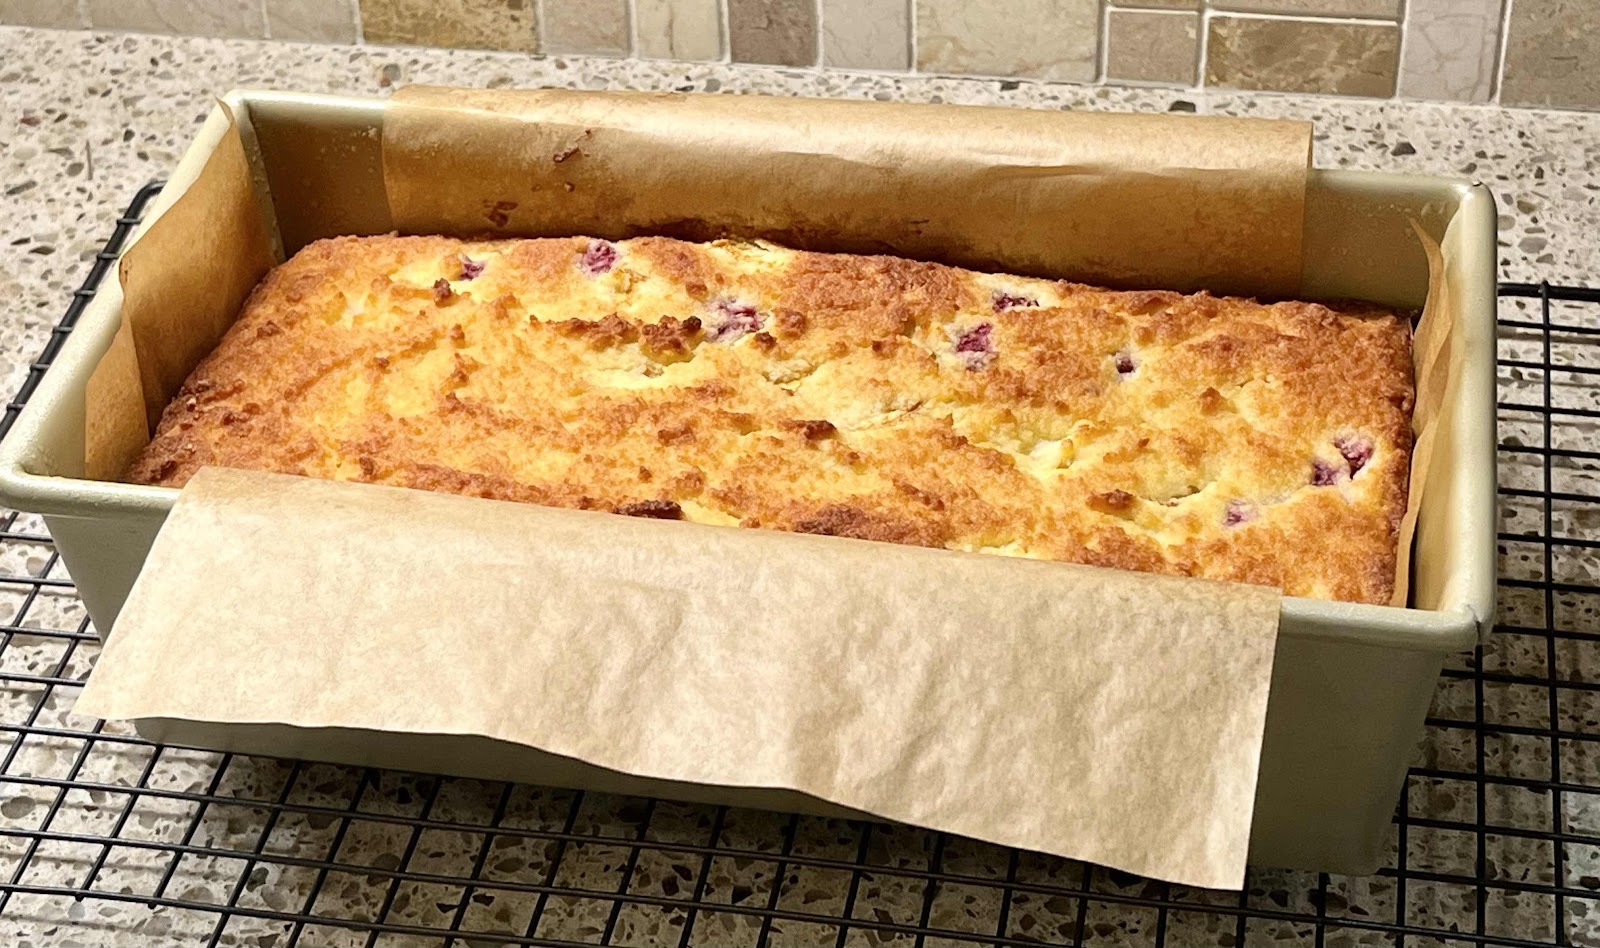
1. Preheat the oven to 325°F. Line the bottom and sides of a large loaf pan with parchment paper and grease the corners or any place not lined with the parchment paper sling.

2. In a medium bowl, whisk or sift together the coconut flour, sweetener, whey protein powder, baking powder and salt. Set aside.

3. In a large bowl with an electric mixer, beat the eggs, egg whites and extracts until light and fluffy. Add the melted butter, coconut milk and beat on medium-low until just incorporated. All at once, add the dry ingredients and beat until well blended. Fold in the chopped peaches and raspberries. The batter will thicken up as the coconut flour absorbs much of the liquid, which is normal.

4. Spoon the batter into the prepared loaf pan and spread to the edges and level the top with the back of a spoon or small offset spatula. Bake for 50 to 55 minutes in the preheated oven until top is golden brown and firm to the touch. It’s always a good idea to test the internal temperature of keto cakes and breads to better determine doneness. It should read between 206 to 210°F.

Loaf Cake in pan with parchment paper sling
5. Remove from the oven and let cool for 25 minutes in the pan. If needed, run a sharp knife around the insides of the pan and lift the loaf out using the parchment paper sling. Remove and discard parchment paper. Cool cake completely before frosting.

6. For the icing, put the softened butter in a bowl with the confectioners sugar and beat with an electric mixer until very soft and smooth. Add the softened cream cheese and beat again until thick and pale. Add the peach or apricot preserves for a fruity flavor, if you like, and add a drop or two of yellow or orange food coloring if you want to turn it a pretty peachy color. This frosting can be kept at room temperature for about an hour, or you may chill the icing until it has firmed up a bit or for longer storage. Return to room temperature and stir before spreading over the top of the cake. Decorate the cake with extra fresh raspberries and peach slices. (It’s best to do this just before serving because the peach slices can discolor if added too far in advance.)

Decorate top with fresh fruit
Tips: Ripe peaches work best in this recipe. If your fruit is under ripe, try keeping it in a brown paper bag with a banana to speed up the ripening process. The unfrosted cake keeps for a couple of days in an airtight container. Use a serrated bread knife to slice.

Nutritional Information per serving (1/12 of cake), with frosting, but not counting fruit garnish: 200 calories, 10g carbohydrates (3.9 g dietary fiber, 3.9 g sugars, 3 g sugar alcohols), 17.3 g total fat (10.8 g saturated fat, 0 g trans fat), 104 mg cholesterol, 231 mg sodium, 123 mg calcium, 73 mg potassium, 1 mg iron, 178 IU Vit A, 1 mg Vit C, 7 g protein. Net carbs per serving: 3.1 grams

Photos and recipe by Kathy Sheehan, copyright 2022
All rights reserved. Please do not duplicate without the author’s permission.

Thursday, March 1, 2018

Raspberry Yogurt Fluff

Raspberry Yogurt Fluff
This is a very quick and easy dessert or it makes a delicious breakfast, too. It’s best made with fresh raspberries (not frozen) so it sets up nicely. The pale pink color and hint of sweet raspberries are delightful, making this a perfect spring dessert!

Raspberry Yogurt Fluff
Makes 4 servings

1/2 cup heavy whipping cream
1/2 teaspoon vanilla extract
3/4 teaspoon stevia powder, divided and to taste (I used Sweet Leaf brand)
3 ounces cream cheese, cubed and softened
3/4 cup plain, unsweetened whole milk yogurt
10 fresh raspberries, mashed with a fork
4 fresh raspberries for garnish

1. Whip the heavy cream with a handheld or standing mixture on high until soft peaks form. Add the vanilla extract and 1/4 teaspoon stevia powder. Continue whipping until fully whipped. Remove 3/4 of the whipped cream to a separate bowl and set aside.

2. Into the remaining 1/4 whipped cream in the mixing bowl, add the softened cream cheese and yogurt. Whip on high until completely smooth. Add the remaining 1/2 teaspoon stevia powder and the 10 mashed raspberries. Whip until well combined.

3. Gently fold in the reserved whipped cream until well combined and no streaks remain. Spoon into 4 individual serving dishes and garnish each with one fresh raspberry. Chill in the refrigerator until ready to serve, at least 1 hour or up to 1 day.

Nutritional Information per serving: 214 calories, 4.7 g carbohydrate (0.4 g dietary fiber, 3 g sugars), 19.3 g total fat (11.3 g saturated fat, 0 g trans fat), 73 mg cholesterol, 110 mg sodium, 36 mg calcium, 131 mg potassium, 654 mg Vit A, 4 mg Vit C, 4.6 g protein. Net carbs per serving: 4.2 grams

Photo and recipe by Kathy Sheehan, copyright 2018
All rights reserved. Please do not duplicate without the author’s permission. 

Friday, July 29, 2016

Blueberry Mug Muffin with Easy Cultured Butter


I was lying in bed this morning, thinking about what I might want for breakfast, when an idea flashed into my mind: Blueberry Muffin. This is a twist on my favorite Mug Cake recipes but, instead, it's a Mug Muffin! And to make it even extra healthy, I mixed together kefir cheese and butter to create a simple and quick cultured butter as a spread. YUM...so delicious! I highly recommend using the smaller wild Maine blueberries for this recipe so they won't sink to the bottom (like mine did in this picture) but, even if the bigger variety of berry is all you have, it will still taste amazing, especially topped with creamy butter. (It would also be great made with raspberries.) This delightful breakfast was a great way to start a beautiful summer day in Maine!

Blueberry Mug Muffin
Makes 2 servings

2 tablespoons almond flour/meal
2 teaspoons coconut flour
2 teaspoons LaKanto Monkfruit sweetener (or other erythritol sweetener)
1/4 + 1/8 teaspoon stevia powder (I used Sweet Leaf brand)
A pinch of salt
1/2 teaspoon baking powder
1/8 teaspoon lemon extract or 1 teaspoon lemon zest (or 2 drops dietary-grade lemon essential oil)
1/2 teaspoon vanilla extract
5 drops Lemon Drop stevia (I used Sweet Leaf brand)
1 large egg
1 tablespoon butter, melted (use ghee for dairy-free)
1 tablespoon small wild blueberries (fresh or frozen)

1. Melt the 1 tablespoon of butter in a mug by microwaving on high for about 15 seconds; set aside.

2. In a small mixing bowl, combine the almond flour, coconut flour, sweeteners, salt and baking powder. Stir with a fork until well combined and no lumps are visible.

3.  Add the melted butter, extracts, lemon stevia drops, and egg. Whisk with a fork until a smooth batter forms. Take a paper towel and coat the bottom and sides of the mug with any butter remaining in the mug. Add 1/2 of the blueberries to the batter and gently fold to incorporate and pour into the prepared mug. Top batter with remaining berries.

4. Microwave on high for about 45 seconds.* Remove and test by touching the muffin near the center. It is done when the batter on top of the muffin looks set and springs back when touched lightly. If additional cooking time is needed, microwave at 10 second intervals and retest. Do not overcook. Allow the muffin to cool in the mug for 1 minute.

5. Invert the muffin onto a serving plate and allow to cool for 1-2 minutes. Serve immediately with butter or store leftovers in an airtight container at room temperature for 1 day. This recipe makes 2 servings.

*To bake in the oven, divide batter into two greased muffin tins or ramekins and bake at 325-degree Fahrenheit for 16-18 minutes or until toothpick comes out clean when tested or muffins spring back when touched near the center. 

These muffins can be microwaved or baked in the oven. Both methods are equally delicious!
Nutritional Information per 1/2 recipe: 143 calories, 6 g carbohydrate (1.7 g dietary fiber, 0.9 g sugars, 4 g sugar alcohols), 11.7 g total fat (4.9 g saturated fat, 0 g trans fat), 113 mg cholesterol, 173 mg sodium, 114.5 mg calcium, 88 mg potassium, 5 g protein.  Net carbs per serving: 4.3 grams

Easy and Quick Cultured Butter: Mix together 2 tablespoons softened butter, 1 tablespoon kefir cheese (to make kefir cheese, click here) and 1/4 teaspoon honey.  This probiotic-rich buttery spread is excellent on muffins, pancakes and waffles.

Recipes by Kathy Sheehan, copyright 2016
All rights reserved. Do not duplicate without author's permission.

Tuesday, December 22, 2015

Raspberry Chocolate Chip Kefir Ice Cream or Pops


This creamy low carb dessert is such a treat and another great way to incorporate more natural, probiotic-rich food into your diet. It's made with frozen organic raspberries (or fresh) that are both low on the glycemic scale and high in antioxidants. To make it extra creamy, I drained the whey out of my homemade kefir, or you can use store bought, to create kefir cheese. (Recipe for making kefir at home can be found here.) To make kefir or yogurt cheese, simply line a strainer with two unbleached coffee filters, set it over a bowl, fill the strainer with plain kefir (or plain unsweetened yogurt, but not Greek) and allow to drain in the refrigerator overnight.  When the thickened, cream cheese-like kefir cheese is added to the kefir with the full-fat coconut milk, the result is a super luscious and decadent frozen treat.  If you want to have a festive ice cream for the holidays, simply add some peppermint extract or a few drops of dietary-grade peppermint essential oil to the mix.  I've had it both ways and it is delightful!

Raspberry Chocolate Chip Kefir Ice Cream
Makes 6 servings (1/2 cup each)

3/4 cup fresh or frozen raspberries
1/2 cup kefir cheese (or yogurt cheese)
1/2 cup plain unsweetened kefir
1 cup full-fat coconut milk
1 teaspoon vanilla extract
1 tablespoon Lakanto Monkfruit Sweetener (or erythritol sweetener)
1/2 teaspoon stevia powder (I used Sweetleaf brand) or to taste
3 tablespoons chopped dark chocolate (85% cacao or higher)
For optional peppermint flavor, add 1/4 teaspoon peppermint extract or 2-3 drops dietary grade peppermint essential oil, or to taste

1. In a blender, blend together the raspberries, kefir cheese, kefir, coconut milk, vanilla, sweeteners and peppermint extract or oil, if using, until smooth.  Taste mixture and add more sweetener, if desired. If you used fresh raspberries, refrigerate mixture for at least one hour before proceeding. Chop the dark chocolate and set aside.

2. Churn the ice cream according to the manufacturer's instructions for your ice cream maker, adding the chopped chocolate at the appropriate time.  Serve immediately or freeze for a few minutes until it reaches a soft-serve consistency. Put any leftovers into ice pop molds and freeze to serve later. (This is best served as soft-serve ice cream.  If allowed to freeze completely, it will be too firm to scoop, so making ice pops is the best way to use leftover ice cream.)

Nutritional Information per 1/2 cup serving: 193 calories, 7.6 g carbohydrate (1.3 g dietary fiber, 4.8 g sugars, 2 g sugar alcohols), 18.1 g total fat (11.6 g saturated fat, 0 g trans fat), 20 mg cholesterol, 36 mg sodium, 71.1 mg calcium, 24 mg potassium, 2.3 g protein.  Net carbs per serving: 6.3 grams

Recipe by Kathy Sheehan, copyright 2015

Saturday, October 25, 2014

The Creamiest Homemade Dairy Free Yogurt


Since learning that I am highly sensitive to casein, the protein in milk products, I've had to find substitutions for my favorite dairy foods.  There are alternative, dairy free yogurts on the market, but either they are too high in carbohydrate and added sugar or they just taste strange!  Most are low or fat free, making their texture more like a sweet panna cotta or jello than what you'd expect from a tangy, creamy yogurt.  I've created a superior DF yogurt that is creamy, so delicious, very low carb and with that distinctive yogurt zip.  It is 1000 times better than the dairy free yogurt you can buy in the store and it's incredibly easy to make.  

First, you need to know that making yogurt from a non-milk base requires some kind of thickener.  I use high-quality, unflavored gelatin powder (Great Lakes brand) because it gives consistent, successful results.  I've experimented with a variety of dairy free milks and have never had a failure.  Secondly, if you want your yogurt to be a good source of calcium, you will need to use a mixture of milks, in which at least one contains plenty of calcium per cup.  In this recipe, I've used a mixture of 100% high-fat coconut milk for creaminess and Silk brand unsweetened cashew milk because it contains 450 mg of calcium per cup.  (You can use any calcium-fortified nut milk, such as almond, coconut, flax, soy or hazelnut.  Choose your favorite.)  Also, you can experiment with the ratio of full fat coconut milk to nut milk.  The creaminess comes from the coconut milk, so I don't think I'd go lower than 50:50, but if having a lower fat and less creamy yogurt is desirable, then experiment until you find a combination that's right for you.  Finally, I have cultured my yogurt in a yogurt maker, which is a fairly inexpensive piece of kitchen equipment.  I got mine for less than $30 on Amazon and I love it!  If you don't have a yogurt maker, you can "cook" your yogurt on a heating pad or in the oven (search online for how to do it).  Culturing takes 15-20 hours to get the right flavor, so I usually prepare the yogurt base in the evening and let it "cook" all night.  This recipe explains how to make plain, unsweetened yogurt, to which you can add your favorite fruits and flavorings before serving.  If you use your creativity, every jar in a batch can be different!  Below I describe several of my favorite additions to make a variety of yogurt flavors.  Once you make your own dairy free yogurt, you'll never buy it in a store again!

The Creamiest Homemade Dairy Free Yogurt
Makes 7 servings (about 3/4 cup each)

3 cups full-fat coconut milk, canned (I use Aroy-D brand)
2 cups calcium-fortified nut milk (I use Silk Unsweetened Cashew Milk, look for 1g carb per serving)
4 level teaspoons unflavored gelatin powder (I use Great Lakes brand)
1 tablespoon raw honey
1-1/2 packets non-dairy yogurt starter (I recommend Belle + Bella Yogo)*

Equipment needed: large very clean saucepan, very clean whisk, candy thermometer, measuring spoons, small jars with lids, yogurt maker (or search online for alternate method for culturing using a heating pad or oven), glass measuring cup with spout (optional).

1.  Measure coconut milk and 1 cup of nut milk into the large saucepan.  Heat over medium heat, stirring occasionally, until mixture reaches a temperature of 180-degrees Fahrenheit.  

2. In a glass measuring cup, measure remaining 1 cup nut milk and sprinkle the gelatin over the top of the milk.  Allow to sit for a few minutes, then whisk the gelatin into the milk.  Add the gelatin mixture into the hot coconut milk mixture and allow the temperature to return to 180-degrees.  (Gelatin mixture can be added prior to the milk mixture reaching 180-degrees.). Whisk until gelatin is completely dissolved.  Remove saucepan from heat.

3.  Add honey and whisk.  The honey is necessary to feed the culture, so do not use a sugar-free sweetener for this step.  Allow the hot milk mixture to cool until it reaches 110-degrees.  (You can hasten the cooling process by placing the saucepan into a sink of cool water, just make sure water doesn't spill into the milk.)

4.  When the milk mixture cools to 110-degrees, pour about 2 cups into the glass measuring cup.  While whisking, add the yogurt starter.  Whisk until completed dissolved.  Return the milk with starter to the saucepan and whisk to combine.  

5.  Using the glass measuring cup, pour milk mixture into individual serving jars and place into the yogurt maker (or follow your machine's instructions).  Do not place lids on the jars.  Culture (or "cook") the yogurt for 15-20 hours.  (The less time allowed for culturing results in a sweeter yogurt. You can increase time for a tangier yogurt, but I wouldn't exceed 24 hours.)  While "cooking," the mixture will be thin and separate into white milk on top and a clear liquid on the bottom, but don't worry, it is normal.

6.  After 15-20 hours, place a lid securely on each jar and shake gently to fully blend the two layers.  Refrigerate for at least 8 hours or overnight to set.

* You can substitute 1/2 cup coconut yogurt with live cultures for the starter or use the powder from probiotic capsules equaling about 35 billion.  I have tried the probiotic method, but was not pleased with the result.  Either the probiotic I used was no longer alive, or it didn't culture well.  For me, the distinctive yogurt tang just wasn't there.  From my experience, the starter powder works very well.  

Nutritional Information per serving (3/4 cup), plain yogurt: 196 calories, 4 g carbohydrate (0 g dietary fiber, 3.7 g sugar), 18.6 g total fat (12.9 g saturated fat, 0 g trans fat), 0 mg cholesterol, 70 mg sodium, 141.5 mg calcium, 2.6 g protein.  Net carbs per serving: 4 grams

Some of my favorite low-carb flavors (be sure to add these additional carbs to the yogurt for the full count):

Raspberry with a Hint of Chocolate: With a fork, mash 2 tablespoons of raspberries in a bowl.  Add a serving of plain yogurt and 2-3 drops of Chocolate Raspberry flavored liquid stevia.  If you want more chocolate flavor, add 1 teaspoon unsweetened cocoa powder and 2-3 more drops of stevia or to taste.  Stir to combine.  (Substitute finely chopped cherries for the raspberries, if desired.)

Pumpkin Spice: Place 1 heaping tablespoon of unsweetened cooked pumpkin in a bowl (canned is fine).  Add 1/2 teaspoon pumpkin pie spice and 1/4 teaspoon vanilla extract and stir.  Add one serving of plain yogurt and 4 drops of plain or Vanilla Creme liquid stevia, or to taste.  Stir to combine.

Strawberry Vanilla: With a fork, mash 2-3 ripe strawberries in a bowl.  Add one serving of plain yogurt, 1/4 teaspoon vanilla extract and 3-4 drops of plain or Vanilla Creme liquid stevia or to taste.  Stir to combine.  (Substitute blueberries for strawberries, if desired, or a combination of berries.)

Maple Vanilla Walnut: Place 3-4 walnuts into a plastic bag and hit with the handle of a butter knife to break into small pieces, or chop with a knife.  Mix together the plain yogurt, walnuts, 1/4 teaspoon vanilla extract, 1/2 teaspoon maple syrup (or sugar free maple syrup) and 2 drops of plain or Vanilla Creme liquid stevia or to taste.  Stir to combine.  Sprinkle with nutmeg and serve.  (Substitute pecans for the walnuts and 2 drops of black strap molasses for the syrup, if desired.)

Recipes by Kathy Sheehan, copyright 2014


Thursday, July 30, 2009

Raspberries & Cream Jellyroll Cake

I didn't intend to make this elegant-looking dessert when I got up this morning, but I came home with a pint of locally grown raspberries after a trip to the farm stand down the road. I felt like I had discovered a secret cache of rubies and when their natural sweetness exploded in my mouth, I knew they deserved a place of honor at our dinner table tonight.

Jellyroll cakes appear daunting, but really they are easy to prepare. The pastry is basically a long, thin angel food cake that is usually filled with high fat cream. This healthier version contains a delicious vanilla cream made from a thickened pudding, with a secret ingredient to make it extra creamy. Don't be put off by the egg whites because there's really only one trick to success: a very clean bowl and beaters. Also, this jellyroll cake is equally delicious filled with other berries or chopped fruits, such as peaches or bananas. So, have fun with it!

My Raspberries & Cream Jellyroll Cake (Makes 10 servings)

Cake Ingredients:
¼ cup all-purpose flour
¼ cup almond flour (or finely ground blanched almonds)
1 teaspoon baking powder
¼ teaspoon salt
4 eggs, separated
½ teaspoon vanilla extract
3 tablespoons granulated sugar, divided
4 tablespoons Splenda granular (not baking blend), divided

Filling Ingredients:
2 oz. mascarpone cheese (can be purchased in specialty cheese section of grocery)
1¼ cups 1% milk, cold
½ teaspoon vanilla extract (or seeds scraped from 1 vanilla bean)
1 pkg. sugar-free, fat-free instant vanilla pudding (the size that makes 4 servings)
½ pint fresh raspberries (another berry or chopped fruit of your choice can be substituted)

To make the cake:
1. Preheat oven to 375-degrees. Line a 15” x 10” jellyroll pan with parchment paper. (Batter will not spread, so any baking sheet with low sides will do. If yours is larger than recommended pan size, fold edges of parchment paper to create the proper size space for batter.)

2. In a small bowl, mix together the flours, baking powder, and salt; set aside.

3. Separate eggs by placing the yolks into a small mixing bowl and whites into a clean, dry large mixing bowl. Set whites aside. Add vanilla to yolks and beat with a handheld or standing mixer at high speed for 5 minutes until thick and yellow. Gradually add 1 tablespoon sugar and 1 tablespoon Splenda to yolk mixture and continue beating until sugars are dissolved. Set aside.

4. Important step! Remove beaters from mixer and thoroughly clean using dishwashing liquid and a sponge in warm water. After rinsing thoroughly to remove all traces of soap, run beaters under cold water. Thoroughly dry with a clean towel and reinsert into the mixer.

5. Beat egg whites on high speed until soft peaks form, about 1-2 minutes. Gradually add 2 tablespoons sugar and 2 tablespoons Splenda and continue beating until stiff peaks form.

6. With a rubber spatula, take about 1/5 of egg whites and mix into yolk mixture to lighten. Pour ½ of yolk mixture into egg whites and gently fold to incorporate. Repeat with remaining yolk mixture until fully incorporated, being careful not to deflate egg whites. Sprinkle the dry ingredients over the egg mixture and fold until just blended.

7. Pour into prepared pan and spread to create an even layer. Bake in preheated oven for 12-14 minutes or until cake springs back when lightly touched. While cake is baking, lay a clean kitchen towel (large enough for entire cake) on counter and sprinkle lightly with 1 tablespoon Splenda. When cake is removed from oven, immediately place warm cake on towel and remove parchment paper. Roll cake and kitchen towel into a log shape and allow to cool completely on wire rack. (The kitchen towel will prevent cake from sticking to itself while cooling.)

8. Make filling: Place milk, vanilla and mascarpone cheese in a medium mixing bowl and beat with a wire whisk until cheese begins to blend with the milk. Add the entire package of pudding mix into the milk mixture and beat until well blended and smooth. Place in refrigerator for at least 20 minutes, until thick and set.

9. When cake is cooled, unroll from towel and spread chilled pudding mixture to about 1” from edge. Sprinkle fruit over pudding. Carefully roll cake into a log and place on serving dish. If desired, sprinkle top very lightly with powdered sugar and top with a few extra berries and mint leaves for garnish. Refrigerate until 5 minutes prior to serving. Refrigerate any leftovers.

Nutritional Information per serving (1/10th of cake): 126.3 calories, 13.3 g carbohydrate, 6.14 g fat, 1.4 g fiber, 5 g protein

Original Recipe by Kathy Sheehan, copyright 2009

How does this recipe compare to a traditional jellyroll cake? My lightened version is almost 100 calories less per serving! Also, it is much lower in carbohydrates and fat, plus it has more protein. In comparison, the average nutritional information for a slice of traditional jellyroll cake made with cream and raspberries is 223 calories, 29.2 g carbohydrates, 10 g fat, 1 g fiber, 3.7 g protein.