Friday, November 24, 2023

Keto Eggnog Cake

Keto Eggnog Cake

This festive cake is perfect for the holiday season! It super easy to make because it starts with a keto yellow cake mix, so all the measuring of dry ingredients has been done for you. You can use any brand of keto yellow cake mix, but I highly recommend King Arthur’s Keto Yellow Cake Mix, which is my favorite and I used in this recipe. The result is moist and flavorful, with the distinctive flavors of eggnog and nutmeg. Before baking, make a batch of your favorite low carb eggnog or use my recipe (click here for my eggnog recipe). It’s the real deal!

Keto Eggnog Cake
Makes 12 servings

Cake Ingredients:
1 box Keto Yellow Cake Mix (King Arthur’s or your favorite brand)
Avocado oil or melted butter (use amount according to package directions)
Large eggs (use amount according to package directions)
1 teaspoon ground nutmeg
Low carb Eggnog (see separate recipe here), substituted for the amount of liquid according to package directions

Eggnog Glaze:
½ cup zero carb powdered sweetener (I used LaKanto Powdered Monkfruit Sweetener)
1/4 teaspoon vanilla extract
A pinch of nutmeg
3-4 tablespoons low carb eggnog

1. Preheat oven to recommended temperature on cake mix package. Grease a 12-cup non-stick Bundt pan. 

2. In a large mixing bowl, combine the cake mix with the required amount of oil, eggs and nutmeg. Omit water or liquid called for on the package, and substitute the same amount of low carb eggnog in its place.  Mix and bake according to package instructions. When done, turn cake out onto a wire rack and cool completely.

3. To make the eggnog glaze, whisk together the zero carb powdered sweetener, vanilla, a pinch of nutmeg and 3 tablespoons of low carb eggnog in a mixing bowl until smooth and no lumps remain. Add additional eggnog, if needed, to achieve the desired consistency. If the glaze is too thin, just add a bit more powdered sweetener. 

4. Before serving, drizzle the eggnog glaze over the top of the cake, letting it drip down the sides. Sprinkle with nutmeg.

Keto Eggnog Cake (sliced)

Nutritional Information per serving (based on using King Arthur’s Keto Cake Mix): 153 calories, 10.5 g carbohydrates (8 g dietary fiber, 1.4 g sugars, 1.1 g sugar alcohols), 13 g total fat (3.1 g saturated fat, 0 g trans fat), 90 mg cholesterol, 216 mg sodium, 62.6 mg calcium, 105 mg potassium, 1 mg iron, 49 IU Vit A, 4.1 g protein. Net carbs per serving: 2.5 grams

Photos and recipe by Kathy Sheehan, copyright 2023
All rights reserved. Please do not duplicate without the author’s permission. 


Tuesday, November 7, 2023

Keto Crispy Cheese Egg In a Nest


Keto Crispy Cheese Egg in a Nest

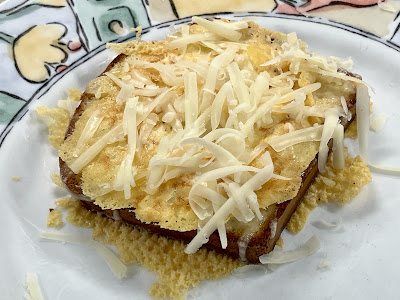
Cheese is a familiar addition to a traditional Egg in a Nest, but what about super crispy, crunchy cheese? This method of cooking allows the cheese in the pan to sizzle and crisp up, adding an unforgettable texture and flavor to this favorite breakfast food. For best results, use a nonstick skillet. You can use any aged cheese. My favorite is sharp cheddar.

Keto Crispy Cheese Egg In a Nest
Makes 1 serving

1 slice of low carb bread, with a hole cut out of the center
1 large egg
1½ ounces cheddar, shredded
Salt and pepper

Step by step Process

1. Preheat a nonstick skillet to medium to medium-high. Sprinkle a bit more than 1/3 of the shredded cheese onto the preheated skillet.

2. When it starts to sizzle, place a piece of low carb bread on top.

3. Crack an egg into the hole and sprinkle with salt and pepper.

4. Sprinkle more cheese on top of the bread and egg, reserving some for serving. Cover the skillet to allow the cheese over the top to melt a bit.

Flip when cheese is crispy

5. Once the cheese on the bottom is golden brown and crispy, flip and continue cooking until the cheese on the flip side is crispy and the egg is done to your liking. To serve, sprinkle reserved cheese over the top to melt. Enjoy!

Crispy Cheese Egg in a Nest (cooked)

Nutritional Information (may vary, depending on the low carb bread used): 349 Calories, 1.4 g carbohydrate (1 g dietary fiber, 1.2 g sugars), 27.3 g total fat (11.6 g saturated fat, 0 g trans fat), 310 mg cholesterol, 448 mg sodium, 345.6 mg calcium, 129 mg potassium, 2 mg iron, 318 IU Vit A, 24.8 g protein. Net carbs per serving: 0.4 grams

Photos and recipe by Kathy Sheehan, copyright 2023
All rights reserved. Please do not duplicate without the author’s permission. 

Thursday, November 2, 2023

Keto Tater Tots


You won’t believe these “tater tots” are potato-free! Their taste and texture is spot on! Crunchy on the outside and tender on the inside. Dip them in sugar free ketchup and relive a taste from your childhood. There are a lot of faux-tato tot recipes out there, and I’ve made quite a few, but this recipe is my favorite, by far. So simple and requiring only a few ingredients, plus some spices you already have in your cabinet. Make dinner fun tonight!!

Keto Tater Tots
Makes 2 servings

6 ounces frozen riced cauliflower (about 2 cups)
½ cup whole milk cottage cheese (4%)
1/4 teaspoon salt
Ground pepper to taste
1/8 teaspoon garlic powder
1/8 teaspoon onion powder
1/8 teaspoon paprika (I used sweet paprika, but smoked paprika would be good too)
2 tablespoons + 1/3 cup pork rind panko

1. Cook riced cauliflower in a skillet over medium heat until thawed and beginning to be tender. Remove to a plate, covered with a paper towel, and allow the excess liquid to wick away.

2. Meanwhile, blitz the cottage cheese in a food processor or blender until smooth. Transfer to a bowl and add the salt, pepper, garlic powder, onion powder, paprika and 2 tablespoons pork rind panko. Stir to combine.

3. Add the cooled cauliflower and stir to combine. Form mixture into tots, roll them in the remaining 1/3 cup pork rind panko that has been spread in a layer on a plate and place them on a baking sheet that has been greased well. Spray the top of each tot with cooking spray or brush lightly with avocado oil.

4. Bake in a 450°F oven for about 20 minutes (in a convection oven or air fryer, cook at 425°F), turning each tot over halfway through cooking. Continue baking until lightly browned. Remove from oven and allow the tots to cool on the baking pan for a few minutes to firm up a bit. Serve with sugar-free ketchup, if desired. Enjoy! 

5. Storage: These are best served immediately, but leftovers can be stored in a covered container in the refrigerator and reheated on a baking sheet in a 375°F oven for 10 to 12 minutes, or until heated through and the pork rind panko coating crisps up.


Nutritional Information per serving (½ recipe): 121 calories, 6.8 g carbohydrates (2.1 g dietary fiber, 3.6 g sugars), 5 g total fat (2.5 g saturated fat, 0 g trans fat), 25 mg cholesterol, 675 mg sodium, 60.9 mg calcium, 6 mg potassium, 65 IU Vit A, 42 mg Vit C, 13.6 g protein. Net carbs per serving: 4.7 grams

Photos and recipe by Kathy Sheehan, copyright 2023
All rights reserved. Please do not duplicate without the authors permission. 

Wednesday, July 12, 2023

Keto Shortcakes

Keto Shortcakes

Strawberry Shortcake is a summer tradition! Some people like theirs on a biscuit but, when I was growing up, we bought the little packaged shortcake cups often displayed near the strawberries in the summer months (see image below). They were light sponge cakes with a hint of lemon that soaked up the juices from the berries. I set out to recreate those iconic snack cakes and have succeeded with this recipe! These lightly sweet mini cakes are soft, have a light and airy texture and, if baked in a shortcake pan (as pictured), are nearly identical to the shortcakes I remember. Of course, if you don’t have a shortcake baking pan, just use a regular muffin pan. Piled high with berries and cream, this is a summer treat everyone will enjoy!

Store bought vs. Homemade Shortcakes

Keto Shortcakes
Makes 6 shortcakes (or muffins)

3 eggs
2 tablespoons lemon juice
1/4 cup heavy cream
½ teaspoon vanilla extract
1/4 teaspoon lemon extract
6 tablespoons Swerve Confectioners or LaKanto Powdered Monkfruit sweetener 
1/4 cup coconut flour
1/4 cup almond flour (or substitute an additional 1 TB coconut flour for nut free)
1 tablespoon unflavored whey protein powder
1½ teaspoons baking powder
1/4 teaspoon baking soda
1/4 teaspoon salt

Suggested Topping:
1 pint fresh strawberries, cut into fourths
1 tablespoon allulose or an erythritol-based powdered sweetener 
Serve with whipped cream


1. Spray a muffin pan with nonstick spray. Preheat overnight to 350 degrees F.

2. Place eggs, lemon juice, cream, vanilla extract, lemon extract and confectioners sweetener into a large bowl. Using an electric mixer, blend until combined or whisk by hand vigorously until well aerated.

3. In a small bowl, whisk together the coconut flour, almond flour, whey protein powder, baking powder, baking soda and salt until no lumps remain. Add the dry ingredients into the wet ingredients all at once and mix on low, then increase to medium speed. Scrap down the sides of the bowl and blend again. Once well combined, evenly pour the batter into the prepared baking pan or into each muffin cup  (¾ full).

4. Bake for 20 to 24 minutes, or until a toothpick in the center comes out clean. Allow to cool in the pan for 10 minutes before removing the cakes or muffins to a wire rack to cool completely.

5. Meanwhile, sprinkle allulose or your sweetener of choice over the strawberries, stir to coat the berries and allow to sit at room temperature for about 30 minutes. To serve, top the cake with strawberries and whipped cream. Enjoy!

6. Storage: These cakes can be stored at room temperature for 2 days, or refrigerate for longer. They can also be well wrapped and frozen up to 3 months. They are best served at room temperature.

Custard Filled Shortcake

Nutritional Information per mini cake (no topping): 106 calories, 4.6 g carbohydrate (1.8 g dietary fiber, 0.6 g sugars, 1 g sugar alcohols), 8.3 g total fat (4 g saturated fat, 0 g trans fat), 106 mg cholesterol, 208 mg sodium, 103 mg calcium, 249 mg potassium, 1 mg iron, 81 IU Vit A, 2 mg Vit C, 4.4 g protein. Net carbs per serving: 1.8 grams

Photos and recipe by Kathy Sheehan, copyright 2023
All rights reserved. Please do not duplicate without the author’s permission. 

Saturday, July 1, 2023

Keto Bacon and Cheese Dutch Baby Pancake

Keto Bacon and Cheese Dutch Baby Pancakes

This fluffy, puffy egg pancake is baked in the oven in a preheated, hot skillet. When it comes out of the oven, it is impressive! I use a 6-inch cast iron skillet, which imparts a higher rise and nice crust. Similar to a puffy omelet, but so much easier to make.

Keto Bacon and Cheese Dutch Baby Pancake
Makes 1 serving

1 tablespoon unsalted butter
6 inch heatproof skillet
2 large eggs
2 tablespoons heavy cream
2 tablespoons water
2 tablespoons almond flour (or 1 tablespoon coconut flour for nut free)
Salt and pepper to taste
2 slices cooked bacon, chopped
1 ounce cheddar cheese, shredded
Sugar free maple syrup (optional)

1. Placed the 1 tablespoon of unsalted butter into your skillet. Place the skillet into the oven and preheat to 400°F.

2. Meanwhile, whisk together the eggs, cream, water, almond flour, salt, and pepper. You can do this in a blender or food processor for an extra fluffy pancake.

3. When the oven and pan are preheated, swirl the melted butter all around the bottom and sides of the skillet. Pour the egg mixture into the hot skillet. Sprinkle the chopped bacon and cheese on top. Return the skillet to the oven and bake for 14 minutes until puffy and golden.

4. Remove the skillet from the oven and use a sharp knife to loosen the pancake from the sides of the pan. Transfer the pancake to a serving plate and drizzle sugar-free maple syrup on top, if desired. Eat it immediately. The pancake will deflate as it cools.

Cooked Keto Dutch Baby Pancake

Nutritional Information per serving (entire recipe): 618 calories, 2.5 g carbohydrate (0.9 g dietary fiber, 0.4 g sugars), 56.7 g total fat (27 g saturated fat, 0 g trans fat), 491 mg cholesterol, 723 mg sodium, 270.4 mg calcium, 276 mg potassium, 2 mg iron, 480 IU Vit A, 26.8 g protein. Net carbs per serving: 1.6 grams

Recipe and photos by Kathy Sheehan, copyright 2023
All rights reserved. Please do not duplicate without the author’s permission. 
Saturday, June 24, 2023

Summer Vegetable Stir Fry

Summer Vegetable Stir Fry

This is a dish we make often in the summer, utilizing the myriad of local summer vegetables available in the Farmer’s Markets. It’s a quick and easy stir fry that is fresh and delicious!

Summer Vegetable Stir Fry
Makes 2-3 servings

Cooked bratwurst, kielbasa or other cooked sausage 
1 small yellow zucchini or yellow summer squash
1 small green zucchini
½ onion
1 small Roma tomato
2 ounces cheese (cheddar, Parmesan or whatever is on hand)
Salt and pepper to taste

Optional Additions:
1-2 tablespoons tomato paste
1/4 cup heavy cream

1. Cut up the cooked sausage into cubes. Cube the yellow and green zucchini, onion, and tomato. Shred the cheese. Set aside.

2. Sauté the onions and sausage in a nonstick skillet over medium heat until the sausage begins to color and the onion is translucent and beginning to brown.

3. Add the zucchini and sauté, stirring occasionally, until it begins to soften and pick up some color. Add some salt and pepper to season the vegetables.

4. At the very end of cooking, add the chopped tomatoes and shredded cheese. When you stir in the tomatoes, they released their juices, which mixes with melted cheese to make a light sauce. If you want a saucier dish, add the optional tomato paste and heavy cream; stir to incorporate.

5. Taste and adjust seasoning if needed. Serve immediately.

Nutritional Information per serving (1/3 of recipe, not including optional additions): 351 calories, 8.9 g carbohydrate (1.8 g dietary fiber, 4.1 g sugars), 27.9 g total fat (12.2 g saturated fat, 0 g trans fat), 67 mg cholesterol, 1156 mg sodium, 151.2 mg calcium, 235 mg potassium, 107 IU Vit A, 15 mg Vit C, 15.3 g protein. Net carbs per serving: 7.1 grams.

Recipe and Photo by Kathy Sheehan, copyright 2023
All rights reserved. Please do not duplicate without the author’s permission. 

Monday, June 12, 2023

Keto Black and White Cookies

Keto Black and White Cookies

I’ve been trying for years to create an authentic, sugar free, Black and White cookie. Well, this is it! In this recipe, I start with raw macadamia nuts and process them in a food processor (or blender) to make smooth and creamy macadamia nut butter. This is the key to making these light, puffy, tender and cake-like cookies, which are the base of this iconic cookie. I chose macadamia nuts for the base of my cookie batter because they are the lowest carb and highest fat of all the nuts, mild in flavor, plus they’re much lower in oxalates, minimizing the need for almond flour. This cookie is a dream come true!

Keto Black and White Cookies
Makes 18 cookies

Cookies:
1½ cups raw macadamia nuts
2 large eggs
1 tablespoon unsalted butter, very soft or melted
1 teaspoon lemon juice
1½ teaspoons vanilla extract 
¾ cup powdered low carb sweetener (I used Confectioners LaKanto Monkfruit sweetener)
1/4 cup almond flour
1½ tablespoons oat fiber powder (not oat flour!)
2 tablespoons coconut flour
1 tablespoon unflavored whey protein powder
1 teaspoon baking powder
1/4 teaspoon baking soda
A pinch of salt
1-2 tablespoons water, only if needed!

Glaze:
1½ cups powdered low carb sweetener* (see note)
1 tablespoon vegetable glycerin or liquid allulose (it adds shine to the glaze, omit if you don’t have any)
¾ teaspoon lemon juice
½ teaspoon vanilla extract 
2-3 tablespoons water (or more, if needed)
1/4 cup unsweetened Dutch-process cocoa powder
More water for chocolate glaze, as needed

1. Preheat oven to 350°F. Line a rimmed baking sheet with a silicone baking mat or parchment paper.

2. In a food processor or powerful blender, process the macadamia nuts until a smooth nut butter forms, scraping down the sides occasionally. Add the eggs, softened butter, lemon juice and vanilla extract. Process until the mixture is completely smooth and no lumps remain.

3. Transfer the nut mixture to a large mixing bowl. Add the powdered sweetener and, using an electric mixer with the paddle attachment (if you have one), mix until the sweetener is completely incorporated.

4. In a small bowl, combine the almond flour, oat fiber powder, coconut flour, whey protein powder, baking powder, baking soda and salt. All at once, add the dry ingredients to the nut mixture and mix until the ingredients are well combined. Let the batter rest for a few minutes to allow the coconut flour to absorb the liquid, then mix again. What you’re looking for is a thick, but cohesive batter that is like a thick cake batter, slightly looser than a dough. (Only if needed, add water 1 teaspoon at a time until the proper consistency is reached.)

5. Using a 1½ tablespoon cookie scoop (size 40), drop the cookie batter onto the lined cookie sheet about 1½ inches apart. The cookies will spread a bit as they bake.

6. Bake for 12 to 14 minutes (begin checking them at 12 minutes). Bake until they’re lightly golden and the tops are just firm and spring back slightly when touched in the center. Remove the baking sheet from the oven and allow the cookies to remain on the baking sheet for a few minutes. Remove the cookies to a wire rack to cool completely before glazing.

7. To make the glaze, add the powdered sugar substitute, vegetable glycerin or liquid allulose, lemon juice, vanilla, and 2-3 tablespoons of water in a small bowl, and stir until smooth and easily spreadable. Then divide the glaze equally into two bowls. Add the cocoa powder to one and add just enough water until the consistency is the same as the vanilla glaze (adding 1 teaspoon of water at a time; it may take 3-6 teaspoons or more, judge by its consistency).

8. To ice the cookies, use the flat side (bottom) of the cookie and spread each half of the cookie with one of the icings, starting with the vanilla icing. Spread the vanilla on one half of all the cookies first, then coming back later after the vanilla has hardened, and adding chocolate icing to them on the remaining half, so you avoid the colors mixing.

9. Cookies can be stored at room temperature for 2-3 days, or refrigerate for longer periods, but allow the cookies to come to room temperature before enjoying. If stacking cookies in a cookie jar or storage container, place parchment paper between layers to prevent the icing from sticking.

Spread vanilla frosting first, then spread chocolate frosting last

*Notes: You can use an erythritol-based powdered sweetener (best option), such as Confectioners LaKanto Monkfruit sweetener. But because of the slight cooling effect, some people put off by that sensation might wish to use powdered allulose for the glaze. Allulose doesn’t have a cooling affect or aftertaste. If you can’t find powdered allulose, you can powder it yourself in a food processor. But NOTE: Allulose doesn’t absorb liquid in the same way as erythritol. Use less liquid, if using allulose. Also, icing made with allulose really doesn’t set up. It remains soft and sticky. Tastes delicious, but if you want to store them on top of each other in a cookie jar, don’t use allulose. 

Nutritional Information per cookie (with glaze): 106 calories, 6.1 g carbohydrate (1.8 g dietary fiber, 0.6 g sugars, 2.4 g sugar alcohols), 10.2 g total fat (2.1 g saturated fat, 0 g trans fat), 22 mg cholesterol, 87 mg sodium, 15.8 mg calcium, 71 mg potassium, 1 mg iron, 15 IU Vit A, 2 g protein. Net carbs per serving: 1.9 grams

Photos and recipe by Kathy Sheehan, copyright 2023
All rights reserved. Please do not duplicate without the author’s permission.