Monday, September 28, 2015

Pumpkin Pecan Kefir Ice Cream


Fall is here!  Leaves are turning, the temperature is cooler and pumpkins are decorating the front porches all along my neighborhood.  This is the time of year that I begin to crave the flavors of autumn and pumpkin is one of my favorites.  This creamy frozen dessert is a real treat!  The best part is that it's low carb, dairy-free, full of beneficial live probiotic cultures, provides healthy fats and is unbelievably DELICIOUS!  Start by making a batch of coconut milk kefir (see my earlier post), then flavor the plain kefir before putting it into your ice cream maker.  The result is a healthy dessert worthy of any occasion that the whole family will enjoy.

Pumpkin Pecan Kefir Ice Cream
Makes 8 servings (1/2 cup each)

3 cups plain, unsweetened, coconut milk kefir (click here for directions)
1 tablespoon butter, ghee or non-dairy butter substitute
1/3 cup chopped pecans
2 tiny pinches of salt, divided
1/2 cup canned pumpkin purée 
1/2 cup unsweetened non-dairy milk (I used flax milk, but substitute with your favorite)
2 teaspoons pumpkin pie spice
1 teaspoon blackstrap molasses
10 drops liquid English Toffee Stevia (I used Sweet Leaf brand)
5 drops liquid Vanilla Creme Stevia
1/4 teaspoon 100% Stevia powder (I used Sweet Leaf brand)
1/4 teaspoon vanilla extract

1.  A day or two ahead, make a batch of homemade, plain, coconut milk kefir using full-fat coconut milk (not coconut milk beverage).  Keep refrigerated until ready to use.  (If desired, you may use purchased plain, unsweetened kefir, but the nutritional information will be different and the resulting ice cream will not be non-dairy.)

2.  In a small skillet, melt 1 tablespoon butter, ghee or non-dairy butter substitute.  Add 1/3 cup chopped pecans and cook over low heat until pecans are fragrant and lightly toasted.  Sprinkle with 1 teaspoon of LaKanto Golden Monkfruit Sweetener, a tiny pinch of salt and stir to coat.  Remove from heat, transfer pecans and any liquid into a bowl and set aside at room temperature to cool.

3.  Place 3 cups of plain, unsweetened kefir into a blender. Add 1/2 cup canned pumpkin, 1/2 cup unsweetened non-dairy milk, 1 teaspoon Lakanto Golden Monkfruit Sweetener, 1 teaspoon molasses, 2 teaspoons pumpkin pie spice, liquid Stevia drops, 1/4 teaspoon stevia powder, a tiny pinch of salt and vanilla extract. Blend to combine and taste. Add more Stevia drops or powder, if desired, until desired sweetness is achieved.  Refrigerate mixture for about an hour before proceeding.

4.  Follow the directions from your ice cream maker.  Pour the pumpkin-kefir mixture into the ice cream maker and churn until thickened and beginning to set.  Add the pecans and reserved liquid from the bowl into the ice cream and continue churning until desired consistency is reached.  Serve immediately soft-set or pour into a container and place in the freezer for about 20 minutes.*

* Important Note: This kefir ice cream needs to be eaten while in a soft-set stage.  If allowed to freeze completely, the ice cream will be too firm to scoop.  Any extra ice cream can be frozen in individual ice pop molds and served later as a creamy ice pop.

Nutritional Information per 1/2 cup serving: 179 calories, 4.9 g carbohydrate (0.9 g dietary fiber, 2.7 g sugars, 1.2 g sugar alcohols), 17.4 g total fat (10.2 g saturated fat, 0 g trans fat), 4 mg cholesterol, 34 mg sodium, 35.4 mg calcium, 70 mg potassium, 1.3 g protein.  Net carbs per serving: 4 grams

Recipe by Kathy Sheehan, copyright 2015.

Wednesday, September 2, 2015

Baked Cinnamon Spice Grain-Free, Low-Carb Granola


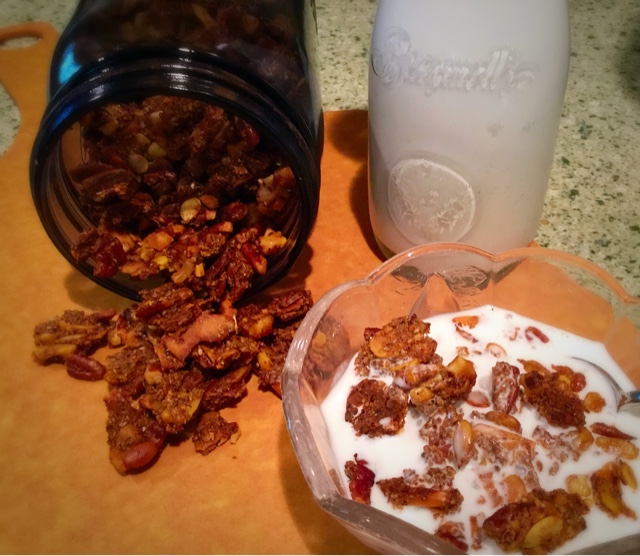
It's granola...so it must be healthy, right?  No, not necessarily.  Granola is one of those foods that is touted as healthy but can often be so full of sugar and carbohydrate that it's no better than eating right out of the sugar bowl!  If you check out the nutritional label on a store-bought granola cereal, you'd be shocked to see that there are about 45 carbs per serving, which translates into 8-1/2 teaspoons of sugar.  You can just imagine the spike in your blood glucose that is anything but healthy for your body.  In this grain-free recipe, there are only 4 net carbs per serving and I think the taste is better than a processed, boxed variety.  I used a combination of honey and no-carb sweeteners to achieve the right touch of sweetness without overpowering the warm spices and crunchy nuts.  It makes a delicious and nutritious breakfast topped with your favorite cold, non-dairy milk or sprinkle it on yogurt, applesauce or eat it plain as a snack.  Recently I stirred some into homemade vanilla kefir ice cream and it tasted like Cookies and Cream!  I always have some of this granola around because it's simple to make ahead of time and convenient when I need a quick and easy breakfast.

Baked Cinnamon Spice Grain-Free, Low-Carb Granola
Makes 12 servings (1/2 cup each)

1/2 cup chopped pecans
1 cup chopped walnuts
1/2 cup slivered or sliced almonds
1/2 cup unsweetened flaked coconut
1/2 cup hazelnut or almond meal/flour
1/4 cup chia seeds, ground in a nut grinder (or 1/4 cup ground flaxseed)
1/4 cup pepitas (pumpkin seeds)
1/4 cup sunflower seeds
1/4 cup melted butter (or 1/2 butter & 1/2 coconut oil)
2 tablespoons LaKanto Monkfruit Sweetener (or other erythirtol sweetener)
3/4 teaspoon Stevia powder (I use Sweet Leaf brand)
1 tablespoon raw honey, melted
10 drops of Vanilla Creme liquid Stevia, or to taste (I use Sweet Leaf brand)
1-1/2 teaspoons cinnamon
1/2 teaspoon nutmeg
1/8 teaspoon mace
1/2 teaspoon kosher or sea salt
1/4 cup water

1. Preheat oven to 250-degrees F.  Line cookie sheet with parchment paper and spray with non-stick coconut oil spray; set aside.

2. In a large bowl combine all ingredients and mix very well.  Spread the granola on the parchment paper-lined pan.  Compress it into a firm, even sheet of granola by pressing mixture flat with a rubber spatula or your hand that is protected by parchment or a plastic sandwich bag.  The granola should be about 1/4-inch thick.*

3. Bake for about 70-90 minutes, or until golden throughout (the longer you bake it, the crunchier it gets).  Remove from the oven and allow to fully cool.  Break into pieces and enjoy!  Makes about 6 cups of bite-size pieces.  Store in an air-tight container.

*If you want to make this mixture into bars, shape into 12 equal-size bars or rounds, flatten and bake as directed.  Cool bars completely before removing from pan.  Wrap each bar individually with plastic wrap, then store bars in a zip-lock bag.

Nutritional Information per 1/2 cup pieces: 260 calories, 8.7 g carbohydrate (4.6 g dietary fiber, 2.5 g sugars), 23.8 g total fat (6 g saturated fat, 0 g trans fat), 5 mg cholesterol, 124 mg sodium, 61.2 mg calcium, 184 mg potassium, 7.1 g protein.  Net carbs per serving: 4.1 grams

Recipe by Kathy Sheehan, copyright 2015

Saturday, July 18, 2015

Prosciutto Wrapped Zucchini with Pesto and Mozzarella


I've seen many recipes for prosciutto wrapped asparagus spears, but never zucchini.  In this recipe, I created a small hollow down the center of the zucchini and filled it with pesto and firm mozzarella before wrapping it with the prosciutto and sauteing it in a skillet.  The prosciutto becomes crispy and encases the filling nicely.  This makes a wonderful side dish or, if cut into squares, a perfectly delightful appetizer or snack!  If you're looking for another creative way to enjoy your vegetables, I highly recommend you give this recipe a try.

Prosciutto Wrapped Zucchini with Pesto and Mozzarella
Makes 4 side dish servings or about 12 appetizers

1 medium zucchini (about 8" long and not too fat)
2 tablespoons pesto (homemade or store bought)
firm mozzarella, cut into 1/4" x 1/2" sticks
prosciutto slices (about 3-4)
coconut oil (or oil saved from frying bacon)
Optional garnishes for appetizers: basil leaves, grape tomato halves, small mozzarella balls

1.  Wash and dry the zucchini.  Cut a thin portion off one side to create a flat surface (so the zucchini will not roll when placed on that side).  Repeat on the opposite side.  Cut the zucchini lengthwise down the center, between the two flat surfaces.  Set the zucchini halves with the seed sides up and, using a spoon, scrape down the center of each zucchini to remove the seeds and create a hollowed out space.

2.  Spread 1 TB of pesto down the center of each zucchini half in the hollow space.  Top pesto with mozzarella sticks just the length of the hollow space (do not let cheese extend beyond this space).  Wrap each zucchini half with the sliced prosciutto, being careful to overlap and encase the filling completely.

Saute prosciutto wrapped zucchini in skillet
3.  Heat the oil in a skillet to medium-high.  Place the zucchini with seam side down into the pan and saute until the prosciutto is browned and crispy.  Turn over and repeat with second side.  You may also wish to brown edges, as well.  Remove from pan and drain briefly on a paper towel.  Cut each zucchini into serving size pieces.  To serve as a side dish, cut each zucchini half into 2 pieces.  If creating appetizers, cut each zucchini into small squares and top with suggested garnish (as pictured) and secure with a toothpick.

Nutritional Information per side dish serving (1/4 recipe): 106 calories, 2.5 g carbohydrate (0.6 g dietary fiber, 1.5 g sugar), 8.4 g total fat (3.3 g saturated fat, 0 g trans fat), 14 mg cholesterol, 381 mg sodium, 115.3 mg calcium, 128 mg potassium, 6.7 g protein.  Net carbs per serving: 1.9 grams

Recipe by Kathryn Sheehan, copyright 2015

Thursday, July 9, 2015

Milk and Non-Dairy Kefir


Kefir is a fermented milk beverage often described as a drinkable yogurt.  It is similar to yogurt, although kefir has more of the beneficial live organisms that many people hope to receive from yogurt to improve their health.  By consuming fermented and cultured foods, it helps to reduce inflammation which is a hallmark of T2 diabetes, and balance your gut microbiome.  It's extremely easy to make, requiring only milk or non-dairy milk (I use 100% coconut milk) and a culture starter known as kefir grains (not really a grain like wheat, but that's what they're called).  Kefir grains are a colony of the beneficial bacteria that will turn ordinary milk into kefir.  Lately. I've been having a wonderful time making batch after batch of delicious coconut milk kefir and flavoring it with chocolate, strawberries and, as pictured here, fresh cherries!  I am feeding my microbiome and seeing the positive results on my blood glucose monitor!  I highly encourage you to start making your own kefir and experimenting with different flavorings.  Below is the basic plain recipe, which can be made with any dairy milk from cow to goat, or full-fat coconut milk for non-dairy kefir.  Enjoy!

Milk or Non-Dairy Plain Milk Kefir
Makes 6-8 servings (1/2 cup)

3-4 cups milk of choice (If using coconut milk, choose full-fat and not coconut milk beverage)
2 tablespoons kefir grains (or use one packet of powdered starter)*

Place the milk and kefir grains (or powdered starter) into a clean, glass quart-size Mason jar.  Cover with cheese cloth and secure with a rubber band or cover loosely with the jar lid.  As the milk ferments the organisms will release gas, so it needs a way to escape.  Place at room temperature on your kitchen counter for 8-24 hours until it is slightly sour and tangy to your liking.  It's difficult to tell you an exact amount of time because fermentation happens at different rates depending on the vitality of the kefir grains, the temperature in your kitchen and your personal taste.  Check after 8 hours by tasting and continue checking at regular intervals until it reaches the level of tang that you like.  The longer it ferments, the more sour and tangy it will become.  It should taste similar to yogurt.

Pour through a fine mesh strainer to remove the lumpy kefir grains and store the strained kefir in the refrigerator.  (Do not refrigerate with grains still in the kefir; you must strain them out and save them to start your next batch.  If using powdered starter, strain and keep any small lumpy grains for your next batch.  If using powdered starter, you'll also need to hold back about 1/4-1/2 cup of the plain cultured kefir to add to your next batch.)  Kefir will keep in the refrigerator for about a week, although it may continue to thicken and ferment, becoming more tangy with time.  If it becomes too thick, either eat it with a spoon or add more milk and blend to reach desired consistency.

You can immediately start a new batch with your kefir grains or add them to 1-2 cups of milk and store them in the refrigerator for a few days before making more kefir.  When making non-dairy kefir, it's advisable to store your kefir grains between batches in dairy milk to keep them alive and in good condition.  The preferred food for kefir grains is lactose (milk sugar), so you'll need to revitalize them every few batches by storing them in milk.  Before making another batch of non-dairy kefir, strain and rinse the kefir grains in cool water, which will remove nearly all of the dairy residue.  If you are extremely sensitive to dairy, your best choice would be to use the powdered starter (instead of grains).  Body Ecology brand powdered kefir starter will make about 7 batches before you need to begin again with a new packet of powdered starter.

*Resources: The website Cultures for Health (www.culturesforhealth.com) sells both kefir grains and Body Ecology brand powdered kefir starter.  Also, the website offers many step-by-step, how-to videos for making a wide variety of cultured foods.  I highly recommend you check them out!

How to flavor your kefir:

Strawberry or Cherry Kefir:  Take 3/4 to 1 cup of fresh, sliced strawberries or cherries and gently heat them in a saucepan to release their juices.  Allow the heated fruit to come to room temperature.  Add the cooled fruit and 3 cups strained, plain kefir to a blender and blend until smooth.  Add 5-10 drops of liquid stevia to taste.  You might also wish to add vanilla extract.  If kefir becomes too thick after refrigeration, simply add additional milk and blend until desired consistency.  Try this variation with other berries!

Chocolate Kefir:  Heat 1/2 cup milk, 3 tablespoons unsweetened cocoa powder and 1/2 teaspoon stevia powder in a saucepan.  Stir constantly until cocoa powder dissolves and no lumps remain.  Remove from heat and allow to cool.  Stir again and add this mixture and 3 cups plain kefir to a blender.  Add 1/2 teaspoon vanilla extract and blend until smooth.  Taste and add additional sweetening as desired.  Store in the refrigerator.

Other uses for kefir:  Create your own flavored kefir by trying different fruits!  Use kefir in your smoothies or to make kefir ice cream (see my Pumpkin Pecan Kefir Ice Cream recipe here).  You can make kefir cheese (similar to cream cheese) from thick, dairy kefir by allowing the whey to drain from the kefir overnight through a fine-mesh strainer lined with several layers of cheese cloth.  Note: Non-dairy kefir usually isn't as thick as dairy kefir and may not work for making kefir cheese.

Cherry Chocolate Chip Kefir Ice Cream
 Nutritional Information per 1/2 cup serving will vary depending on type of milk used and other flavor additions.  Plain kefir will have approximately the same nutritional information as the milk used to make it.  Check the packaging label on the milk carton.

Recipe by Kathy Sheehan, copyright 2015.
Friday, April 10, 2015

Grain Free Plain and Pizza Waffle


Pizza Waffle

I've gone hog wild using my old, 33-year old waffle maker!  I discovered how to make grain-free waffles using nut butter as a base, so no flour is needed.  I've created plain and pizza flavored!  (Pizza variation on the basic plain recipe is listed below.)  I'll be creating other flavors, so be on the lookout in future posts.  For someone that hasn't eaten a piece of bread, or a waffle, in over 1-1/2 years, this recipe is like performing a magic trick!  The plain version makes a wonderful bread substitute.  Just top with your favorite sandwich filling, such as chicken salad, and eat as an open-face sandwich.  The pizza waffle is a favorite, especially for a quick lunch or dinner.  As pictured here, I topped mine with uncured, nitrate-free pepperoni cut into slivers that were heated in a skillet, shredded Parmesan and chopped tomatoes seasoned with Italian herbs.  It is to die for!  The waffles can be made ahead and stored in an airtight container.  To crisp them back up, just toast or place them briefly on your heated waffle iron so that it fits on the squares like a puzzle.  Also, if you don't have a waffle maker, either of these recipes can be made into pancakes and cooked in a skillet.  Have fun with these!  I know I have!

Grain Free Basic Plain Waffle
Makes about 3 or 4 waffles (6-8 servings)

1/2 cup almond or cashew butter, room temperature
2 large eggs
2 tablespoons non-dairy milk, such as almond, coconut or flax
1/2 tablespoon apple cider vinegar
1/8 teaspoon salt
1/4 teaspoon (two drops) molasses
1/4 teaspoon baking soda
non-stick vegetable spray or melted ghee (clarified butter), if needed

1.  Mix all of the ingredients in a mixing bowl and beat vigorously with a fork until a smooth batter forms.  The batter should have the consistency of pancake batter, thickened but pourable.  If additional liquid is needed, add 1 TB of non-dairy milk at a time until desired consistency is reached.  (If the batter is too thick, it will work fine but might not make a total of 4 waffles.)

2.  Heat waffle iron to a medium setting.  If needed to prevent sticking, spray both sides of the waffle iron with non-stick vegetable spray or brush lightly with melted ghee.  Ladle the batter onto the waffle iron and close the lid.  Cook until waffle is golden brown.  Carefully remove from waffle iron and serve immediately or place on a wire rack to cool completely, then store in a airtight container.  Repeat with remaining batter.

3.  To reheat a cooled waffle, either toast lightly or carefully fit the waffle back onto a heated waffle iron (make it fit like a puzzle) and close the lid.  Only reheat the waffle for about 20 seconds or until crispy.

Nutritional Information per serving (1/2 waffle, no topping):  129 calories, 5.2 g carbohydrate (0.3 g dietary fiber, 0.6 sugars), 10.4 g total fat (2.2 g saturated fat, 0 g trans fat), 155 mg cholesterol, 121 mg sodium, 33.5 mg calcium, 145 mg potassium, 5.1 g protein.  Net carbs per serving: 4.9 grams

Pizza Waffle Variation:  Omit the molasses and add 1/2 teaspoon Italian seasoning, 2 teaspoons tomato paste, 1/8 teaspoon garlic powder, 1/8 teaspoon onion powder and freshly ground black pepper.  The batter should have the consistency of pancake batter.  If additional liquid is needed, add 1 TB of non-dairy milk at a time until desired consistency is reached.  Proceed with step 2 to make waffles.

Recipe by Kathy Sheehan, copyright 2015.

Tuesday, March 17, 2015

Sugar and Dairy-Free Chocolate Ganache Sauce


This rich, dark chocolate sauce is so easy to make and is delicious!  When chilled, it thickens into a spoonable and spreadable chocolate, similar to a soft truffle.  It can be used as frosting, glaze or a spread.  When heated, it becomes a pourable sauce, perfect for drizzling over fruit, yogurt or other dessert.  Also, you can use it as a base for chocolate milk or hot chocolate.  Sometimes when I want something sweet, I'll eat it by the spoonful straight from the refrigerator!  When you add stevia to the melted chocolate-coconut milk mixture and whisk, it becomes a bit lumpy, so the final blending in a food processor (or blender) is necessary to bring all the ingredients together into a smooth sauce.  Don't be put off by this additional step because this decadent sauce is definitely worth the effort!

Sugar and Dairy Free Chocolate Ganache Sauce
Makes about 14 servings of 1 TB each

1/3 cup full fat coconut milk
2 oz. unsweetened baker's chocolate, chopped (I use Dagoba brand)
2 tablespoons ghee (clarified butter)*
1 teaspoon 100% stevia powder (I used SweetLeaf brand)
1 teaspoon vanilla extract
tiny pinch of salt
1/3 cup almond, flax, hazelnut or other non-dairy milk
5-10 drops 100% liquid stevia or to taste (optional: substitute 1 teas. raw honey)

1.  In a double boiler over simmering water, heat the coconut milk, chopped chocolate and ghee until chocolate is melted.  Remove from heat and whisk in the salt, stevia powder and vanilla extract.  The mixture will be lumpy and may separate, but don't worry.

2.  Using a rubber spatula, place chocolate mixture into a food processor or blender.  Add the 1/3 cup non-dairy milk and blend until mixture is combined and smooth.  Add 5 drops of liquid stevia, blend briefly and taste.  If additional sweetening is needed, add a few more drops, blend and taste.  (If substituting the optional honey, omit liquid stevia drops.)

3.  When satisfied, pour the chocolate sauce into a glass container and chill in the refrigerator until ready to use.  This chocolate sauce can be stored in the refrigerator for about 2 weeks but, honestly, mine has never lasted that long!

Nutritional Information per 1 TB serving: 49 calories, 1.2 g carbohydrate (0.7 g dietary fiber, 0.1 g sugars), 5.2 g total fat (3.3 g saturated fat, 0 g trans fat), 3 mg cholesterol, 13 mg sodium, 6.5 mg calcium, 0 mg potassium, 0.6 g protein.  Net carbs per serving: 0.5 grams

* Ghee is clarified butter with the milk solids removed.  It is lactose and casein free.  Most people with an allergy to dairy can tolerate ghee.  Feel free to substitute coconut oil or your favorite non-dairy butter substitute in place of the ghee, if desired.

Recipe by Kathy Sheehan, copyright 2015

Wednesday, February 25, 2015

No-Bake, Dairy-Free Egg Custard Flan


I dedicate this recipe to my sister, who recently learned that she's sensitive to dairy, egg whites (but not the yolks, strangely) and that consuming gelatin would be healing to her digestive system.  She has been suffering from GERD for months and, by reducing the carbs and sugar in her diet, it has given some relief from her uncomfortable symptoms.  Like all gelatin desserts, this recipe is so easy to make!  It tastes like a traditional flan, without the need for large amounts of sugar or milk.  The topping is made from a 50:50 combination of real maple syrup and water; a serving is only 3/4 teaspoon and contains 1 extra carb.  You have the option to omit it, but I think it's worth it and necessary if you want the true flavor of a flan.  I've set my gelatin in regular-size "flower petal" silicone muffin cups to create individual desserts, but I think this would work equally well set in a small pie tin then unmolded and cut into wedges.  Dear sister, I hope you enjoy this recipe.  It will go a long way to satisfy your sweet tooth!

No-Bake, Dairy-Free Egg Custard Flan
Makes 8 servings

Custard Ingredients:
1/2 cup full-fat coconut milk
1/2 cup unsweetened flax, almond or other type of non-dairy milk
1 cup water
1 tablespoon unflavored gelatin powder
1/2 teaspoon molasses (about 2-3 drops)
1 large egg yolk
1/2 teaspoon nutmeg
1/16 teaspoon mace (pinch, optional)
3/4 teaspoon vanilla extract
1/2 teaspoon 100% stevia powder (I use SweetLeaf brand)

Topping Ingredients:
1 tablespoon real maple syrup
1 tablespoon warm water

1.  Mix together the milks and water.  Pour 1 cup into a small saucepan, add the molasses and heat over medium-low heat until beginning to boil.  Meanwhile, pour the remaining milk mixture into a small bowl and sprinkle the gelatin powder over the top and allow to sit for about 5 minutes.  When the milk in the saucepan is starts boiling, turn the heat to low and add the gelatin-milk mixture.  Whisk until gelatin is completely dissolved.

2.  Separate the egg white from the yolk and put the yolk into the same small bowl used for the gelatin-milk mixture (discard the white or save for another purpose).  Whisk the yolk.  When the gelatin mixture in the saucepan is hot and steamy, but not boiling, carefully ladle about 1/2 cup of the hot liquid into the yolk while whisking constantly.  Return the egg-milk mixture to the saucepan, whisking constantly.  Continue stirring for about 30 seconds to cook the egg yolk, but do not allow to boil (or you'll end up with scrambled egg).  Remove from heat and add the nutmeg, mace, vanilla extract and stevia powder.  Whisk to combine.  Taste the custard mixture and adjust sweetness, if desired.  Allow the mixture to cool at room temperature for about 20-30 minutes, stirring occasionally.

3.  The spices will have settled to the bottom, so before pouring into the molds, whisk to redistribute the spices and whisk occasionally as your divide the mixture equally between 8 silicone muffin cups or pour entire contents into a small pie tin.  Place in the refrigerator until completely set (several hours, but set time depends on the mold).

4.  Make the maple topping by stirring together the maple syrup and water.  Set aside until ready to serve.

5.  To unmold, dip the muffin cups, one at a time, into a bowl filled with warm water to a depth of about 1 inch for about 15 seconds (you might have to gently pull the top of the custard away from the sides of the mold, as well).  If you used a pie tin, place it into a sink that has been filled with warm water to a depth of about 1 inch for 20 seconds and run a sharp knife around the top edge of the custard before unmolding on a serving plate.  Spoon 3/4 teaspoon of the maple topping over the top of each dessert before serving.

Nutritional Information per serving (includes 3/4 teas. topping): 42 calories, 2.5 g total carbohydrate (0.1 g dietary fiber, 2.1 g sugars), 2.9 g total fat (1.7 g saturated fat, 0 g trans fat), 26 mg cholesterol. 10 mg sodium, 26.8 mg calcium, 18 mg potassium, 1.2 g protein.  Net carbs per serving: 2.5 grams

Recipe by Kathy Sheehan, copyright 2015