Sunday, November 8, 2015

Carrot and Pumpkin Spice Beta-Carotene Shots


Carrots, pumpkins and sweet potatoes are the best sources of beta-carotene.  The name beta-carotene comes from the Greek beta and Latin carota (carrot). It is the deep orange-yellow pigment that gives these fall vegetables their beautiful color. The human body converts beta-carotene into vitamin A (retinol), which means it is a precurser of vitamin A. One cup of fresh carrot juice provides an astounding 2, 256 micrograms of beta-carotene! This amount is 2-3 times more than the RDA daily requirement, but don't worry. It is nearly impossible to eat too much beta-carotene because any excess of dietary beta-carotene is simply eliminated from the body (although you need to be careful with over-the-counter supplements because they are often synthetic and metabolized differently, especially if you are a smoker). We've all heard that vitamin A is good for eye health, but did you know it is a powerful antioxidant and can help prevent cancer and lower your risk of heart disease? The downside is that carrots are sweet and 1 cup of carrot juice contains about 2 teaspoons of natural sugar and about 15 carbohydrates. Even so, I love my fresh carrot juice and I wanted to find a way to include it in my diet. This recipe comes to the rescue!  I've added a bit of puréed pumpkin, plain kefir, coconut oil and the warm spices that we associate with this season. This juice blend has a lot going for it: probiotics from the kefir or yogurt, coconut oil to slow the absorption of the sugars and assist in the uptake of fat-soluble vitamin A, plus it includes other important vitamins and minerals. A shot or two of this delicious elixir each day is all I need to provide a healthy, healing dose of beta-carotene that my body craves.

Carrot and Pumpkin Spice Beta-Carotene Shots
Makes 12 servings (of 2 TB each)

1 cup fresh carrot juice (if purchased, look for unpasteurized juice for the healthiest option)
2 tablespoons puréed pumpkin
1/4 cup plain, unsweetened kefir or yogurt (substitute non-dairy, if desired)
1 teaspoon orange zest (or 2 drops of dietary-grade orange or tangerine essential oil)
1 tablespoon coconut oil, melted
10 drops of liquid stevia (orange flavored is nice), or to taste
3/4 teaspoon pumpkin pie spice
A tiny pinch of sea salt

Place all of the ingredients into a blender and blend until well combined. Store in a glass bottle or jar in the refrigerator. Shake before serving. Plan to drink it within a week.

Nutritional Information per 2 TB serving: 19 calories, 1.7 g carbohydrate (0.1 g dietary fiber, 1.4 g sugars), 1.3 g total fat (1.1 g saturated fat, 0 g trans fat), 1 mg cholesterol, 16 mg sodium, 11.4 mg calcium, 3 mg potassium, 0.4 g protein.  Net carbs per serving: 1.6 grams

Recipe by Kathy Sheehan, copyright 2015

Tuesday, November 3, 2015

Two Grain-free, Low-Carb Granola Flavors for Fall


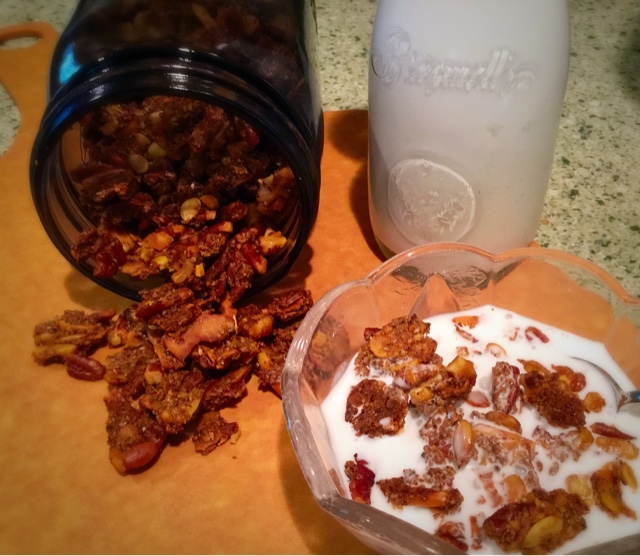
I've been experimenting with new flavors for my reduced-carb baked granola recipe and here are two winners perfect for the season: Pumpkin Spice and Cranberry Nut! Both incorporate ingredients that are local and in season right now, namely pumpkin and fresh cranberries. I recently baked my Halloween "decorations" to make a creamy batch of puréed pumpkin and used it to make this delicious granola. It was so good, I was inspired to chop some fresh cranberries and create another fall favorite. Both are great as breakfast cereals, toppings for yogurt or applesauce or for snacking. This granola is quickly becoming a staple in my pantry. It's so easy! Because I make so much, usually a batch every week, I want to share a tip for making it even easier: When you're measuring out the ingredients for one batch, go ahead and measure out the dry ingredients for a second batch and place it in the refrigerator in a sealed container. When it's time to make more (and you will want to), just add the wet ingredients, stir to combine and bake. These granola flavors make great holiday gifts, too.

Pumpkin Spice Granola
Makes 12 servings (1/2 cup each)

1 cup chopped walnuts
1/2 cup chopped pecans
1/2 cup slivered or sliced almonds
1/2 cup pepitas (pumpkin seeds)
1/2 cup hazelnut or almond meal/flour
1/2 cup unsweetened flaked coconut
1/4 cup chia seeds (ground in a nut grinder) or flaxseed meal
2 tablespoons LaKanto Monkfruit Sweetener (or other erythirtol sweetener)
3/4 teaspoon stevia powder (I used Sweet Leaf brand)
3 teaspoons pumpkin pie spice
1/2 teaspoon kosher or sea salt
1/4 cup butter or ghee (clarified butter), melted (substitute non-dairy, if desired)
1 tablespoon blackstrap molasses
10 drops English Toffee stevia drops, or to taste
1/4 cup pumpkin purée (canned or homemade)
1 tablespoon water (only if needed)

1. Preheat oven to 250-degrees Fahrenheit.  Line a cookie sheet with parchment paper and spray with non-stick coconut oil spray; set aside.

2. In a large bowl, combine all of the ingredients and mix very well. Spread the granola mixture on the parchment paper-lined pan. Compress it into a firm, even sheet of granola by pressing mixture flat with your hand that is protected by parchment or a plastic sandwich bag or rubber spatula. The granola should be about 1/4-inch thick.

3. Bake for 75-80 minutes or until golden throughout (the longer it bakes, the crunchier it gets). If you notice that the edges are well browned, but the center is not, use a spatula to remove the outer edge of the granola and place on a plate to cool. Return the cookie sheet to the oven, reduce heat to 200-degrees and continue baking until golden. Remove from oven and allow to cool completely. Break into bite-size pieces and enjoy! Store in an airtight container.

Nutritional Information per 1/2 cup serving: 262 calories, 8.8 g carbohydrate (4.6 g dietary fiber, 2.6 g sugars), 23.8 g total fat (5.4 g saturated fat, 0 g trans fat), 10 mg cholesterol, 131 mg sodium, 74.1 mg calcium, 258 mg potassium, 7.3 g protein.  Net carbs per serving: 4.2 grams
Cranberry Nut Baked Granola
Makes 15 servings (1/2 cup each)

1 cup chopped walnuts
1 cup sliced almonds
1 cup chopped pecans
1/4 cup pepitas (pumpkin seeds)
1/4 cup chia seed (ground in a nut grinder) or flaxseed meal
1/4 cup hazelnut flour
1/4 cup almond meal/flour
1/2 cup unsweetened flaked coconut
3/4 teaspoon stevia powder (I used Sweet Leaf brand)
3 tablespoons Lakanto Monkfruit sweetener (or any monkfruit/erythritol blend)
3/4 teaspoon apple pie spice or cinnamon
1/2 teaspoon kosher or sea salt
1 cup fresh cranberries, chopped
1 tablespoon raw honey, melted
1/4 cup butter or ghee (clarified butter), melted (substitute non-dairy, if desired)
1 teaspoon vanilla extract
2 tablespoons water
15-20 liquid stevia drops, or to taste

Preheat the oven to 250-degrees and follow the directions above to make the granola.  Makes about 7-1/2 cups of bite-size pieces. Store in an airtight container.

Nutritional Information per 1/2 cup serving: 246 calories, 9.7 g carbohydrate (4.6 g dietary fiber, 2.6 g sugars, 1.6 g sugar alcohol), 22.6 g total fat (4.7 g saturated fat, 0 g trans fat), 8 mg cholesterol, 81 mg sodium, 66.7 mg calcium, 191 mg potassium, 5.9 g protein.  Net carbs per serving: 5.1 grams

Recipes by Kathy Sheehan, copyright 2015

Tuesday, October 20, 2015

Peanut Butter Kefir Ice Cream with Candied Peanuts and Chocolate Chips


Since I received an ice cream maker for my birthday, I've been having a wonderful time making lower carb frozen desserts.  This kefir ice cream is creamy, delicious and a real hit with my family.  The "candied" chopped peanuts are first sautéed in a little butter, then sprinkled with a monkfruit sweetener that hardens into a crackle when cooled.  The "chocolate chips" are several small squares of an 85% cacao chocolate bar (I like Organic Green & Black's 85% bar) that have been finely chopped so the tiny bits of chocolate are distributed evenly throughout.  When chopped fine, a little goes a long way without adding too many carbs.  When most "low carb" ice creams available commercially have about 18 carbs per serving, this infinitely-more-delicious homemade ice cream has only about 9 total carbs (6.7 net carbs), plus it has the additional health benefit of probiotics from the kefir. Your taste buds and your gut will be happier.  This is a win-win combination in my book!

Peanut Butter Kefir Ice Cream with Candied Peanuts and Chocolate Chips
Makes eight (1/2 cup) servings

1 tablespoon butter, ghee or non-dairy butter substitute
1/3 cup peanuts, roughly chopped
2-1/2 teaspoons Lakanto Golden Monkfruit sweetener, divided
3 cups plain, unsweetened coconut milk kefir (to see directions, click here)
1/2 cup non-dairy milk (I used flax, but your favorite will do)
3/4 cup natural peanut butter, no sugar added
1/4 + 1/8 teaspoon stevia powder (I use Sweet Leaf brand), or to taste
1 teaspoon vanilla extract
A pinch of salt
6 small squares of 85% dark chocolate, finely chopped (about 3 TB)

1.  A day or two ahead, make a batch of homemade, plain, unsweetened coconut milk kefir using full-fat coconut milk (not coconut milk beverage).  Refrigerate until ready to use.  (You can use purchased plain, unsweetened kefir but the nutritional information with be different and the resulting ice cream will not be non-dairy.)

2.  In a small skillet, melt the butter over medium-low heat and add the chopped peanuts.  Sauté briefly until warm throughout (do not overcook because the peanuts can burn easily).  Sprinkle 1-1/2 teaspoons of the Lakanto Golden Monkfruit sweetener over the peanuts and stir to coat.  When the monkfruit sweetener has melted, remove from heat and transfer the peanuts and any remaining liquid to a bowl.  Set aside to cool completely.

3.  Place 1/2 cup non-dairy milk, plain kefir, peanut butter, remaining 1 teaspoon of Lakanto Golden Monkfruit sweetener, liquid stevia drops, stevia powder, vanilla extract and salt into a blender.  Blend until smooth and all ingredients are well combined.  Taste and add additional stevia drops or powder, if desired.  Place in a jar or other container and refrigerate for at least 1 hour before making the ice cream.  Meanwhile, chop the chocolate and set aside.

4. Follow the directions for your ice cream maker.  Pour the peanut butter-kefir mixture into the ice cream maker and churn until thickened and beginning to set.  Add the peanuts, reserved liquid and chopped chocolate and continue churning until desired consistency is reached.  Serve immediately as soft-set or transfer to a container and place in the freezer for about 20 minutes.*

*Important Note:  This ice cream needs to be eaten while in a soft-set stage.  If allowed to freeze completely, it will be too firm to scoop.  Any leftover ice cream can be frozen in individual ice pop molds and served later as a creamy ice pop.

Nutritional Information per 1/2 cup serving: 315 calories, 8.9 g carbohydrate (2.2 g dietary fiber, 2.6 g sugars, 1 g sugar alcohols), 27.6 g total fat (10.6 g saturated fat, 0 g trans fat), 0 mg cholesterol, 98 mg sodium, 34.2 mg calcium, 37 mg potassium, 7.4 g protein.  Net carbs per serving: 6.7 grams

Recipe by Kathy Sheehan, copyright 2015.

Monday, September 28, 2015

Pumpkin Pecan Kefir Ice Cream


Fall is here!  Leaves are turning, the temperature is cooler and pumpkins are decorating the front porches all along my neighborhood.  This is the time of year that I begin to crave the flavors of autumn and pumpkin is one of my favorites.  This creamy frozen dessert is a real treat!  The best part is that it's low carb, dairy-free, full of beneficial live probiotic cultures, provides healthy fats and is unbelievably DELICIOUS!  Start by making a batch of coconut milk kefir (see my earlier post), then flavor the plain kefir before putting it into your ice cream maker.  The result is a healthy dessert worthy of any occasion that the whole family will enjoy.

Pumpkin Pecan Kefir Ice Cream
Makes 8 servings (1/2 cup each)

3 cups plain, unsweetened, coconut milk kefir (click here for directions)
1 tablespoon butter, ghee or non-dairy butter substitute
1/3 cup chopped pecans
2 tiny pinches of salt, divided
1/2 cup canned pumpkin purée 
1/2 cup unsweetened non-dairy milk (I used flax milk, but substitute with your favorite)
2 teaspoons pumpkin pie spice
1 teaspoon blackstrap molasses
10 drops liquid English Toffee Stevia (I used Sweet Leaf brand)
5 drops liquid Vanilla Creme Stevia
1/4 teaspoon 100% Stevia powder (I used Sweet Leaf brand)
1/4 teaspoon vanilla extract

1.  A day or two ahead, make a batch of homemade, plain, coconut milk kefir using full-fat coconut milk (not coconut milk beverage).  Keep refrigerated until ready to use.  (If desired, you may use purchased plain, unsweetened kefir, but the nutritional information will be different and the resulting ice cream will not be non-dairy.)

2.  In a small skillet, melt 1 tablespoon butter, ghee or non-dairy butter substitute.  Add 1/3 cup chopped pecans and cook over low heat until pecans are fragrant and lightly toasted.  Sprinkle with 1 teaspoon of LaKanto Golden Monkfruit Sweetener, a tiny pinch of salt and stir to coat.  Remove from heat, transfer pecans and any liquid into a bowl and set aside at room temperature to cool.

3.  Place 3 cups of plain, unsweetened kefir into a blender. Add 1/2 cup canned pumpkin, 1/2 cup unsweetened non-dairy milk, 1 teaspoon Lakanto Golden Monkfruit Sweetener, 1 teaspoon molasses, 2 teaspoons pumpkin pie spice, liquid Stevia drops, 1/4 teaspoon stevia powder, a tiny pinch of salt and vanilla extract. Blend to combine and taste. Add more Stevia drops or powder, if desired, until desired sweetness is achieved.  Refrigerate mixture for about an hour before proceeding.

4.  Follow the directions from your ice cream maker.  Pour the pumpkin-kefir mixture into the ice cream maker and churn until thickened and beginning to set.  Add the pecans and reserved liquid from the bowl into the ice cream and continue churning until desired consistency is reached.  Serve immediately soft-set or pour into a container and place in the freezer for about 20 minutes.*

* Important Note: This kefir ice cream needs to be eaten while in a soft-set stage.  If allowed to freeze completely, the ice cream will be too firm to scoop.  Any extra ice cream can be frozen in individual ice pop molds and served later as a creamy ice pop.

Nutritional Information per 1/2 cup serving: 179 calories, 4.9 g carbohydrate (0.9 g dietary fiber, 2.7 g sugars, 1.2 g sugar alcohols), 17.4 g total fat (10.2 g saturated fat, 0 g trans fat), 4 mg cholesterol, 34 mg sodium, 35.4 mg calcium, 70 mg potassium, 1.3 g protein.  Net carbs per serving: 4 grams

Recipe by Kathy Sheehan, copyright 2015.

Wednesday, September 2, 2015

Baked Cinnamon Spice Grain-Free, Low-Carb Granola


It's granola...so it must be healthy, right?  No, not necessarily.  Granola is one of those foods that is touted as healthy but can often be so full of sugar and carbohydrate that it's no better than eating right out of the sugar bowl!  If you check out the nutritional label on a store-bought granola cereal, you'd be shocked to see that there are about 45 carbs per serving, which translates into 8-1/2 teaspoons of sugar.  You can just imagine the spike in your blood glucose that is anything but healthy for your body.  In this grain-free recipe, there are only 4 net carbs per serving and I think the taste is better than a processed, boxed variety.  I used a combination of honey and no-carb sweeteners to achieve the right touch of sweetness without overpowering the warm spices and crunchy nuts.  It makes a delicious and nutritious breakfast topped with your favorite cold, non-dairy milk or sprinkle it on yogurt, applesauce or eat it plain as a snack.  Recently I stirred some into homemade vanilla kefir ice cream and it tasted like Cookies and Cream!  I always have some of this granola around because it's simple to make ahead of time and convenient when I need a quick and easy breakfast.

Baked Cinnamon Spice Grain-Free, Low-Carb Granola
Makes 12 servings (1/2 cup each)

1/2 cup chopped pecans
1 cup chopped walnuts
1/2 cup slivered or sliced almonds
1/2 cup unsweetened flaked coconut
1/2 cup hazelnut or almond meal/flour
1/4 cup chia seeds, ground in a nut grinder (or 1/4 cup ground flaxseed)
1/4 cup pepitas (pumpkin seeds)
1/4 cup sunflower seeds
1/4 cup melted butter (or 1/2 butter & 1/2 coconut oil)
2 tablespoons LaKanto Monkfruit Sweetener (or other erythirtol sweetener)
3/4 teaspoon Stevia powder (I use Sweet Leaf brand)
1 tablespoon raw honey, melted
10 drops of Vanilla Creme liquid Stevia, or to taste (I use Sweet Leaf brand)
1-1/2 teaspoons cinnamon
1/2 teaspoon nutmeg
1/8 teaspoon mace
1/2 teaspoon kosher or sea salt
1/4 cup water

1. Preheat oven to 250-degrees F.  Line cookie sheet with parchment paper and spray with non-stick coconut oil spray; set aside.

2. In a large bowl combine all ingredients and mix very well.  Spread the granola on the parchment paper-lined pan.  Compress it into a firm, even sheet of granola by pressing mixture flat with a rubber spatula or your hand that is protected by parchment or a plastic sandwich bag.  The granola should be about 1/4-inch thick.*

3. Bake for about 70-90 minutes, or until golden throughout (the longer you bake it, the crunchier it gets).  Remove from the oven and allow to fully cool.  Break into pieces and enjoy!  Makes about 6 cups of bite-size pieces.  Store in an air-tight container.

*If you want to make this mixture into bars, shape into 12 equal-size bars or rounds, flatten and bake as directed.  Cool bars completely before removing from pan.  Wrap each bar individually with plastic wrap, then store bars in a zip-lock bag.

Nutritional Information per 1/2 cup pieces: 260 calories, 8.7 g carbohydrate (4.6 g dietary fiber, 2.5 g sugars), 23.8 g total fat (6 g saturated fat, 0 g trans fat), 5 mg cholesterol, 124 mg sodium, 61.2 mg calcium, 184 mg potassium, 7.1 g protein.  Net carbs per serving: 4.1 grams

Recipe by Kathy Sheehan, copyright 2015

Saturday, July 18, 2015

Prosciutto Wrapped Zucchini with Pesto and Mozzarella


I've seen many recipes for prosciutto wrapped asparagus spears, but never zucchini.  In this recipe, I created a small hollow down the center of the zucchini and filled it with pesto and firm mozzarella before wrapping it with the prosciutto and sauteing it in a skillet.  The prosciutto becomes crispy and encases the filling nicely.  This makes a wonderful side dish or, if cut into squares, a perfectly delightful appetizer or snack!  If you're looking for another creative way to enjoy your vegetables, I highly recommend you give this recipe a try.

Prosciutto Wrapped Zucchini with Pesto and Mozzarella
Makes 4 side dish servings or about 12 appetizers

1 medium zucchini (about 8" long and not too fat)
2 tablespoons pesto (homemade or store bought)
firm mozzarella, cut into 1/4" x 1/2" sticks
prosciutto slices (about 3-4)
coconut oil (or oil saved from frying bacon)
Optional garnishes for appetizers: basil leaves, grape tomato halves, small mozzarella balls

1.  Wash and dry the zucchini.  Cut a thin portion off one side to create a flat surface (so the zucchini will not roll when placed on that side).  Repeat on the opposite side.  Cut the zucchini lengthwise down the center, between the two flat surfaces.  Set the zucchini halves with the seed sides up and, using a spoon, scrape down the center of each zucchini to remove the seeds and create a hollowed out space.

2.  Spread 1 TB of pesto down the center of each zucchini half in the hollow space.  Top pesto with mozzarella sticks just the length of the hollow space (do not let cheese extend beyond this space).  Wrap each zucchini half with the sliced prosciutto, being careful to overlap and encase the filling completely.

Saute prosciutto wrapped zucchini in skillet
3.  Heat the oil in a skillet to medium-high.  Place the zucchini with seam side down into the pan and saute until the prosciutto is browned and crispy.  Turn over and repeat with second side.  You may also wish to brown edges, as well.  Remove from pan and drain briefly on a paper towel.  Cut each zucchini into serving size pieces.  To serve as a side dish, cut each zucchini half into 2 pieces.  If creating appetizers, cut each zucchini into small squares and top with suggested garnish (as pictured) and secure with a toothpick.

Nutritional Information per side dish serving (1/4 recipe): 106 calories, 2.5 g carbohydrate (0.6 g dietary fiber, 1.5 g sugar), 8.4 g total fat (3.3 g saturated fat, 0 g trans fat), 14 mg cholesterol, 381 mg sodium, 115.3 mg calcium, 128 mg potassium, 6.7 g protein.  Net carbs per serving: 1.9 grams

Recipe by Kathryn Sheehan, copyright 2015

Thursday, July 9, 2015

Milk and Non-Dairy Kefir


Kefir is a fermented milk beverage often described as a drinkable yogurt.  It is similar to yogurt, although kefir has more of the beneficial live organisms that many people hope to receive from yogurt to improve their health.  By consuming fermented and cultured foods, it helps to reduce inflammation which is a hallmark of T2 diabetes, and balance your gut microbiome.  It's extremely easy to make, requiring only milk or non-dairy milk (I use 100% coconut milk) and a culture starter known as kefir grains (not really a grain like wheat, but that's what they're called).  Kefir grains are a colony of the beneficial bacteria that will turn ordinary milk into kefir.  Lately. I've been having a wonderful time making batch after batch of delicious coconut milk kefir and flavoring it with chocolate, strawberries and, as pictured here, fresh cherries!  I am feeding my microbiome and seeing the positive results on my blood glucose monitor!  I highly encourage you to start making your own kefir and experimenting with different flavorings.  Below is the basic plain recipe, which can be made with any dairy milk from cow to goat, or full-fat coconut milk for non-dairy kefir.  Enjoy!

Milk or Non-Dairy Plain Milk Kefir
Makes 6-8 servings (1/2 cup)

3-4 cups milk of choice (If using coconut milk, choose full-fat and not coconut milk beverage)
2 tablespoons kefir grains (or use one packet of powdered starter)*

Place the milk and kefir grains (or powdered starter) into a clean, glass quart-size Mason jar.  Cover with cheese cloth and secure with a rubber band or cover loosely with the jar lid.  As the milk ferments the organisms will release gas, so it needs a way to escape.  Place at room temperature on your kitchen counter for 8-24 hours until it is slightly sour and tangy to your liking.  It's difficult to tell you an exact amount of time because fermentation happens at different rates depending on the vitality of the kefir grains, the temperature in your kitchen and your personal taste.  Check after 8 hours by tasting and continue checking at regular intervals until it reaches the level of tang that you like.  The longer it ferments, the more sour and tangy it will become.  It should taste similar to yogurt.

Pour through a fine mesh strainer to remove the lumpy kefir grains and store the strained kefir in the refrigerator.  (Do not refrigerate with grains still in the kefir; you must strain them out and save them to start your next batch.  If using powdered starter, strain and keep any small lumpy grains for your next batch.  If using powdered starter, you'll also need to hold back about 1/4-1/2 cup of the plain cultured kefir to add to your next batch.)  Kefir will keep in the refrigerator for about a week, although it may continue to thicken and ferment, becoming more tangy with time.  If it becomes too thick, either eat it with a spoon or add more milk and blend to reach desired consistency.

You can immediately start a new batch with your kefir grains or add them to 1-2 cups of milk and store them in the refrigerator for a few days before making more kefir.  When making non-dairy kefir, it's advisable to store your kefir grains between batches in dairy milk to keep them alive and in good condition.  The preferred food for kefir grains is lactose (milk sugar), so you'll need to revitalize them every few batches by storing them in milk.  Before making another batch of non-dairy kefir, strain and rinse the kefir grains in cool water, which will remove nearly all of the dairy residue.  If you are extremely sensitive to dairy, your best choice would be to use the powdered starter (instead of grains).  Body Ecology brand powdered kefir starter will make about 7 batches before you need to begin again with a new packet of powdered starter.

*Resources: The website Cultures for Health (www.culturesforhealth.com) sells both kefir grains and Body Ecology brand powdered kefir starter.  Also, the website offers many step-by-step, how-to videos for making a wide variety of cultured foods.  I highly recommend you check them out!

How to flavor your kefir:

Strawberry or Cherry Kefir:  Take 3/4 to 1 cup of fresh, sliced strawberries or cherries and gently heat them in a saucepan to release their juices.  Allow the heated fruit to come to room temperature.  Add the cooled fruit and 3 cups strained, plain kefir to a blender and blend until smooth.  Add 5-10 drops of liquid stevia to taste.  You might also wish to add vanilla extract.  If kefir becomes too thick after refrigeration, simply add additional milk and blend until desired consistency.  Try this variation with other berries!

Chocolate Kefir:  Heat 1/2 cup milk, 3 tablespoons unsweetened cocoa powder and 1/2 teaspoon stevia powder in a saucepan.  Stir constantly until cocoa powder dissolves and no lumps remain.  Remove from heat and allow to cool.  Stir again and add this mixture and 3 cups plain kefir to a blender.  Add 1/2 teaspoon vanilla extract and blend until smooth.  Taste and add additional sweetening as desired.  Store in the refrigerator.

Other uses for kefir:  Create your own flavored kefir by trying different fruits!  Use kefir in your smoothies or to make kefir ice cream (see my Pumpkin Pecan Kefir Ice Cream recipe here).  You can make kefir cheese (similar to cream cheese) from thick, dairy kefir by allowing the whey to drain from the kefir overnight through a fine-mesh strainer lined with several layers of cheese cloth.  Note: Non-dairy kefir usually isn't as thick as dairy kefir and may not work for making kefir cheese.

Cherry Chocolate Chip Kefir Ice Cream
 Nutritional Information per 1/2 cup serving will vary depending on type of milk used and other flavor additions.  Plain kefir will have approximately the same nutritional information as the milk used to make it.  Check the packaging label on the milk carton.

Recipe by Kathy Sheehan, copyright 2015.