Friday, July 29, 2016

Blueberry Mug Muffin with Easy Cultured Butter


I was lying in bed this morning, thinking about what I might want for breakfast, when an idea flashed into my mind: Blueberry Muffin. This is a twist on my favorite Mug Cake recipes but, instead, it's a Mug Muffin! And to make it even extra healthy, I mixed together kefir cheese and butter to create a simple and quick cultured butter as a spread. YUM...so delicious! I highly recommend using the smaller wild Maine blueberries for this recipe so they won't sink to the bottom (like mine did in this picture) but, even if the bigger variety of berry is all you have, it will still taste amazing, especially topped with creamy butter. (It would also be great made with raspberries.) This delightful breakfast was a great way to start a beautiful summer day in Maine!

Blueberry Mug Muffin
Makes 2 servings

2 tablespoons almond flour/meal
2 teaspoons coconut flour
2 teaspoons LaKanto Monkfruit sweetener (or other erythritol sweetener)
1/4 + 1/8 teaspoon stevia powder (I used Sweet Leaf brand)
A pinch of salt
1/2 teaspoon baking powder
1/8 teaspoon lemon extract or 1 teaspoon lemon zest (or 2 drops dietary-grade lemon essential oil)
1/2 teaspoon vanilla extract
5 drops Lemon Drop stevia (I used Sweet Leaf brand)
1 large egg
1 tablespoon butter, melted (use ghee for dairy-free)
1 tablespoon small wild blueberries (fresh or frozen)

1. Melt the 1 tablespoon of butter in a mug by microwaving on high for about 15 seconds; set aside.

2. In a small mixing bowl, combine the almond flour, coconut flour, sweeteners, salt and baking powder. Stir with a fork until well combined and no lumps are visible.

3.  Add the melted butter, extracts, lemon stevia drops, and egg. Whisk with a fork until a smooth batter forms. Take a paper towel and coat the bottom and sides of the mug with any butter remaining in the mug. Add 1/2 of the blueberries to the batter and gently fold to incorporate and pour into the prepared mug. Top batter with remaining berries.

4. Microwave on high for about 45 seconds.* Remove and test by touching the muffin near the center. It is done when the batter on top of the muffin looks set and springs back when touched lightly. If additional cooking time is needed, microwave at 10 second intervals and retest. Do not overcook. Allow the muffin to cool in the mug for 1 minute.

5. Invert the muffin onto a serving plate and allow to cool for 1-2 minutes. Serve immediately with butter or store leftovers in an airtight container at room temperature for 1 day. This recipe makes 2 servings.

*To bake in the oven, divide batter into two greased muffin tins or ramekins and bake at 325-degree Fahrenheit for 16-18 minutes or until toothpick comes out clean when tested or muffins spring back when touched near the center. 

These muffins can be microwaved or baked in the oven. Both methods are equally delicious!
Nutritional Information per 1/2 recipe: 143 calories, 6 g carbohydrate (1.7 g dietary fiber, 0.9 g sugars, 4 g sugar alcohols), 11.7 g total fat (4.9 g saturated fat, 0 g trans fat), 113 mg cholesterol, 173 mg sodium, 114.5 mg calcium, 88 mg potassium, 5 g protein.  Net carbs per serving: 4.3 grams

Easy and Quick Cultured Butter: Mix together 2 tablespoons softened butter, 1 tablespoon kefir cheese (to make kefir cheese, click here) and 1/4 teaspoon honey.  This probiotic-rich buttery spread is excellent on muffins, pancakes and waffles.

Recipes by Kathy Sheehan, copyright 2016
All rights reserved. Do not duplicate without author's permission.

Saturday, July 23, 2016

Coco-Mocha Mug Cake


I just returned from vacation and I'm not quite ready to stop being on vacation! This afternoon, to extend the fun experience, I made this marvelous Keto Mug Cake and ate the whole thing for my lunch. It's grain-free, sugar free and easily can be made dairy free (by substituting ghee for the butter), but it's far from flavor free! The combination of coconut, coffee and chocolate is so delicious. Since Mug Cakes are "baked" in the microwave and can be whipped up in a matter of minutes, I can be spontaneous and carefree about having one. This tender cake is similar to a sweet indulgence I was tempted to have while on vacation, but without all the gluten, sugar, carbs or guilt! Mmmm...this was a great way reward myself for having made healthy choices on my trip and to welcome myself back home.

Coco-Mocha Mug Cake
Makes 2 servings

1-1/2 tablespoons butter, melted (or ghee for dairy free)
2 tablespoons almond flour/meal
2 teaspoons coconut flour
1 tablespoon unsweetened cocoa powder
1/2 teaspoon instant coffee (or substitute 1 tablespoon strong brewed coffee and omit the coconut milk)
2 teaspoons LaKanto Monkfruit sweetener (or other erythritol sweetener)
1/4 teaspoon stevia powder (I used Sweet Leaf brand)
A pinch of salt
1 tablespoon unsweetened shredded coconut
1/2 teaspoon baking powder
1 large egg
5 drops dark chocolate stevia or regular (I used NOW Better Stevia brand)
1 tablespoon coconut milk

Optional toppings (pictured): shaved or chopped dark chocolate (70% or higher), toasted unsweetened shredded coconut or flakes. (Optional toppings are not included in nutritional information.)

1. Prepare your mug by melting the butter or ghee in it (microwave for 15 seconds or so); set aside to cool slightly while you prepare the batter.

2. In a small mixing bowl, combine the almond meal, coconut flour, cocoa powder, instant coffee (if using), sweeteners, salt, shredded coconut, and baking powder until well mixed.  Add the melted butter, egg, stevia drops and coconut milk.  With a fork or whisk, stir until well combined.

3. With a paper towel, coat the inside of your mug with any melted butter still remaining in the mug. Pour in batter and microwave for about 45 seconds until cake is done and springs back when touched near the center. (The time needed for cooking may vary, depending on the mug you use and the wattage of your microwave. It's best to begin with 45 seconds and, if more cooking is needed, microwave in 10 second intervals until done.)

4. Allow to cool in the mug for at least 1 minute, then invert cake onto a serving dish and cool for an additional few minutes until warm, but not too hot.  Sprinkle with optional toppings, if desired. Serve immediately. Store any leftovers in an airtight container at room temperature and eat within 1 day. This recipe makes 2 servings.

Nutritional Information per serving (1/2 recipe without optional toppings): 191 calories, 7.4 g carbohydrate (2.6 g dietary fiber, 0.8 g sugars, 4 g sugar alcohol), 17.5 g total fat (8.9 g saturated fat, 0 g trans fat), 116 mg cholesterol, 172 mg sodium, 120 mg calcium, 137 mg potassium, 5.8 g protein. Net carbs per serving: 4.8 grams

Recipe by Kathy Sheehan, copyright 2016.
All rights reserved. Do not reprint without author's permission.

Sunday, July 3, 2016

Cherry Chocolate Chip Kefir Ice Cream with Macadamia


Summer just isn't summer without ice cream! For a long time, I only would allow myself a single dip of ice cream once a year as a treat. (How sad and un-American is that?) I felt deprived and certainly left out of the whole social experience of eating ice cream with family and friends. I wanted more freedom to enjoy the short, warm season in Maine like everyone else...and that means having plenty of ice cream. The only difference now is that I make it myself. For my birthday last year, I received an ice cream maker and have been having a grand time creating healthy, sugar free ice cream in every season. My imagination has been the only limit to the variety of flavors I've enjoyed! The one ingredient I add to all my recipes is plain milk kefir because it's a delicious way to consume more probiotics. My ice cream is similar to frozen yogurt, but it contains many more beneficial microorganisms to boost digestive health, which is very important for a person with diabetes. This recipe highlights fresh cherries that are in season and at the lowest price right now. Combined with chocolate chips, cacao nibs and chopped macadamia nuts, it is bursting with real summertime flavor! If you don't have an ice cream maker, you can make this mixture into ice pops instead, but I highly recommend you consider getting one for all the ice cream you'll want to make in the future after you taste this!  To browse my other low carb, delicious and healthy ice cream recipes, click here.

Cherry Chocolate Chip Kefir Ice Cream with Macadamia
Makes eight (1/2 cup) servings

Ice cream base:

1 cup plain milk kefir (to learn how to make your own, click here) or use plain yogurt
2 cups full-fat coconut milk (I used A-Roy D brand)
1 tablespoon Lakanto Monkfruit sweetener (or other erythirtol sweetener)
3/4 teaspoon stevia powder, or to taste (I use Sweet Leaf brand)
1 heaping tablespoon raw cacao powder (or unsweetened cocoa powder)
5-8 drops of Cherry flavored liquid stevia (or regular)
1 tablespoon macadamia nut butter (or cashew butter)
12 fresh red sweet cherries, pitted (divided)

Stir-Ins:

2 tablespoons 70% or higher dark chocolate, chopped (I used 5 squares of Green and Black's 85% Organic Chocolate bar)
1 tablespoon raw cacao nibs
1/4 cup chopped macadamia nuts

1. In a blender, blend together the kefir, coconut milk, sweeteners, cacao powder, macadamia nut butter and 8 of the pitted cherries. Blend until well combined and smooth. Taste and adjust sweetening, if desired. Lastly, add the remaining 4 cherries and pulse blender only until cherries are roughly chopped (you want some chopped cherry pieces visible in the mixture). Pour into a glass jar and refrigerate for at least 1 hour.

2. Meanwhile, prepare stir-in ingredients and put them in a small bowl; set aside. (I like using cacao nibs with the chopped dark chocolate because it adds a nice crunchy texture to the finished ice cream but, if you don't have them, you can leave them out and add another 1 tablespoon of chopped chocolate instead.)

3. According to the manufacturer's instructions for your ice cream maker, churn the ice cream base until beginning to solidify.  Add the stir-ins and continue churning until a soft serve consistency is reached. At this point, you can serve immediately or, if you wish to scoop the ice cream, pour into a container and place in the freezer for about 15 minutes, but do not allow it to freeze completely (see note below). 

NOTE: This ice cream is best served right away because, if it is completely frozen, it will be too hard to scoop. Fill ice pop molds with any leftover ice cream and freeze to be eaten as popsicles later.

Nutritional Information per 1/2 cup: 202 calories, 6.8 g carbohydrate (1.3 g dietary fiber, 3.7 g sugars, 1.5 g sugar alcohol), 19 g total fat (10.9 g saturated fat, 0 g trans fat) 0 mg cholesterol, 13 mg sodium, 21.7 mg calcium, 51 mg potassium, 1.8 g protein. Net carbs per serving: 5.5 grams

Recipe by Kathy Sheehan, copyright 2016

Wednesday, June 22, 2016

Healing Golden Milk Kefir with Cacao


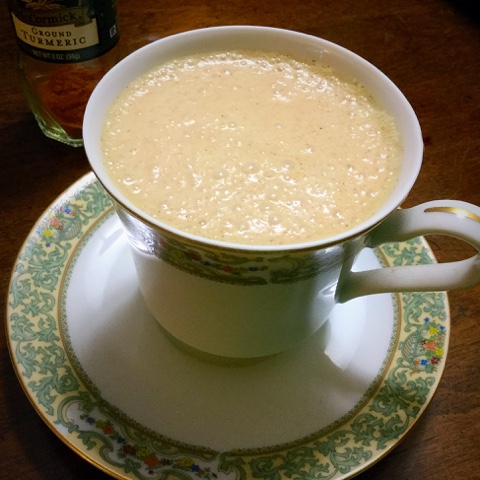
If you read my blog regularly, you know I recommend consuming probiotic-rich foods or beverages on a daily basis for health. Another resource of healing is my spice cabinet! In particular, turmeric, cinnamon and ginger are potent anti-inflammatory spices that are especially beneficial for improving chronic diseases, including T2 diabetes. This recipe is my twist on the classic Golden Turmeric Milk or Tea, which has been proven to reduce pain and systemic inflammation. The addition of raw cacao powder provides antioxidants and, more importantly, a delicious flavor that completely masks the warm, peppery and sometimes bitter turmeric compounds (which are what makes turmeric so healthful). Because I include kefir, this beverage should not be heated to retain the quality of the probiotic microorganisms. If you're worried that this won't taste good, you are wrong...because it is AMAZING! It is slightly spicy, but so sweet and delicious too. It's a great flavor combination and I love it! Enjoy this for breakfast or as a meal replacement, in the afternoon as a pick-me-up or, leave out the cacao powder, and have a cup before bed to help you relax and fall asleep.

Healing Golden Milk Kefir with Cacao
Makes 1 serving

1/2 cup plain milk or coconut milk kefir (click here to make your own)
1/2 cup unsweetened coconut milk (I use full-fat A-roy D brand)
1/2 teaspoon ground turmeric
1/4 teaspoon ground cinnamon
1/8 teaspoon ground ginger
1 teaspoon raw cacao powder (or unsweetened cocoa powder)
1/4 teaspoon stevia powder (I use Sweet Leaf brand)
A pinch of black pepper (increases absorption)

Place all of the ingredients into a blender and blend until well combined. (You may also use a whisk, but I find a blender mixes the ingredients more thoroughly.) Do not heat. Pour into a mug and serve immediately.

Nutritional Information per serving (made with full-fat coconut milk): 230 calories, 7.9 g carbohydrate (0.9 g dietary fiber, 5.7 g sugars), 19.7 g total fat (13.5 g saturated fat, 0 g trans fat), 9 mg cholesterol, 53 mg sodium, 100 mg calcium, 61 mg potassium, 4.4 g protein. Net carbs per serving: 7 grams

Recipe by Kathy Sheehan, copyright 2016

Monday, June 20, 2016

Shortcake in a Mug


It's strawberry season again and there's nothing that says summer like Strawberry Shortcake! I normally don't eat a lot of fruit but, when it's fresh, in season and local, I usually indulge in a pint or two. This is my favorite way to eat strawberries. The best part about this recipe is how quick and easy it is to make the shortcakes. Taking only 45 seconds in the microwave, this mug cake will be ready in minutes to split and share with a friend, topped with sweet berries and a dollop of whipped coconut cream laced with vanilla. (If you can't find a friend to share it with, save half of the shortcake for later.) The cake itself isn't overly sweet, so the flavor of the berries will shine forth. The slight hint of lemon gives it a nice touch and will go well with any fruit. Enjoy the summer!

Shortcake in a Mug
Makes 2 servings

1/4 cup almond flour
2 teaspoons golden flaxseed meal or coconut flour
1 tablespoon Lakanto Monkfruit sweetener (or other erythritol sweetener)
1/2 teaspoon baking powder
A pinch of salt
1 egg, slightly beaten
1 teaspoon lemon juice (or almond milk)
1/2 teaspoon lemon zest (or 1-2 drops dietary grade lemon essential oil)
1/2 teaspoon vanilla extract or unsweetened vanilla powder
5 drops monkfruit extract or liquid stevia
1 teaspoon melted butter (or ghee for dairy free)

1. In a small bowl, combine the first five dry ingredients with a fork until thoroughly mixed.  Add the egg, lemon juice or almond milk, lemon zest (or essential oil), vanilla extract, monkfruit extract or liquid stevia.

2. Melt the butter in an eight-ounce mug or ramekin and add to the batter mixture. With a paper towel, wipe any butter remaining in the mug around the sides and on the bottom of the mug; set aside.

3. With a fork, beat the cake batter until all ingredients are combined and pour into the greased mug or ramekin. Microwave on high for about 45 seconds or until the cake has risen, looks dry and the top springs back when touched lightly in the center. (Note: Cooking may take a bit less or more time, depending on the wattage of your microwave and the mug you are using. You may need to experiment to discover the best amount of time needed to cook your cake. When you have done this, make a note of the mug used and the proper cooking time so, the next time you make a mug cake, you'll know what works best for you.)

4. Allow the cake to cool for a few minutes before running a sharp knife around the edge and inverting your mug to release the shortcake.  Split the cake into two servings, top one half of the shortcake with your favorite berries and whipped cream or whipped coconut cream (recipe below).  Repeat with the other half of the shortcake or cool and store in an airtight container for later. Serve and enjoy.

To make whipped coconut cream: Place a can of full-fat coconut milk in the refrigerator overnight. Do NOT shake the can!! Open and spoon out the thickened coconut cream at the top and discard the liquid (or use for another purpose). Add stevia powder and vanilla to taste and whip with a whisk or fork until well combined and it has the consistency of whipped cream. Serve immediately or store in the refrigerator.

Nutritional Information per 1/2 shortcake (not including berries or topping): 144 calories, 5.3 g carbohydrate (2.2 g dietary fiber, 0.7 g sugars), 11.7 g total fat (2.4 g saturated fat, 0 g trans fat), 99 mg cholesterol, 153 mg sodium, 132 mg calcium, 152 mg potassium, 6.6 g protein. Net carbs per serving: 3.1 grams

Recipe by Kathy Sheehan, copyright 2016

Saturday, June 18, 2016

Faux-tato Pancakes!


Growing up in the mid-West, potato pancakes were a leftover side dish we often were served after having had mashed potatoes the previous night. I loved them! Crispy on the outside, but still obviously soft and creamy mashed potatoes on the inside. My husband, who is not diabetic, often makes potato pancakes for himself from his leftover (and famous) mashed potatoes. He's really quite an expert at making them. Since I choose to no longer eat white potatoes because they spike my blood sugar, I have not indulged in this delicacy for many years, but look on from afar with just a touch of envy. One day, he wondered aloud if I might be able to make "faux-tato" pancakes from the wonderful mashed cauliflower that I eat in place of potatoes. Using some leftover mashed cauliflower I just happened to have in the refrigerator, we were able to put his idea to the test...and the result was spectacular!! The taste and consistency closely matches my memory of this favorite childhood dish. The mid-Western girl in me is very happy and satisfied by this new discovery!

"Faux-tato" Pancakes!
Makes 3 large pancakes

1 cup mashed cauliflower, seasoned to your liking (see my recipe here)
1 large egg, slightly beaten
1 tablespoon ghee or coconut oil

Extra add-ins or toppings (optional): chopped chives, crumbled bacon, cooked crumbled sausage, finely chopped spinach, frozen petite peas (thawed), chopped herbs, finely chopped onions, shredded cheese, sour cream or gluten-free gravy (use these as toppings only).

1. Mix the mashed cauliflower and egg until thoroughly combined. Heat a skillet to medium heat, add ghee or oil and spoon out large dollops of the mashed cauliflower and egg mixture, and flatten slightly with the back of a spoon to form the pancakes.


2. Allow the pancakes to fry in the pan until brown and crispy. (Don't be in a hurry or try to flip the pancakes too soon or they will fall apart. This step may take several minutes. Just watch carefully and turn down the heat if the pancakes are browning too quickly.) 


3. When the first side has browned nicely and the cauliflower mixture has begun to solidify a bit, carefully turn the pancakes with a spatula and continue cooking the second side until brown and crispy.  Serve immediately.

Nutritional Information per pancake (not including any optional add-in or topping): 79 calories, 4.2 g carbohydrate (1.9 g dietary fiber, 1.8 g sugars), 5.5 g total fat (2.9 g saturated fat, 0 g trans fat), 73 mg cholesterol, 76 mg sodium, 26.6 mg calcium, 247 mg potassium, 4.3 g protein. Net carbs per serving: 2.3 grams

Recipe by Kathy Sheehan, copyright 2016

Monday, June 6, 2016

Perfect Mashed Faux-tatoes (Mashed Cauliflower)


Perfect Mashed Cauliflower
Mashed potatoes have always been one of my favorite side dishes but, because I want to keep my blood sugar normal without diabetic medication, I made the choice to stop eating white potatoes a few years ago. It was an easy choice and the benefit to my health has been worth it! A few weeks ago, my husband was making his famous mashed potatoes and it motivated me to perfect my mashed cauliflower recipe. Too often, mashed cauliflower can end up more like a cauliflower smoothie than the consistency of mashed potatoes! Here is my secret for making PERFECT mashed "faux-tatoes" every time.

Cut florets from a large head of cauliflower.

Perfect Mashed "Faux-tatoes" (Mashed Cauliflower)
Makes about 8 servings (1/2 cup each)

1 large head cauliflower
2-3 tablespoons butter
1/3 cup sharp cheddar, shredded or cubed
Salt and pepper to taste

1.  Cut the florets off a large head of cauliflower and discard the leaves and core.

2.  Place the florets in a steamer basket over boiling water and steam covered for about 12-15 minutes, or just until the cauliflower is tender and can be pierced with a fork.  (This is the trick to perfect mashed cauliflower: DO NOT overcook the cauliflower! The longer you steam it, the more water is absorbed and the wetter the finished product will be. So be watchful and remove the cauliflower from the heat as soon as it can be pierced with a fork, but is not too soft.)

Steam florets for 12-15 minutes. DO NOT OVERCOOK!

3.  Using a food processor* with the chopping blade, process the cauliflower WITHOUT adding any liquid until it begins to have the consistency of mashed potatoes. (You may need to do this in batches.) Stop the food processor occasionally and break up and incorporate any larger pieces before continuing to process.

4.  When the mashed cauliflower has begun to reach the proper consistency, add 2-3 tablespoons of salted butter, 1/3 cup shredded or cubed sharp cheddar, salt and pepper to taste.  Continue to process until butter, cheese and seasonings are incorporated and the mixture is smooth or has reached the consistency you desire.  Serve immediately or store covered in the refrigerator for up to 3 days.

*This could be done in a blender in very small batches with frequent stopping and scraping down, although it may be difficult to get the mixture completely smooth.

Nutritional Information per 1/2 cup: 83 calories, 6 g carbohydrate (3 g dietary fiber, 2.6 g sugars), 5.8 g total fat (3.6 g saturated fat, 0 g trans fat), 16 mg cholesterol, 78 mg sodium, 25.8 mg calcium, 336 mg potassium, 3.3 g protein.  Net carbs per serving: 3 grams

Recipe by Kathy Sheehan, copyright 2016