Showing posts with label pork. Show all posts

Saturday, July 1, 2023

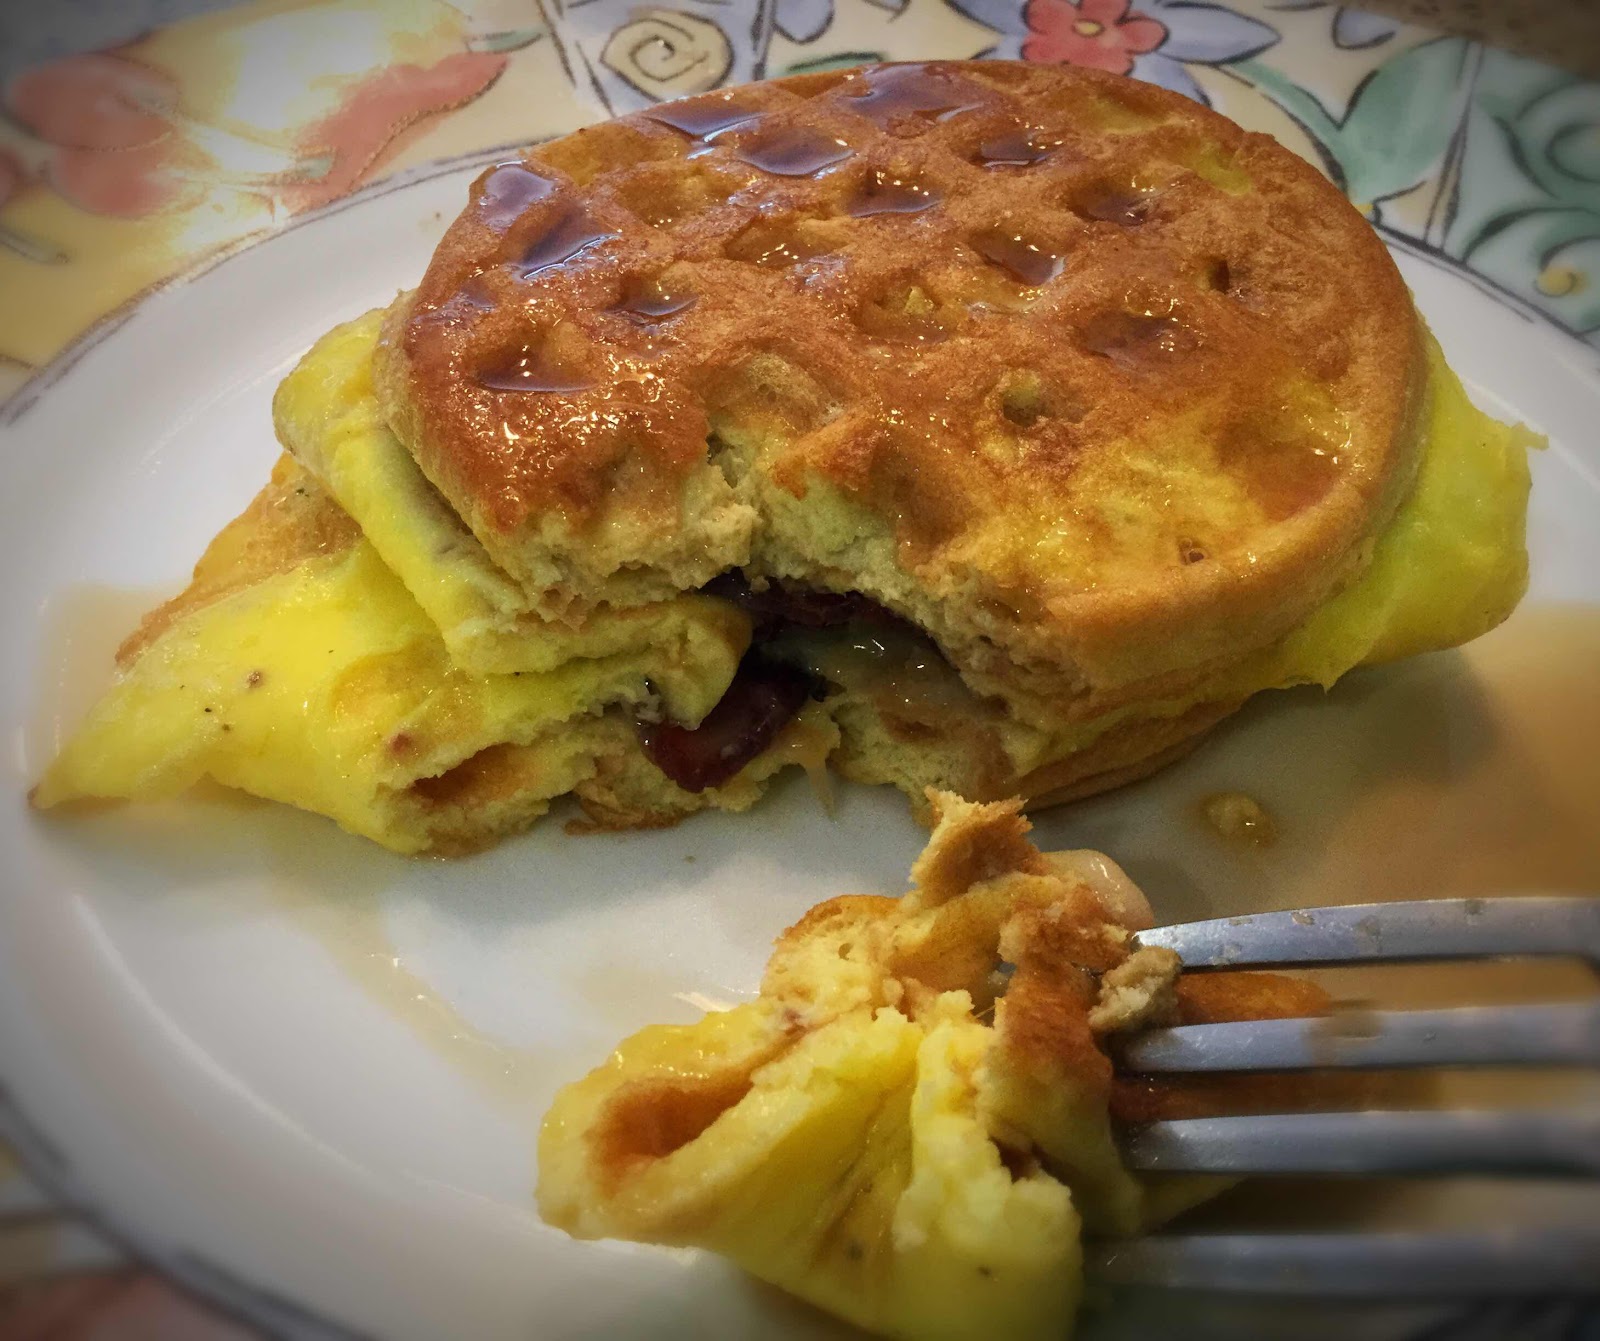
Keto Bacon and Cheese Dutch Baby Pancake

Keto Bacon and Cheese Dutch Baby Pancakes

This fluffy, puffy egg pancake is baked in the oven in a preheated, hot skillet. When it comes out of the oven, it is impressive! I use a 6-inch cast iron skillet, which imparts a higher rise and nice crust. Similar to a puffy omelet, but so much easier to make.

Keto Bacon and Cheese Dutch Baby Pancake
Makes 1 serving

1 tablespoon unsalted butter
6 inch heatproof skillet
2 large eggs
2 tablespoons heavy cream
2 tablespoons water
2 tablespoons almond flour (or 1 tablespoon coconut flour for nut free)
Salt and pepper to taste
2 slices cooked bacon, chopped
1 ounce cheddar cheese, shredded
Sugar free maple syrup (optional)

1. Placed the 1 tablespoon of unsalted butter into your skillet. Place the skillet into the oven and preheat to 400°F.

2. Meanwhile, whisk together the eggs, cream, water, almond flour, salt, and pepper. You can do this in a blender or food processor for an extra fluffy pancake.

3. When the oven and pan are preheated, swirl the melted butter all around the bottom and sides of the skillet. Pour the egg mixture into the hot skillet. Sprinkle the chopped bacon and cheese on top. Return the skillet to the oven and bake for 14 minutes until puffy and golden.

4. Remove the skillet from the oven and use a sharp knife to loosen the pancake from the sides of the pan. Transfer the pancake to a serving plate and drizzle sugar-free maple syrup on top, if desired. Eat it immediately. The pancake will deflate as it cools.

Cooked Keto Dutch Baby Pancake

Nutritional Information per serving (entire recipe): 618 calories, 2.5 g carbohydrate (0.9 g dietary fiber, 0.4 g sugars), 56.7 g total fat (27 g saturated fat, 0 g trans fat), 491 mg cholesterol, 723 mg sodium, 270.4 mg calcium, 276 mg potassium, 2 mg iron, 480 IU Vit A, 26.8 g protein. Net carbs per serving: 1.6 grams

Recipe and photos by Kathy Sheehan, copyright 2023
All rights reserved. Please do not duplicate without the author’s permission. 

Saturday, June 24, 2023

Summer Vegetable Stir Fry

Summer Vegetable Stir Fry

This is a dish we make often in the summer, utilizing the myriad of local summer vegetables available in the Farmer’s Markets. It’s a quick and easy stir fry that is fresh and delicious!

Summer Vegetable Stir Fry
Makes 2-3 servings

Cooked bratwurst, kielbasa or other cooked sausage 
1 small yellow zucchini or yellow summer squash
1 small green zucchini
½ onion
1 small Roma tomato
2 ounces cheese (cheddar, Parmesan or whatever is on hand)
Salt and pepper to taste

Optional Additions:
1-2 tablespoons tomato paste
1/4 cup heavy cream

1. Cut up the cooked sausage into cubes. Cube the yellow and green zucchini, onion, and tomato. Shred the cheese. Set aside.

2. Sauté the onions and sausage in a nonstick skillet over medium heat until the sausage begins to color and the onion is translucent and beginning to brown.

3. Add the zucchini and sauté, stirring occasionally, until it begins to soften and pick up some color. Add some salt and pepper to season the vegetables.

4. At the very end of cooking, add the chopped tomatoes and shredded cheese. When you stir in the tomatoes, they released their juices, which mixes with melted cheese to make a light sauce. If you want a saucier dish, add the optional tomato paste and heavy cream; stir to incorporate.

5. Taste and adjust seasoning if needed. Serve immediately.

Nutritional Information per serving (1/3 of recipe, not including optional additions): 351 calories, 8.9 g carbohydrate (1.8 g dietary fiber, 4.1 g sugars), 27.9 g total fat (12.2 g saturated fat, 0 g trans fat), 67 mg cholesterol, 1156 mg sodium, 151.2 mg calcium, 235 mg potassium, 107 IU Vit A, 15 mg Vit C, 15.3 g protein. Net carbs per serving: 7.1 grams.

Recipe and Photo by Kathy Sheehan, copyright 2023
All rights reserved. Please do not duplicate without the author’s permission. 

Thursday, April 14, 2022

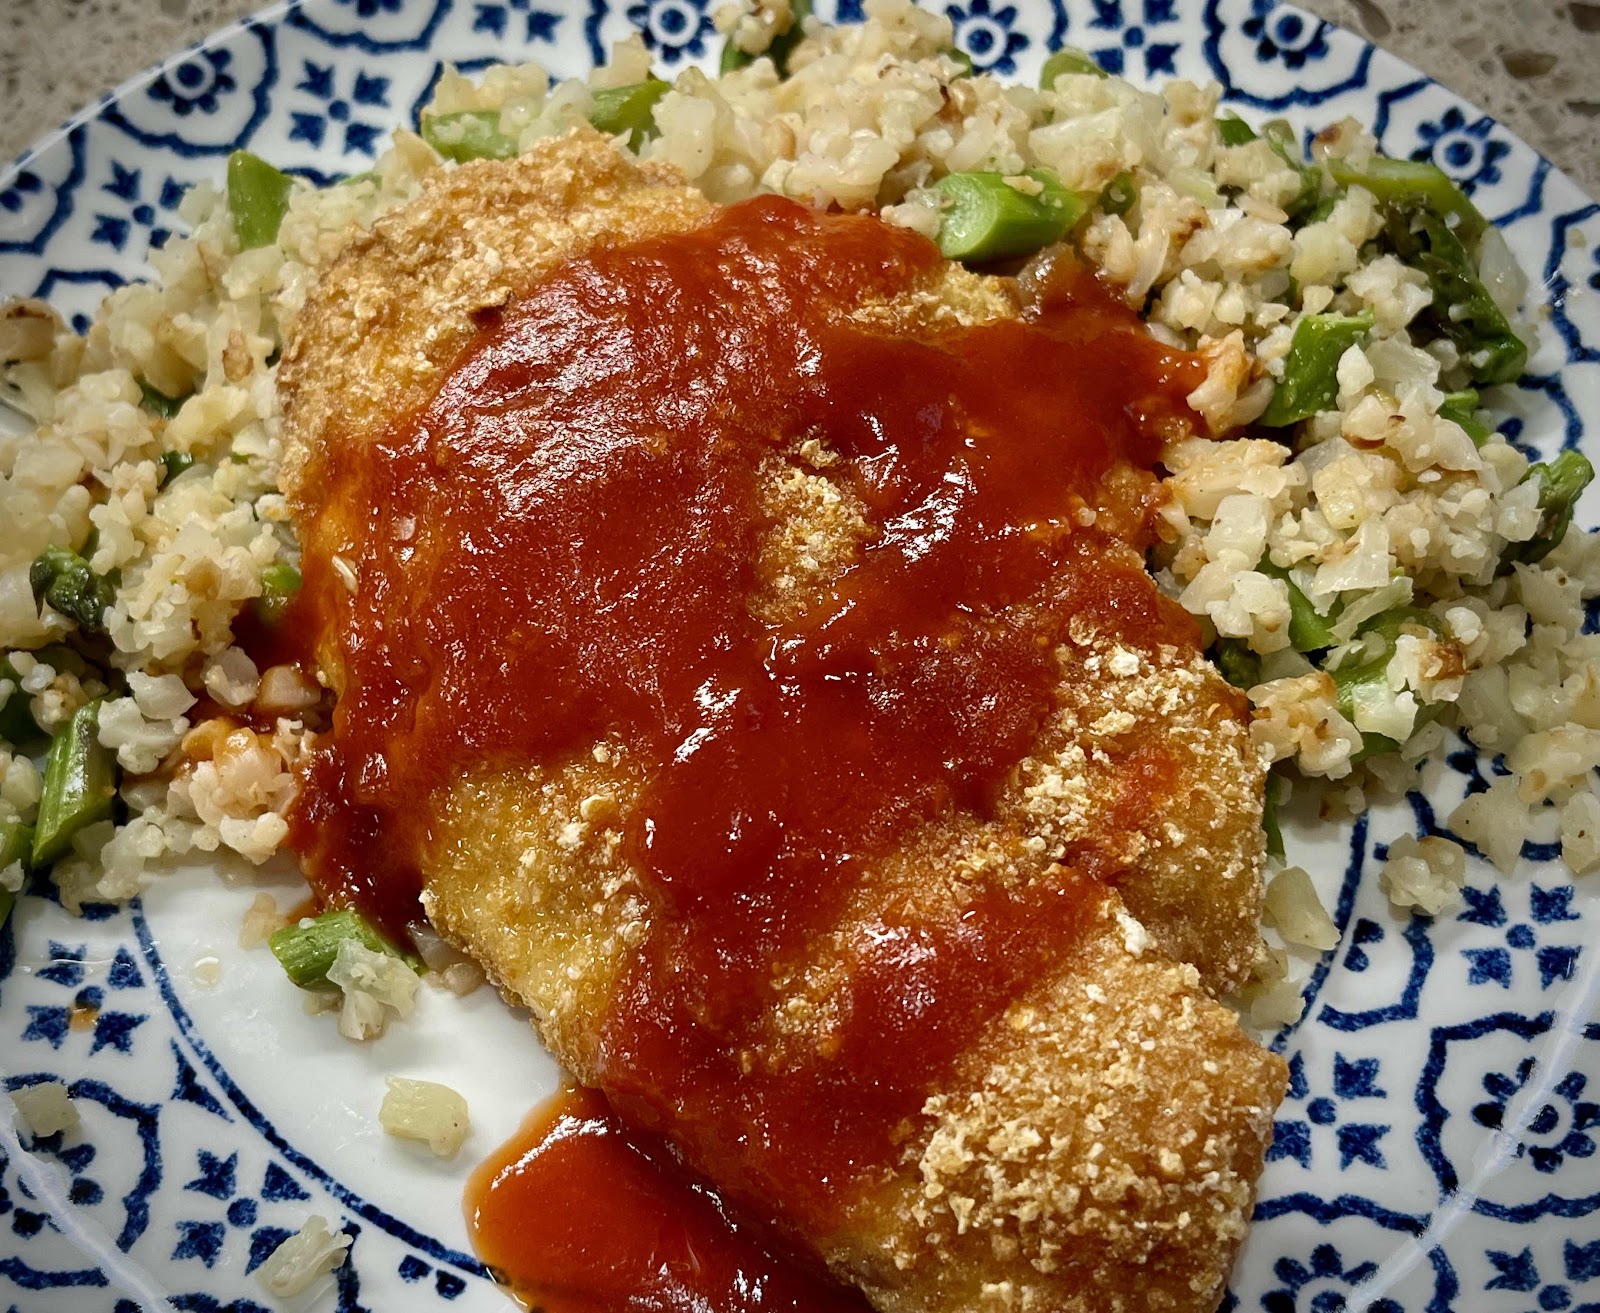
Keto Sweet and Sour Panfried Tilapia (or Sole)

Keto Sweet and Sour Panfried Tilapia
This Asian-inspired, sweet and sour fish is a quick and very tasty meal! I first saw something similar to this dish in an Asian cookbook, but of course it contained flour, breadcrumbs and sugar. This recipe has been revamped to include keto ingredients, making it a perfect choice for a low carb diet. If fish is not your thing, you can replace the fish fillet with a thin chicken cutlet. Serve the fried fish and sauce over cooked riced cauliflower or radishes that have been cut into matchsticks and sautéed in a pan with onions.

Keto Sweet and Sour Panfried Tilapia (or Sole)
Makes 4 servings

2 tablespoons water
2 teaspoons rice vinegar
2 teaspoons soy sauce (or gluten free tamari sauce)
2 tablespoons no-sugar-added ketchup (I use Primal Kitchen brand)
3/4 teaspoon toasted sesame oil
2 teaspoons allulose or monkfruit sweetener
1/4 teaspoon cornstarch (or a pinch of xanthan gum)
1 large egg
1/3 cup unflavored whey protein powder
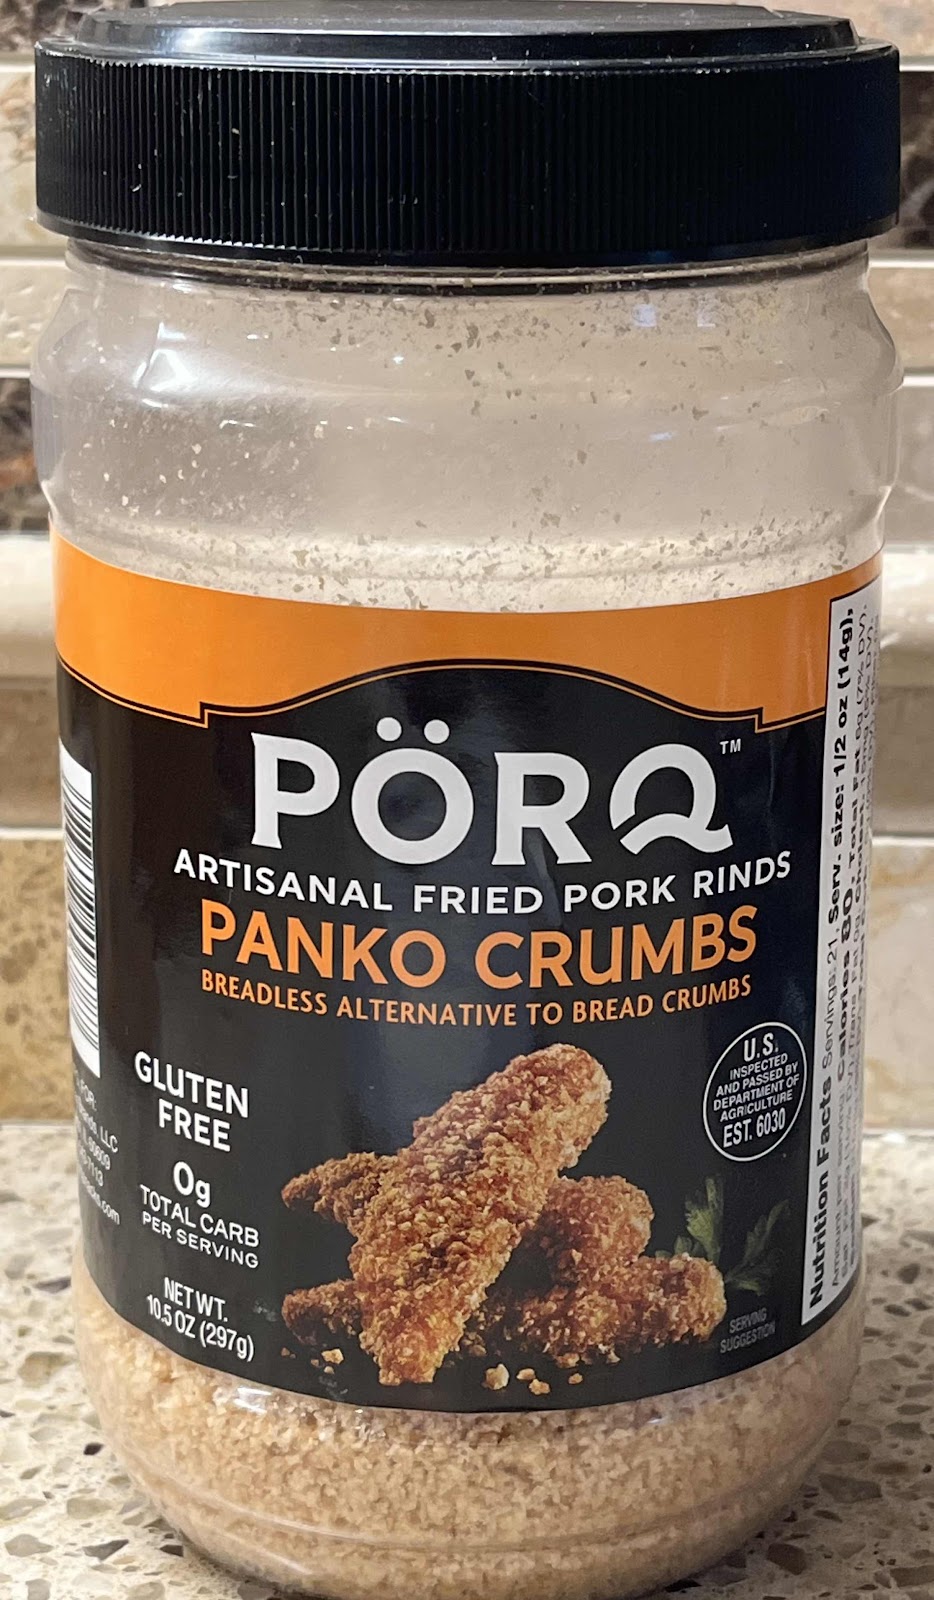
1 cup pork rind Panko
Salt and pepper
4 tilapia fillets (or sole), between 1 and 1-1/2 pounds
3 tablespoons refined coconut oil or avocado oil for frying

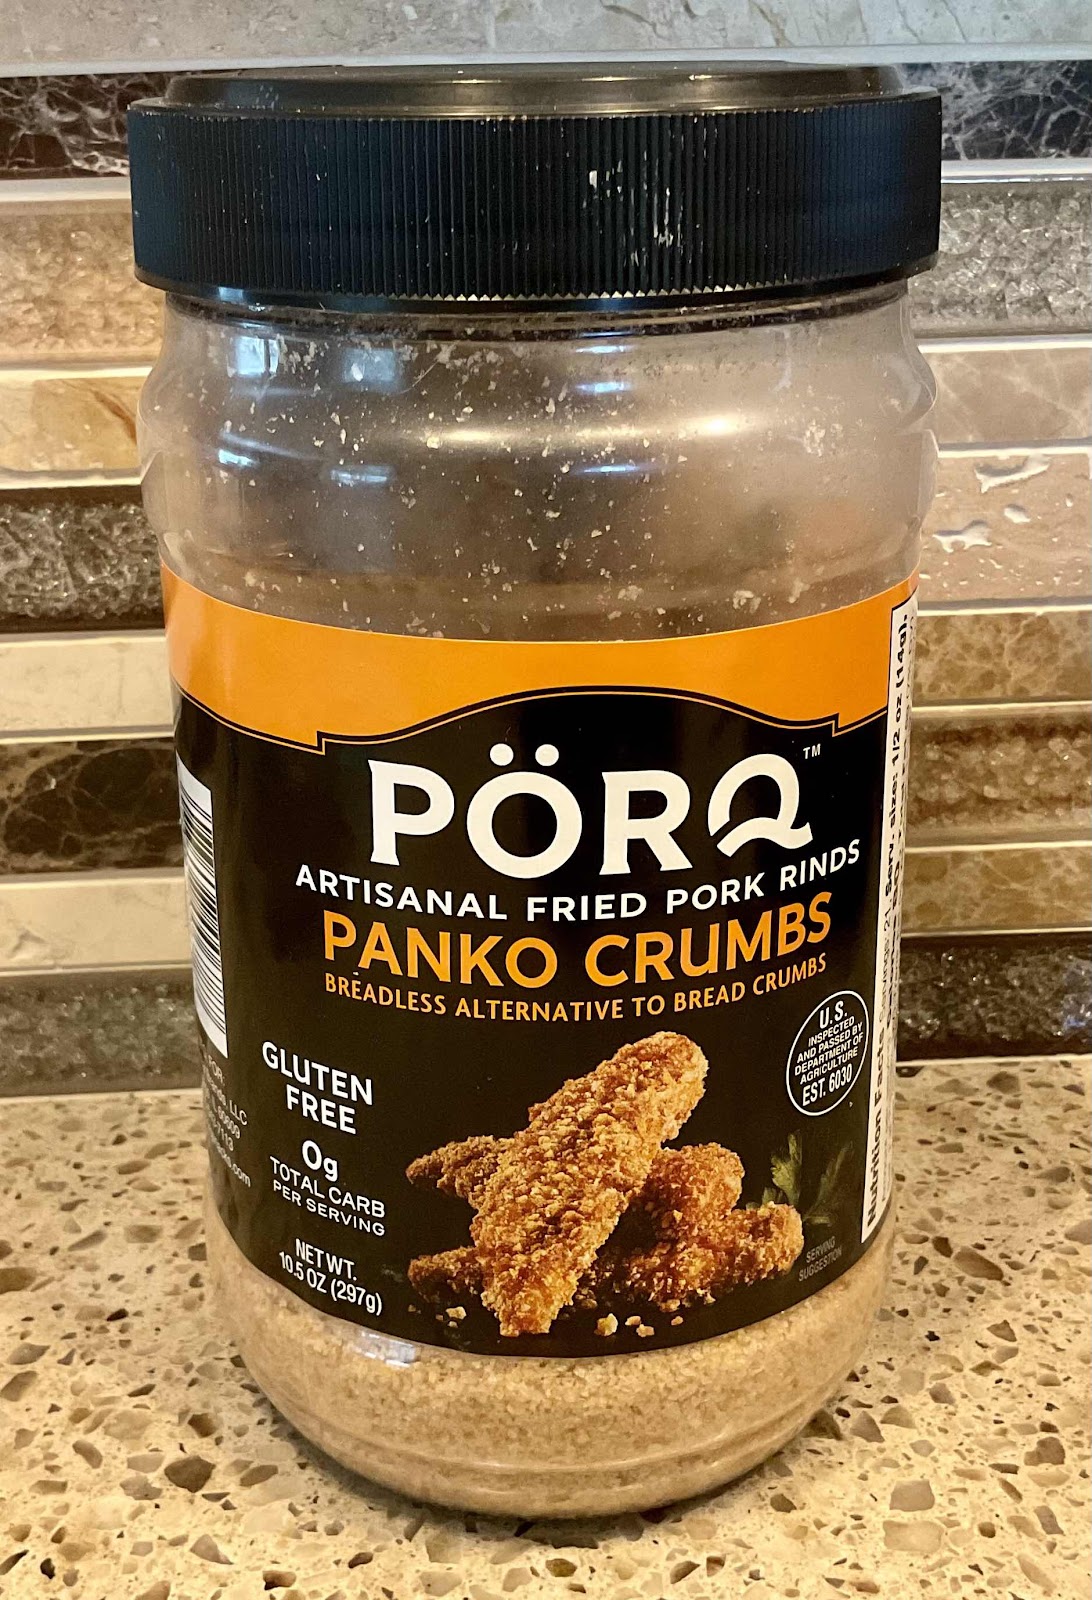
Pork Rind Panko
1. Make the sauce: In a small saucepan over low heat, stir together the 2 tablespoons water, rice vinegar, soy sauce, ketchup, sesame oil, allulose and cornstarch or xanthan gum. (If the sauce is too thick, add a little water to thin it out a bit.) Set aside.

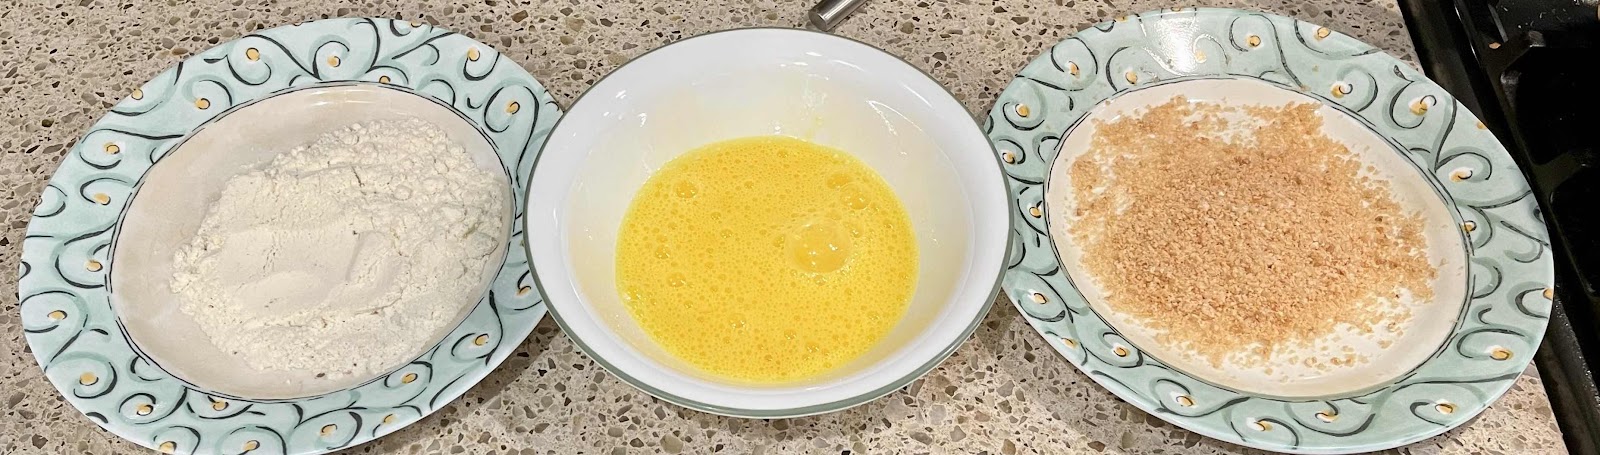
2. In a shallow bowl, whisk the egg. Spread the whey protein powder and pork rind Panko on two separate plates. Season the whey protein powder with salt and pepper. Set up your dipping station in the following order: whey protein powder, beaten egg, then followed by the pork rind Panko.

Dipping Station
3. Just before frying, pat the fish fillets with a paper towel to remove any excess moisture. Dip them first into the seasoned whey protein powder and shake off any excess, then the egg, and finally in the pork rind panko, coating evenly each side.

4. Heat a large, nonstick frying pan over medium-high heat until hot and add the refined coconut oil or avocado oil. Swirl your pan around to distribute the oil evenly in the pan. Add the fish and fry the first side about 4 minutes until golden. Very carefully, turn the fish fillets over and fry on the second side 3 to 4 minutes until golden. Serve immediately with the warm sauce.

5. Serving Suggestion: Serve the fried fish and sauce over cooked rice cauliflower or radishes that have been cut into matchsticks and sautéed in a pan with onion.

Keto Sweet and Sour Tilapia with radishes
Nutritional Information per 1 fish fillet with sauce (no vegetables): 334 calories, 2.6 g carbohydrate (0 g fiber, 0.7 g sugars), 10.5 g total fat (3 g saturated fat, 0 g trans fat), 123 mg cholesterol, 447 mg sodium, 35.7 mg calcium, 377 mg potassium, 1 mg iron, 50 IU Vit A, 35 g protein. Net carbs: 2.6 grams.

Photos and recipe by Kathy Sheehan, copyright 2022
All rights reserved. Please do not copy without the author’s permission.

Thursday, March 10, 2022

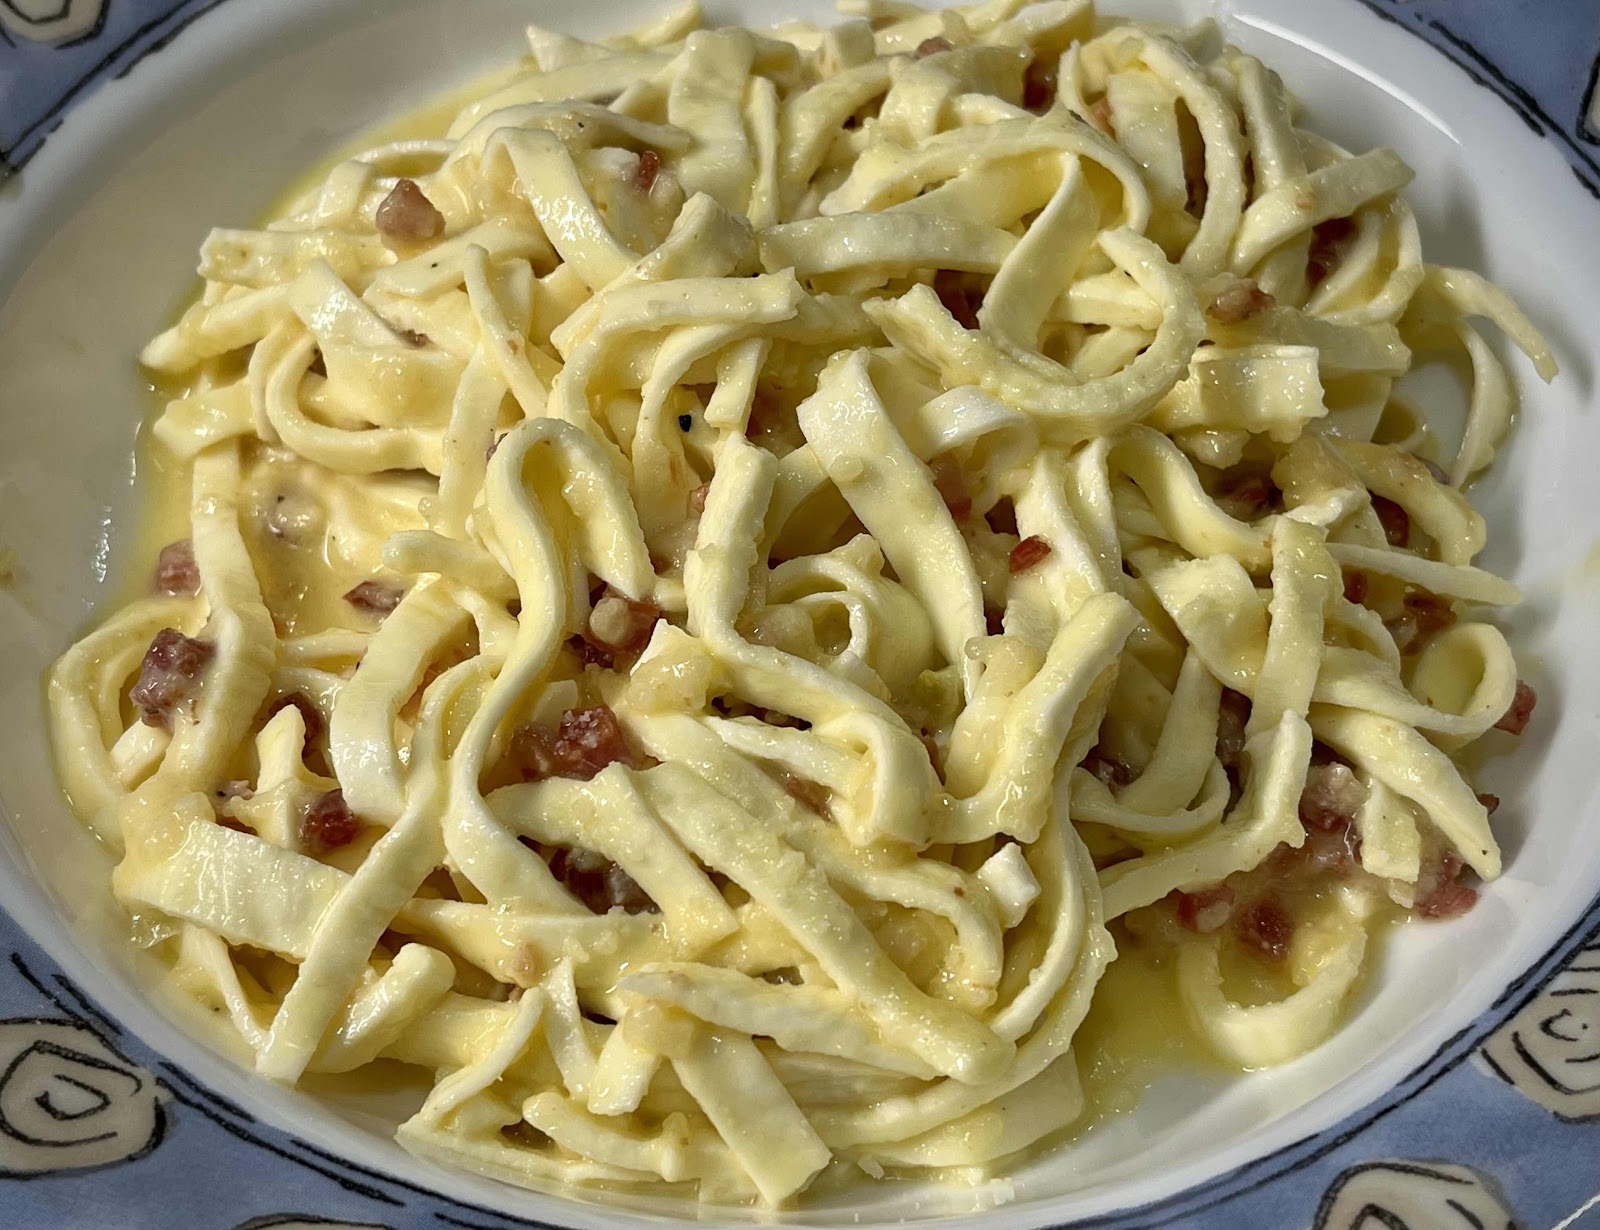
Keto Carbonara (Made with Egglife Wrap Noodles)

Keto Carbonara (Made with Egglife Wrap Noodles)
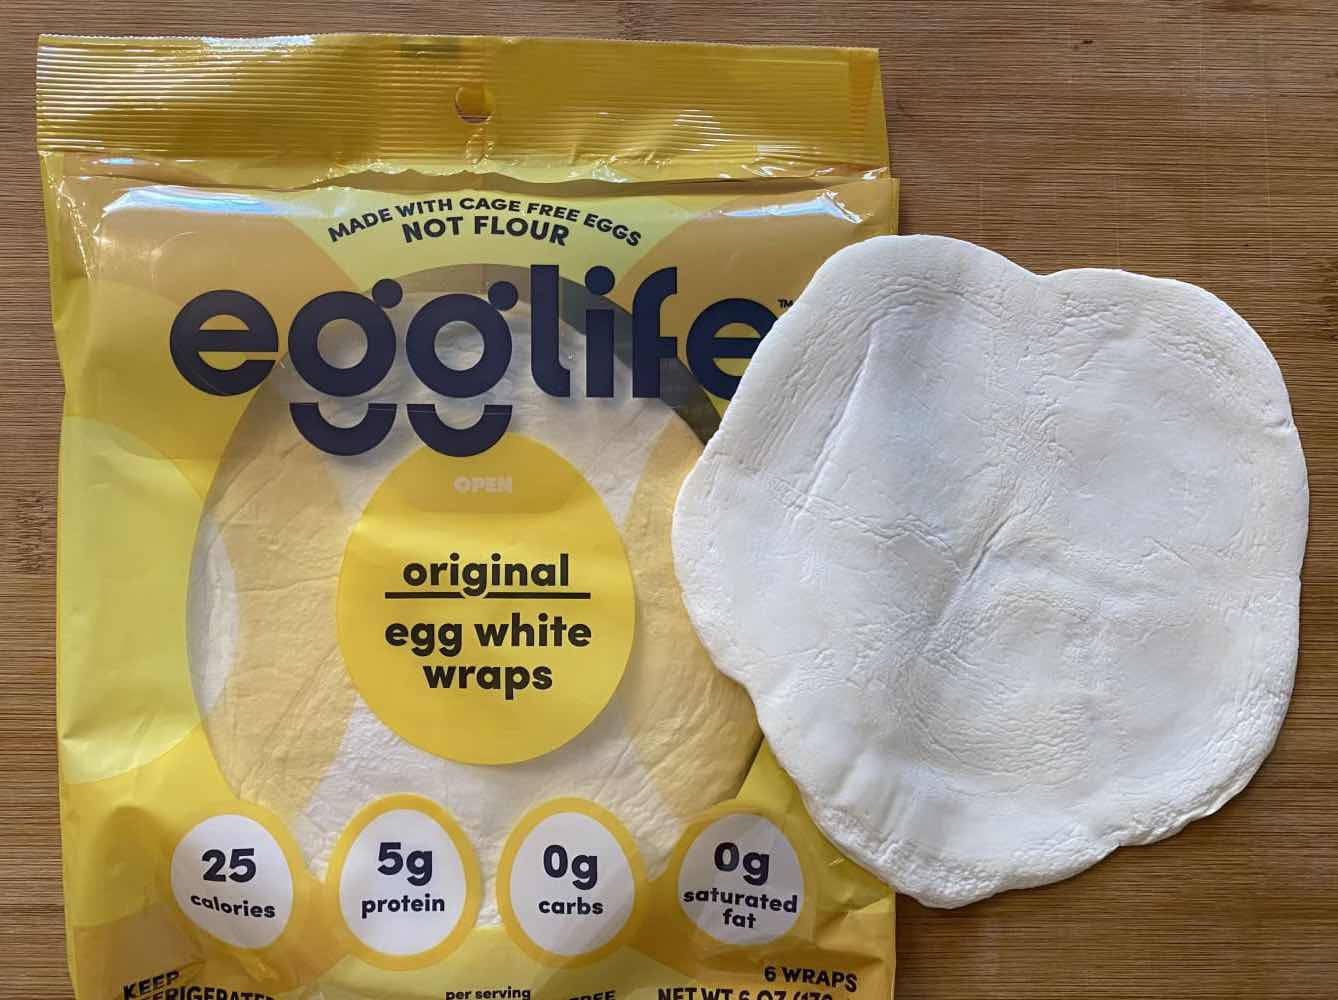
I recently made Carbonara using three Egglife wraps that I cut into thin strips using a pizza cutter. The result was very good! I have to admit that this idea of using Egglife wraps as noodles is not my own. I saw a post on Facebook that inspired me. I thought it was ingenious! So, I tried it with my homemade carbonara recipe and I like the way it turned out. The Egglife wraps, by themselves, are pretty plain. They do not impart much flavor, so using them as a wrap in anything other than a breakfast burrito is not appealing to me. But when cut into thin strips, I think they make a pretty good egg noodle substitute. I will definitely be trying this again in other recipes that call for egg noodles, such as stroganoff. This recipe is convenient and quick to throw together anytime you need a “fast food” dinner. (To find out where you can buy Egglife Wraps in your area, check out the Store Locator on their website here.)

Keto Carbonara (Made with Egglife Wrap “Noodles”)
Makes 1 generous serving (or two side dish servings)

3 plain Egglife Wraps, cut into thin strips
2 ounces pancetta, cut into small cubes (or bacon)
2 cloves garlic, minced
1 egg
6 tablespoons grated Parmesan cheese
Ground black pepper to taste

1. In a small, heavy saucepan, boil some water. Cut three plain Egglife wraps into thin strips using a pizza cutter or sharp knife, about the width of fettuccine noodles; set aside. In a small bowl, whisk together one egg and 6 tablespoons of grated Parmesan cheese. Add pepper to taste; set aside.

Egglife Wraps
2. In a skillet, sauté 2 ounces of cubed pancetta until it has rendered its fat and is beginning to brown. Add two finely chopped or minced cloves of garlic and stir until fragrant. Remove from heat.

3. Once the water has boiled, drop the Egglife ”noodles” into the water for 15 seconds. Reserve about 1/4 cup of the boiling water. Drain the noodles and set aside.

4. To the now empty, but still hot saucepan, add the sautéed pancetta, including any rendered fat. Add the egg/Parmesan mixture and a little bit of the reserved hot water and whisk into a sauce. (Only add enough water to create a smooth, but still slightly thick sauce.) Add the drained Egglife noodles and toss until the noodles are well coated. Serve immediately.

Nutritional Information per entire recipe (1 generous serving): 521 calories, 3.5 g carbohydrate (0.2 g dietary fiber, 0.2 g sugars), 35 g total fat (14.8 g saturated fat, 0 g trans fat), 258 mg cholesterol, 1761 mg sodium, 446 mg calcium, 336 mg potassium, 1 mg iron, 139. IU Vit A, 43 g protein. Net carbs per serving: 3.3 grams

Photo and recipe by Kathy Sheehan, copyright 2022
All rights reserved. Please do not duplicate without the author’s permission. 

Wednesday, February 16, 2022

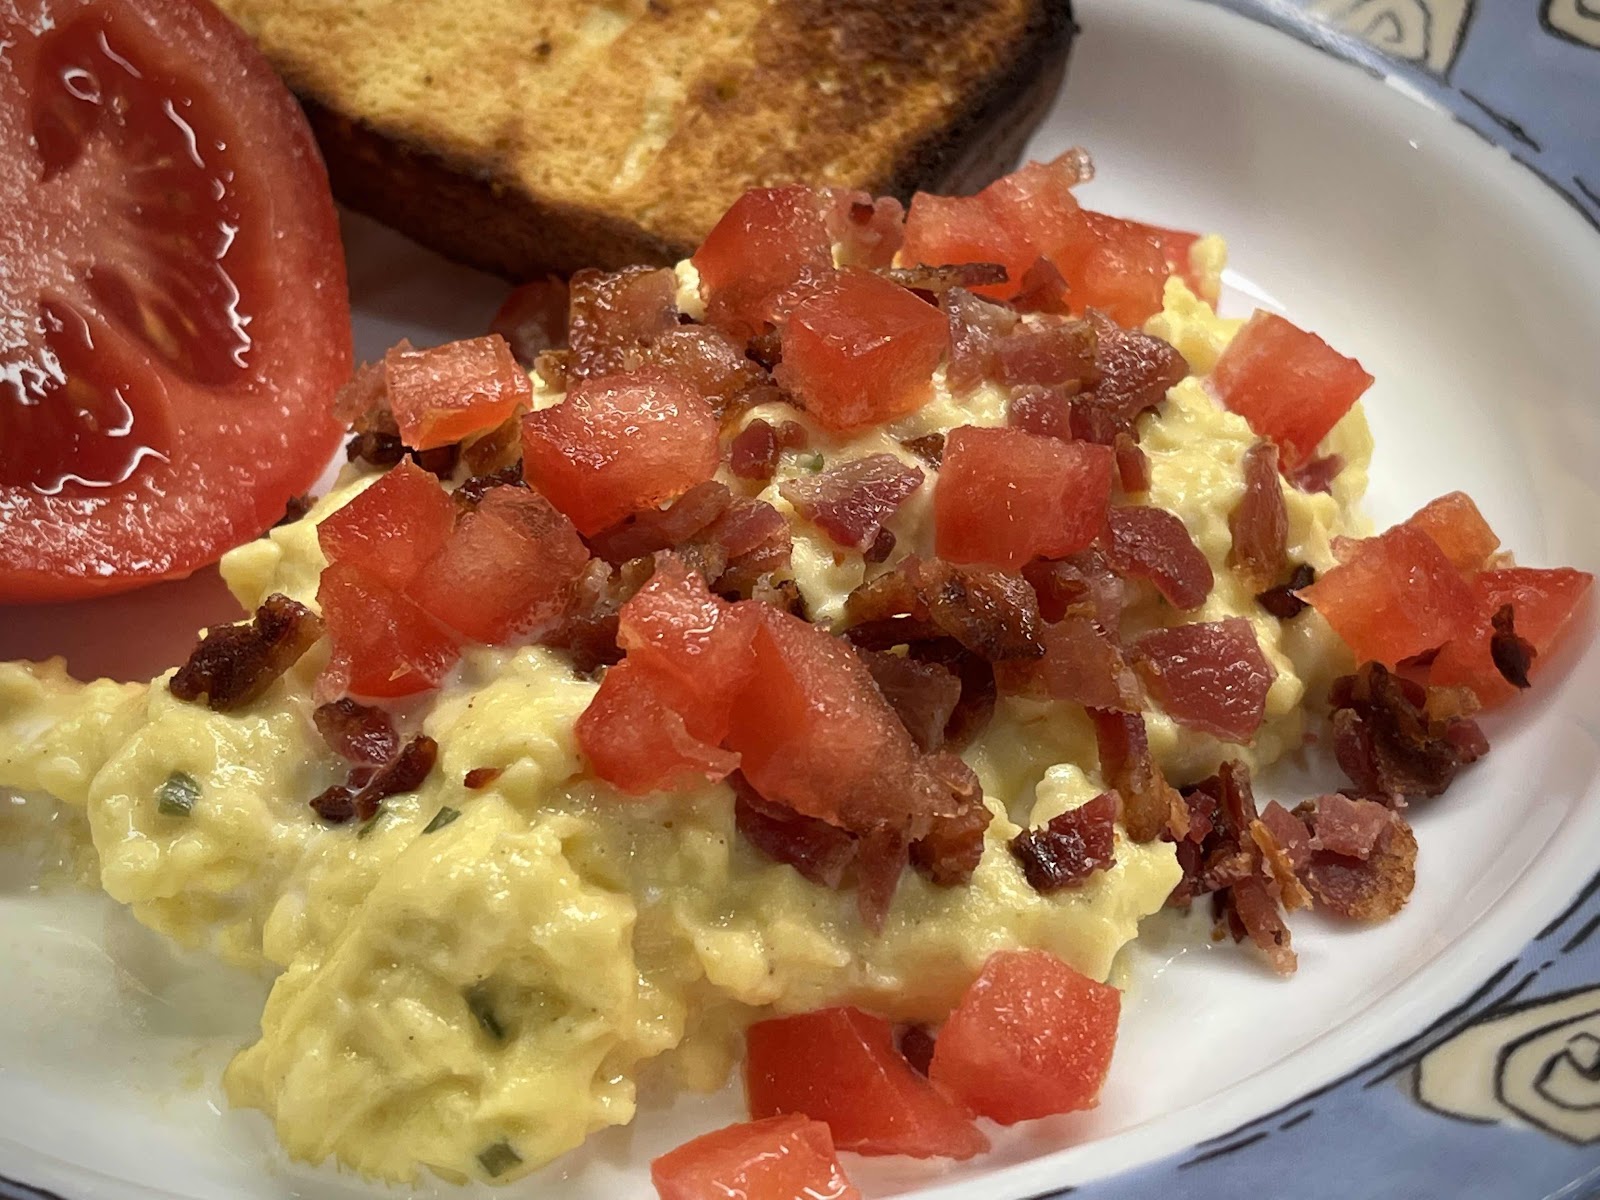
French Style Stirred Scrambled Eggs with Smoked Salmon or Bacon

French-Style Stirred Scrambled Eggs
I eat eggs nearly every morning for breakfast, so it can get boring after a while! I always love trying new ways to prepare eggs and make my breakfast more exciting. I came across this technique for making soft, silky, decadent scrambled eggs and I am in love! The trick is to cook them over low heat and stir them constantly with a whisk. As soon as they are beginning to set and are still soft, remove them from the heat. I think this is going to be one of my very favorite ways of preparing eggs from now on!

French-Style Stirred Scrambled Eggs with Smoked Salmon or Bacon
Makes 2 servings

4 large eggs
1/8 to 1/4 teaspoon salt, to taste
1/8 teaspoon white pepper (or black pepper), or to taste
3 tablespoons heavy cream, divided
1 ounce smoked salmon, diced (or 2 slices cooked bacon, diced)
1 tablespoon unsalted butter

Optional Garnishes: chopped fresh chives or other herbs, diced tomato, flaked sea salt

1. In a bowl, whisk together the eggs, salt, pepper and 1 tablespoon of heavy cream.

2. Place a nonstick skillet over low heat and add the unsalted butter. When the butter is melted, swirl it around in the pan. Add the eggs and stir with a whisk continuously until just set, but still soft. Stir in the remaining 2 tablespoons of heavy cream. Remove from the heat and divide evenly into two serving bowls or ramekins.

3. Top with the diced smoked salmon or bacon and any other garnishes you desire. Drizzle with a tiny bit of additional heavy cream and serve immediately.

Stirred Scrambled Eggs with Bacon and Tomato
Nutritional Information per serving (1/2 recipe): 286 calories, 1 g carbohydrate (0 g dietary fiber, 0.4 g sugars), 24.9 g total fat (12.2 g saturated fat, 0 g trans fat), 421 mg cholesterol, 556 mg sodium, 60.1 mg calcium, 165 mg potassium, 2 mg iron, 309 IU Vit A, 15.2 g protein.

Photos and recipe by Kathy Sheehan, copyright 2022
All rights reserved. Please do not copy without the author’s permission.

Saturday, December 4, 2021

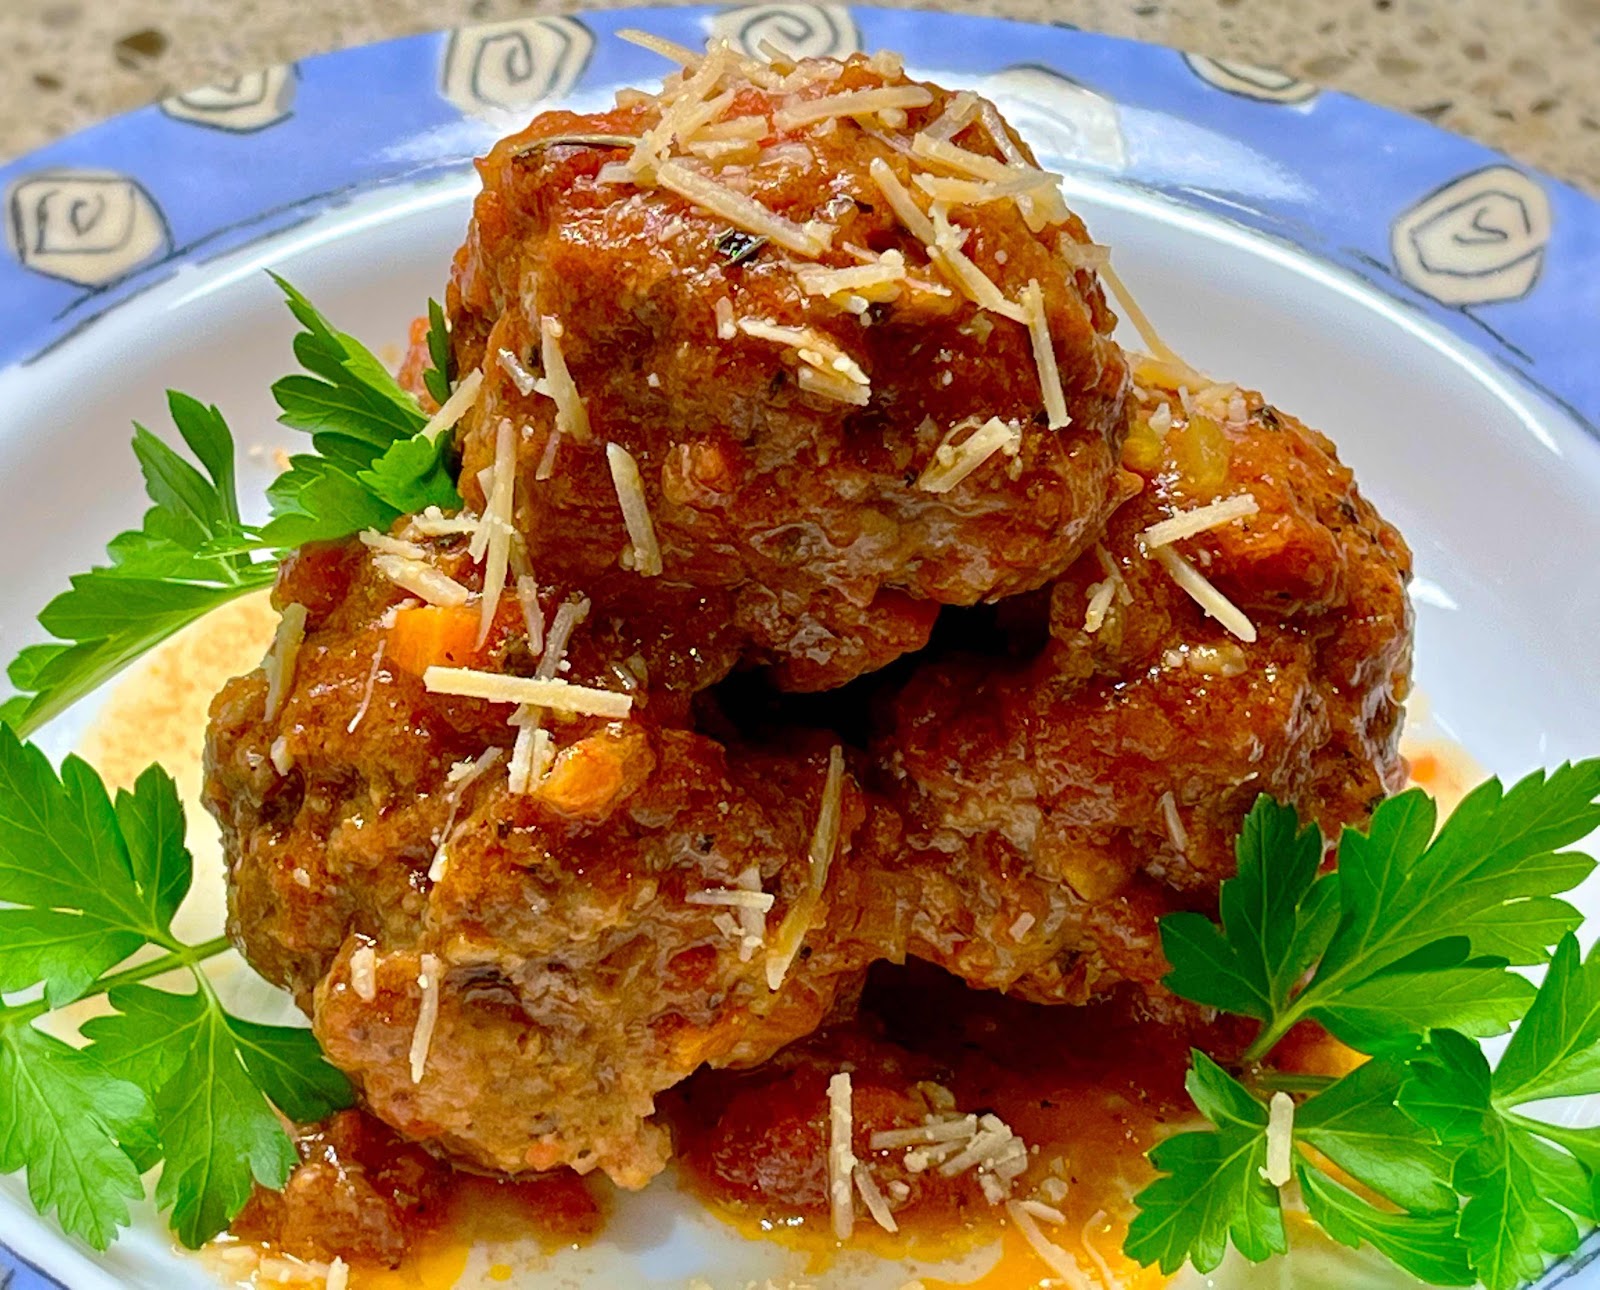
Keto Braised Italian Meatballs

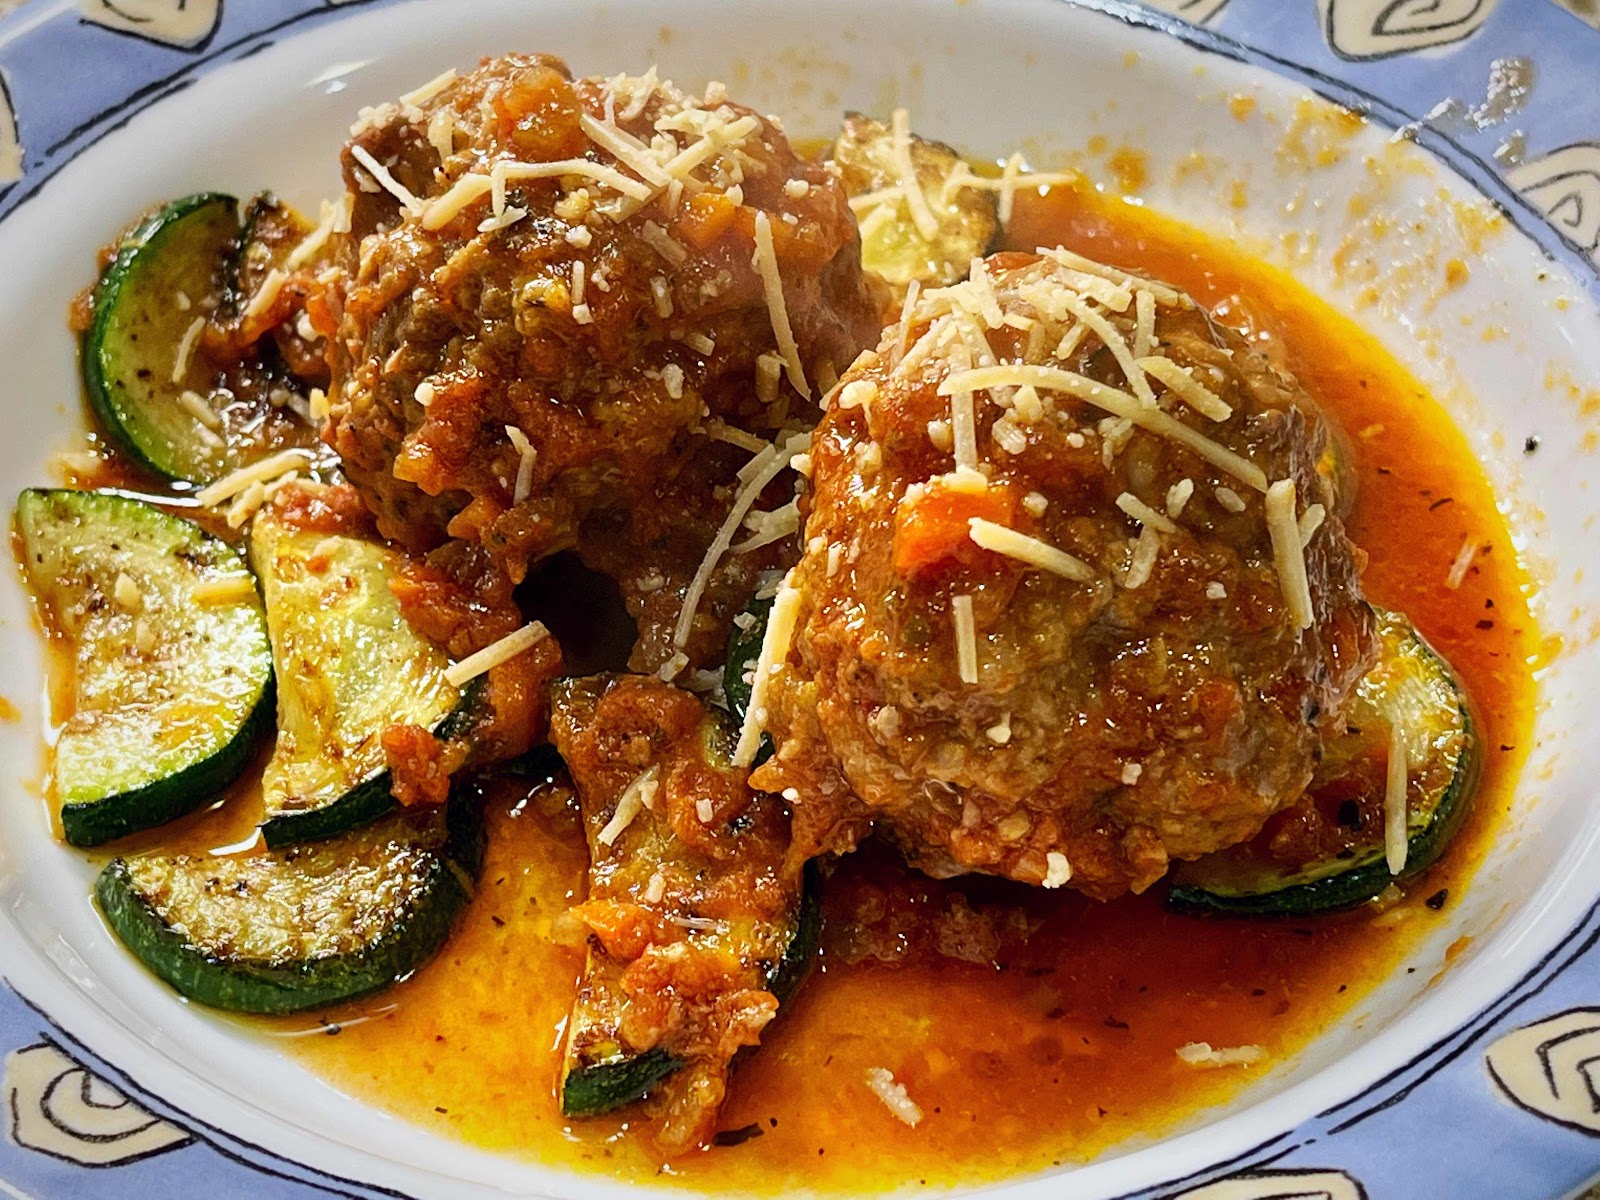
Braised Italian Meatballs
One year, when I vacationed in Italy, I found a restaurant that served the best meatballs I had ever tasted. They were tender and so flavorful! Since then, I discovered that braising meatballs, instead of baking or browning them in a skillet, is the best method for cooking them. Braising is a method of cooking in which the meat is simmered in a cooking liquid or, in this case, a delicious sauce. It is safe to add raw meat to the braising liquid as long as it continues simmering until the meatballs are cooked through. These are hearty, good-sized meatballs so, for me, two are plenty! The sauce is a light tomato-based sauce that also has wine and beef broth. As the meatballs cook in the sauce, a twofold exchange is going on: First, the meatballs become more flavorful by absorbing the sauce as they cook. Secondly, the sauce reduces and deepens in flavor as the meat releases its juices. I think you’ll agree with me that these tender and delicious meatballs are some of the best you’ve ever had!

Keto Braised Italian Meatballs
Makes 6 servings

Meatballs:
1/2 pound ground pork
1 pound ground beef
2 slices of low carb bread (or 2 chaffles), lightly toasted or dried out
1/2 cup riced cauliflower, thawed and excess liquid removed
1 egg
1 cup parmesan cheese, grated
1 teaspoon dried Italian herb seasoning
3/4 teaspoon fennel seeds

Sauce:
1 can (14.5 or 15 oz) diced tomatoes (with liquid), blitzed in a food processor to make a smooth sauce (or 1-1/2 cups tomato sauce)
1 tablespoon tomato paste
2 tablespoons olive oil
1/4 cup carrots, finely chopped
1/4 cup onions, finely chopped
1 stalk celery, finely chopped
2 cloves garlic, minced
1/4 teaspoon salt
1/2 teaspoon black pepper
1/2 teaspoon zero-carb brown sugar substitute, such as Swerve Brown
1 tablespoon fresh sage leaves, chopped (if using dried herbs, use 1/2 the amount called for)
1 tablespoon fresh thyme, chopped
1 tablespoon fresh parsley, chopped 
1/2 cup dry white wine
1 cup beef stock

1. Tear the dried low carb bread (or chaffles) into pieces and place in a food processor. Add the drained riced cauliflower and pulse together until crumbs; set aside.

2. Placed the ground pork and beef into a large bowl and mix well. Mix in the bread or chaffle crumbs, the egg and mix. Add the grated cheese, herbs and fennel seeds and mix well with your hands until all the ingredients are well distributed.

3. Using your hands, shape into meatballs about 2-1/2 inches in diameter or use slightly less than 1/3 cup measuring cup to form 12 equal-sized meatballs. Set aside. (This step can be done one day ahead and refrigerated. Allow the meatballs to sit at room temperature for at least 30 minutes before cooking.)

4. To make the sauce: Pour the diced tomatoes and tomato paste into the food processor and blitz until it forms a smooth sauce. Measure to make sure you have at least 1-1/2 cups of tomato sauce (a little more is fine); set aside.

5. Add the olive oil to a wide, deep, heavy sauce pan and warm over medium heat. Add the carrots, celery and onion. Stir and cook for 2 minutes. Add the garlic and stir briefly until fragrant.

6. Add the salt, pepper, brown sugar substitute, sage, thyme and parsley. Stir well and cook for 2 minutes. Stir in the wine and cook for 2 minutes. Add the tomato sauce mixture and beef stock; stir to combine. Increase heat to medium-high and bring to a boil. After reaching a boil, add the meatballs and return to a boil. Reduce the heat to medium-low or low and simmer, uncovered, for 35 minutes.

7. Carefully, remove the meatballs to a serving plate or bowl with a slotted spoon. If necessary, continue to boil and reduce the sauce until it reaches the desired consistency. For extra flavor and color, you may garnish with chopped chives or parsley.

Braised Meatballs with Zucchini
Nutritional Information per 2 meatballs with 1/2 cup sauce: 548 calories, 6 g carbohydrate (1.5 g dietary fiber, 2.8 g sugars), 33.1 g total fat (11.8 g saturated fat, 0 g trans fat), 191 mg cholesterol, 754 mg sodium, 235.5 mg calcium, 456 mg potassium, 11 mg iron, 416 IU Vit A, 12 mg Vit C, 53.8 g protein. Net carbs per serving: 4.5 grams

Photo and recipe by Kathy Sheehan, copyright 2021
All rights reserved. Please do not duplicate without the author’s permission.

Friday, May 7, 2021

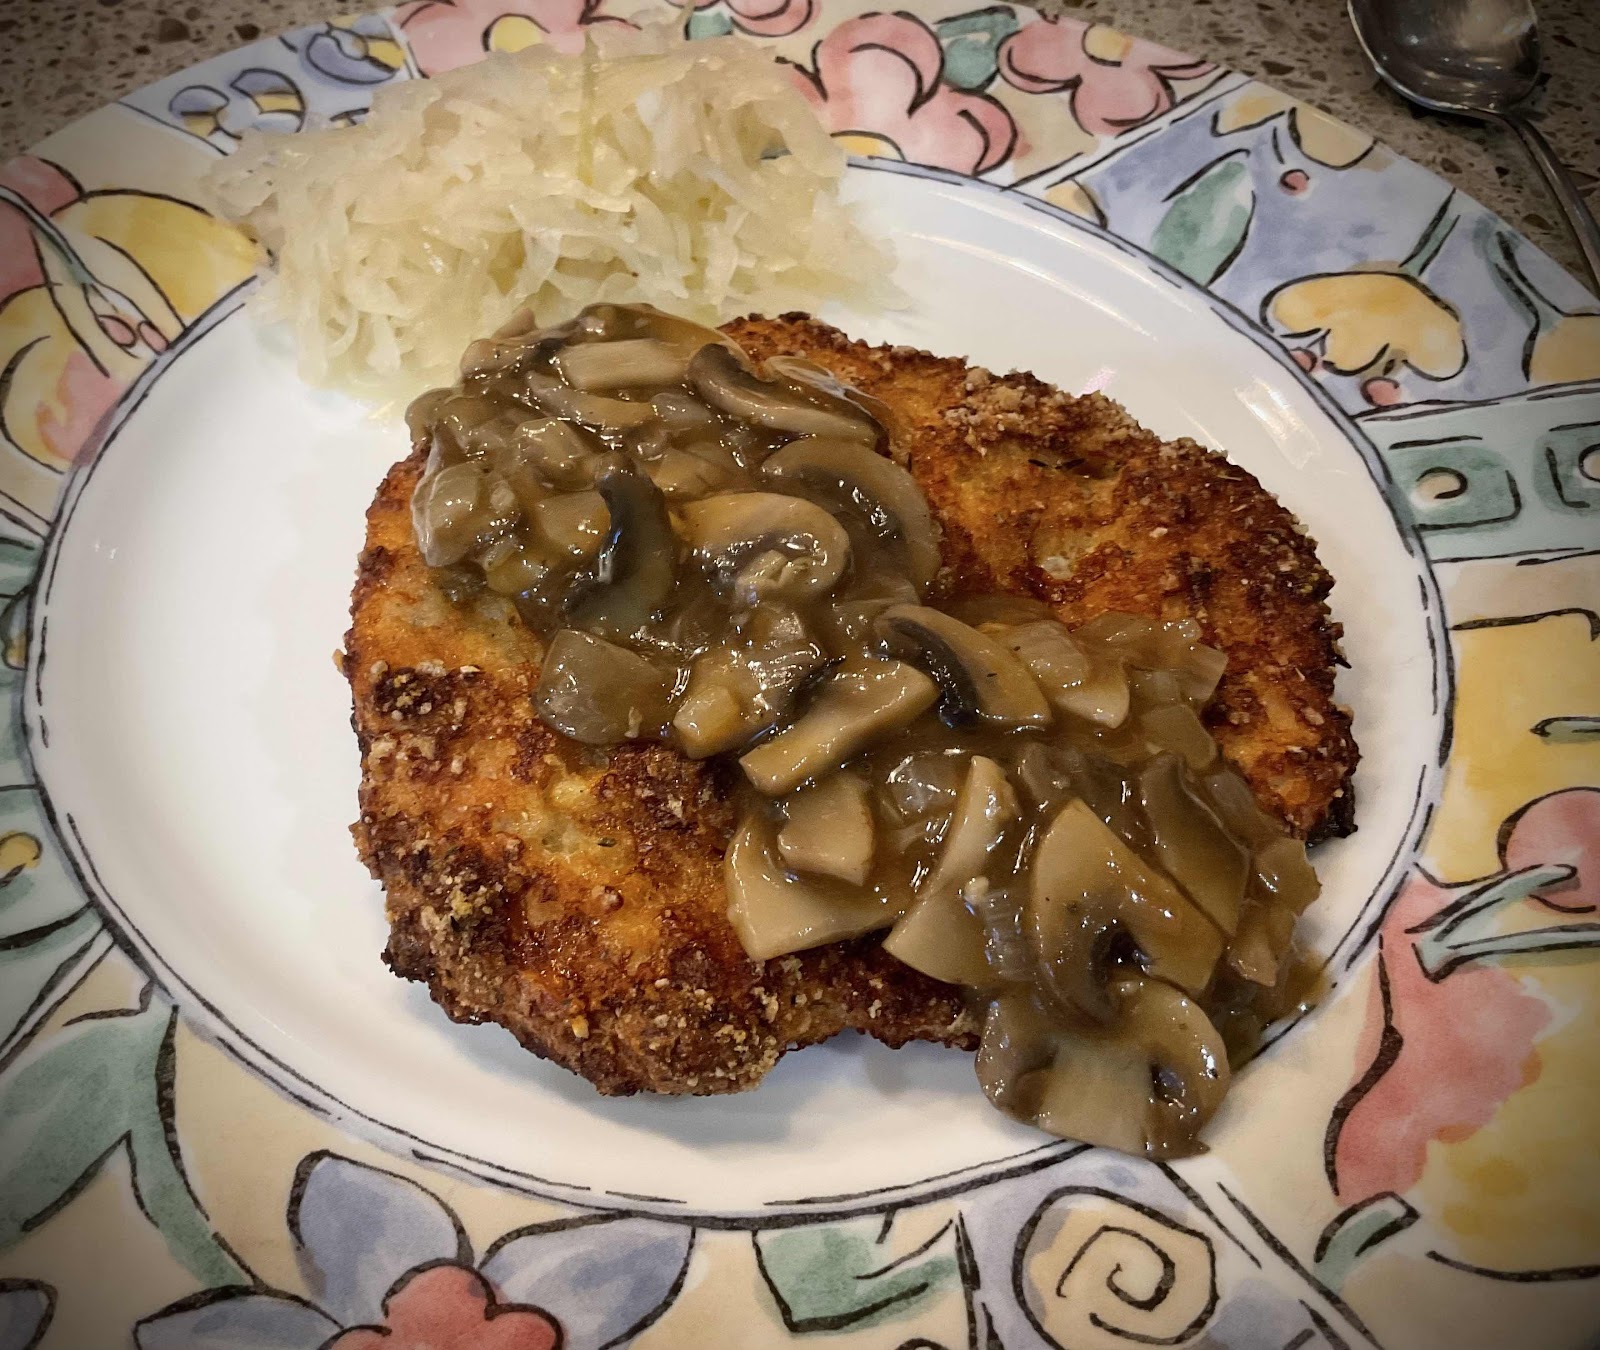
Schnitzel with Keto Brown Mushroom Gravy (Jagerschnitzel)

Schnitzel with Keto Brown Mushroom Gravy
My husband is a big fan of German cooking. I have tried other recipes for schnitzel that call for almond flour, but was always a bit disappointed in their soggy breading. I’ve been experimenting with using crushed pork rinds as breading and, so far, the results have been excellent! This pork rind breading is super crunchy and, even when reheated, remains crisp. I’m not a fan of pork rinds as a snack, but in this application, they are a winner! This schnitzel recipe has authentic flavor and texture. You can make it with your favorite cutlet, such as pork, chicken, turkey or veal. I’m sure you’ll be as pleased as my husband and this recipe will become a favorite of your family, too.

Schnitzel with Keto Brown Mushroom Gravy (Jagerschnitzel)
Makes 4 servings

Schnitzel:
1 pound boneless pork chops (or substitute chicken, turkey or veal)
1 1/2 cups crushed pork rinds (see notes)*
1/4 teaspoon salt
1/4 to 1/2 teaspoon black pepper
1/4 teaspoon dried thyme
1 large egg
1 tablespoon sour cream (omit for dairy free)
1/2 cup unflavored whey protein powder

Brown Mushroom Gravy:
1 tablespoon butter
1/2 onion, chopped
1 clove garlic, minced
8 ounces white button mushrooms, sliced
1 1/4 cups beef broth
1/4 teaspoon dried thyme (optional)**
1 teaspoon red wine vinegar (optional)**
1/4 to 1/2 teaspoon xanthan gum to thicken
Salt and pepper to taste

1. Prepare the 3-step dredging station by placing the whey protein powder onto a plate. In a small bowl, whisk together the egg and sour cream and pour onto a second plate. Finally, stir together the crushed pork rinds, salt, pepper and thyme and pour onto a third plate. Preheat the oven to 425 degrees Fahrenheit. 

2. Cut the pork chops in half horizontally and pound thin between two pieces of plastic wrap, to about 1/4 inch thickness. Set aside while you start the mushroom gravy. 

3. Melt the butter in a 10 or 12 inch skillet. Add the onion and heat over medium heat until softened and translucent. Add the garlic and stir for about 1 minute. Add the sliced mushrooms and sauté until all the liquid has evaporated and the mushrooms are nicely browned. Add the beef broth, thyme and vinegar. Bring to a simmer and allow to cook and reduce, stirring occasionally, while you prepare the schnitzel.

4. Line a baking sheet with foil and spray generously with non-stick cooking spray. 

5. Pat any excess moisture from the cutlets with a paper towel. Dredge each cutlet by first dipping into the whey protein powder on both sides and shaking off the excess. Next, dip the cutlet into the egg mixture and coat both sides. Lastly, place it in the third plate with the pork rind breading, turning to coat both sides. Place the dredged cutlet onto the prepared baking sheet. Repeat with the remaining cutlets. 

6. Place the baking sheet into the preheated oven on the middle rack and cook for 20 minutes. Meanwhile, finish the gravy.

7. Sprinkle the xanthan gum over the simmering gravy and stir briskly until dissolved and the gravy thickens. Season with salt and pepper to taste.

8. At the end of the 20 minutes of cooking, if the breading on the cutlets is not sufficiently browned and crispy, then broil for a few minutes until deeply golden brown. Serve immediately, topped with the mushroom gravy.

Crushed Pork Rind Crumbs
Notes: 
*Pork rinds conveniently come already crushed in panko-style crumbs! Look for them near the breadcrumbs or in the gluten-free section of your grocery store.

**If you want to make a plain, brown gravy, you may omit the thyme and vinegar. Personally, I like the very slight acidity the vinegar adds to the gravy, but if you don’t, then just leave it out.

Nutritional Information per serving of schnitzel (4 oz. cutlet, no gravy): 358 calories, 0.4 g carbohydrate (0 g fiber, 0 g sugars), 19.3 g total fat (7.4 g saturated fat, 0 g trans fat), 147 mg cholesterol, 378 mg sodium, 43.2 mg calcium, 545 mg potassium, 1 mg iron, 29 IU Vit A, 43.8 g protein. Net carbs per serving: 0.4 grams

Nutritional Information per 1/2 cup gravy: 51 calories, 4.1 g carbohydrate (0.9 g dietary fiber, 1.9 g sugars), 3 g total fat (1.8 g saturated fat, 0 g trans fat), 10 mg cholesterol, 354 mg sodium, 7.8 mg calcium, 206 mg potassium, 0 mg iron, 1 IU Vit A, 2 mg Vit C, 2.7 g protein. Net carbs per serving: 3.2 grams

Photos and recipe by Kathy Sheehan, copyright 2021
All rights reserved. Please do not duplicate without the author’s permission. 

Tuesday, May 12, 2020

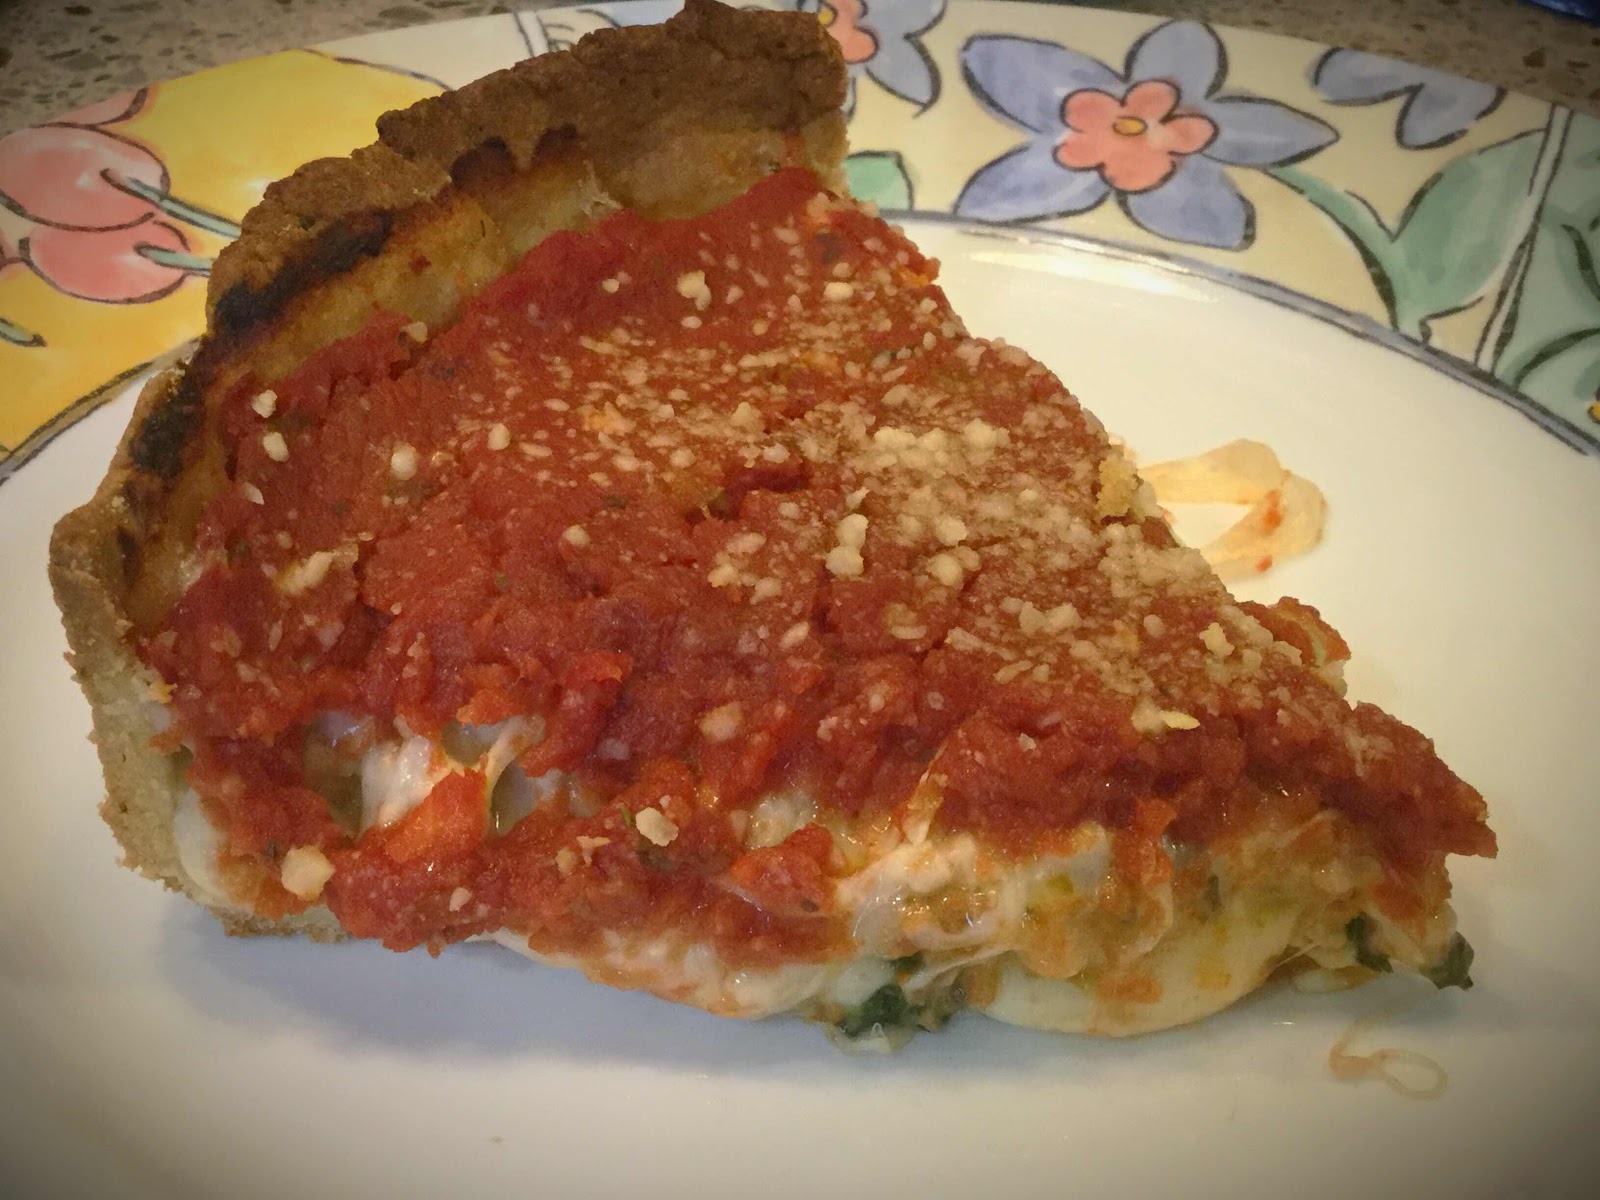
Low Carb Deep Dish, Chicago-Style Sausage Pizza

Low Carb Deep Dish, Chicago-style Pizza
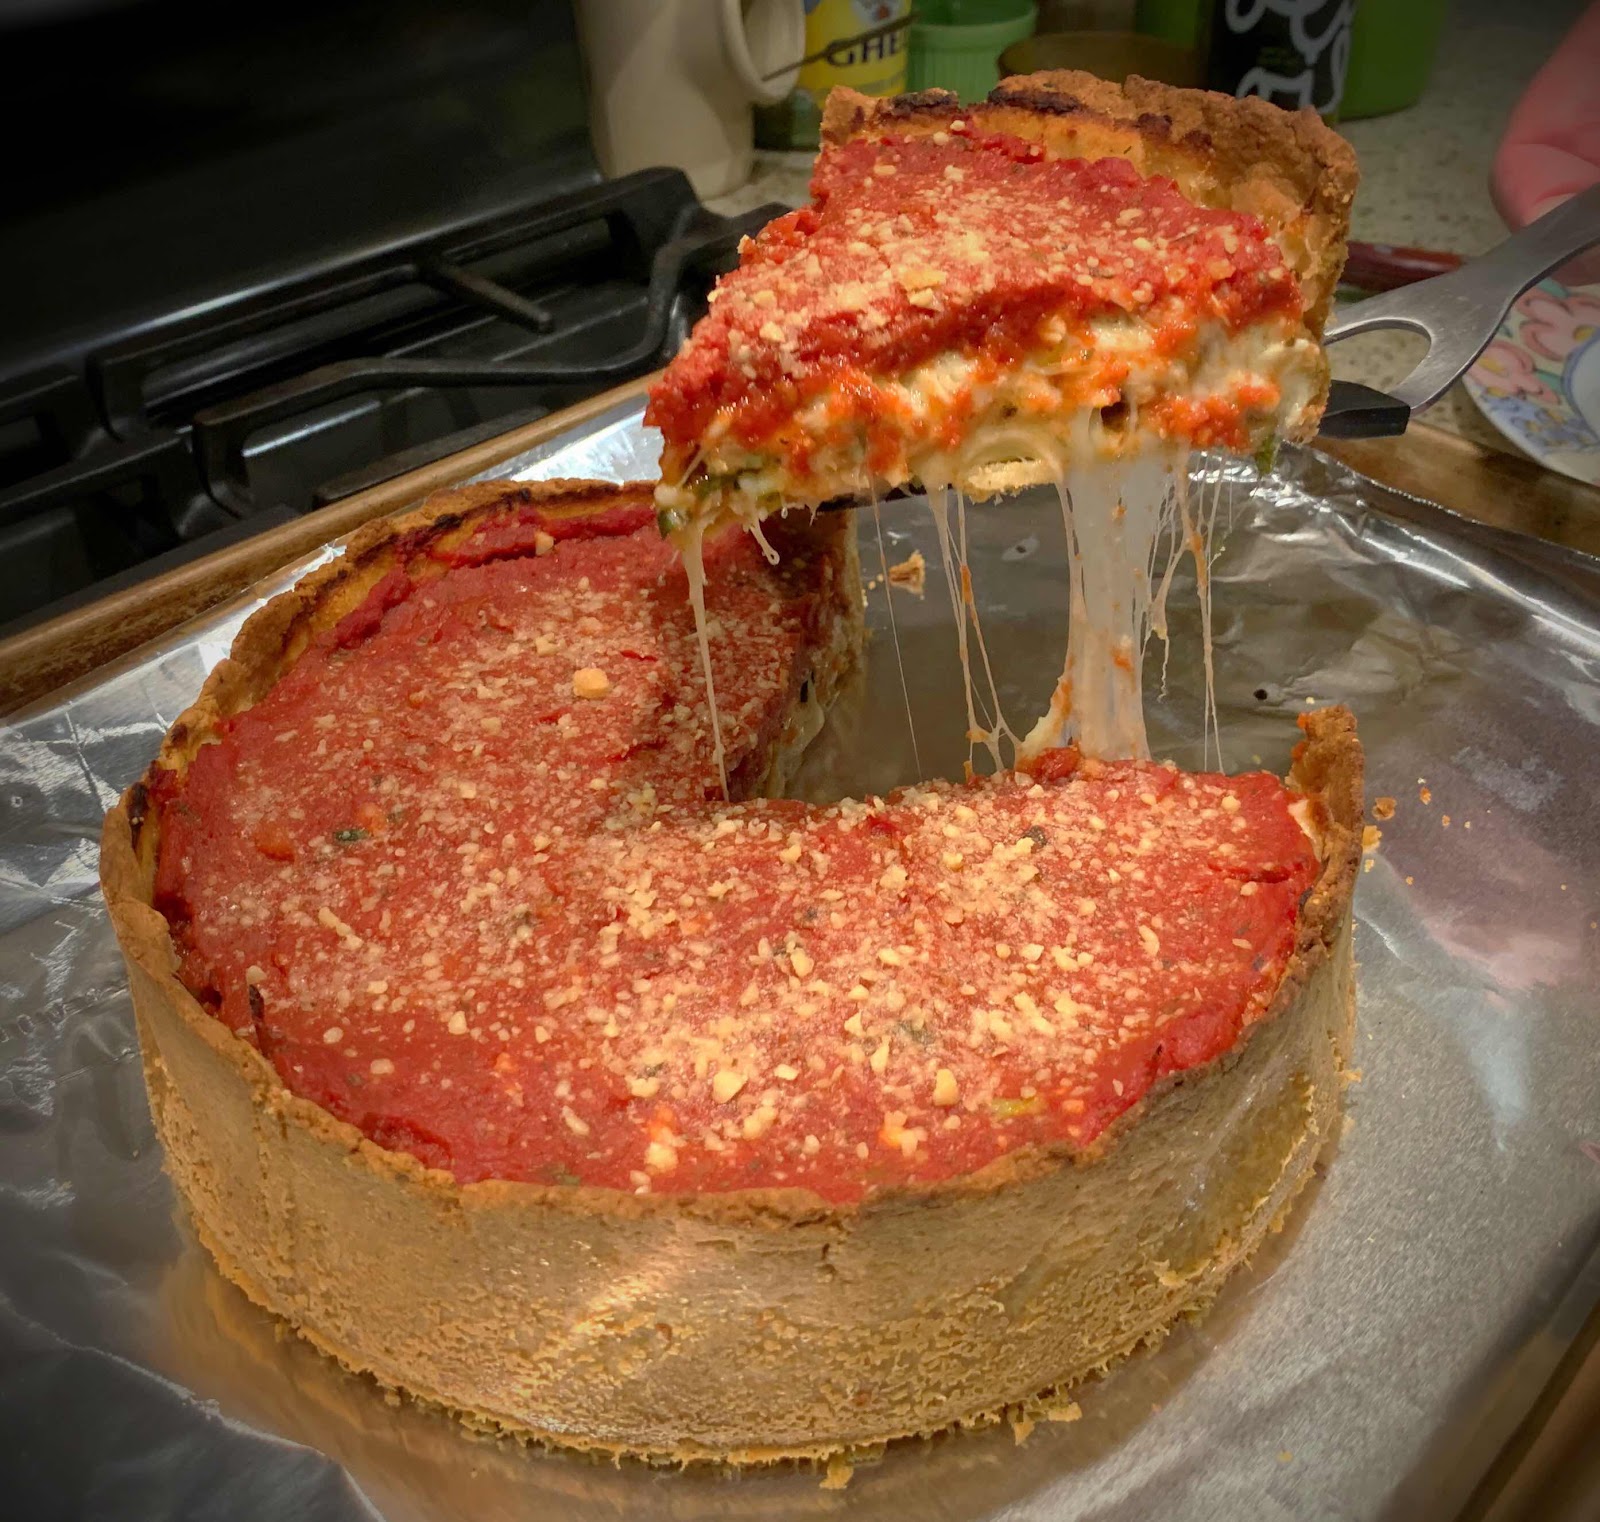
This is one of the most outstanding recipes I’ve ever made and tastes so much like the real thing, no one will be able to tell it’s low carb and gluten free. The dough comes together quickly in a food processor and really holds up during the baking process. The result is a crisp crust overflowing with gooey, melted cheese, savory Italian sausage and tangy tomato sauce in every bite. Believe me, if you like Uno’s Pizza, you and your family will be delighted with this copy-cat recipe. Fill the pizza with any fillings you desire to make it your own.

Low Carb Deep Dish, Chicago-Style Sausage Pizza
Makes 6 servings

Sauce:
26 oz. box of Pomi chopped tomatoes, drained of excess liquid (yields about 1 1/4 cup)
3 cloves garlic, minced
3/4 teaspoon dried oregano
1/4 teaspoon salt (or to taste)

Pizza Crust:
3/4 cup almond flour
3 tablespoons Keto Birch Benders Pancake Mix (or more almond flour)
1/4 cup coconut flour
1 tablespoon psyllium husk powder (I use this Terrasoul brand)
1 teaspoon baking powder
1/4 teaspoon salt
3/4 teaspoon dried Italian herb seasoning
3 tablespoons olive oil (or avocado oil)
1 large egg
3 tablespoons cold water
2 tablespoons grated Parmesan cheese (for dusting inside of pan)

Filling:
6 ounces provolone cheese, sliced
1 pound Italian pork sausage
Sliced black olives (optional)
Sliced mushrooms, heated in skillet until they release their moisture (optional)
6 ounces mozzarella, shredded (whole milk cheese melts better!)

Topping:
3/4 cup grated Parmesan cheese

1. Preheat the oven to 350 degrees Fahrenheit. Grease a 9-inch springform pan very well and sprinkle with 2 tablespoons of finely grated Parmesan cheese, moving the pan around until the bottom and sides are coated; set aside.

2. If using mushrooms, heat over medium heat in a dry skillet until the mushrooms have released their moisture; remove to a bowl and set aside. Remove the sausage from their casings and sauté in the same skillet, breaking up into crumbles, until just cooked through. Drain on a plate that has been lined with several layers of paper towels to remove excess fat; set aside. 

3. Pour the chopped tomatoes into a fine-mesh strainer that has been placed over a bowl to catch excess liquid. Drain, stirring occasionally with a spoon, until most of the liquid has been removed. You want a thick, chunky sauce. Place the tomato sauce into a bowl and add the garlic, oregano and salt; stir to combine and set aside. (Discard or store the drained liquid in the refrigerator for another use.) 

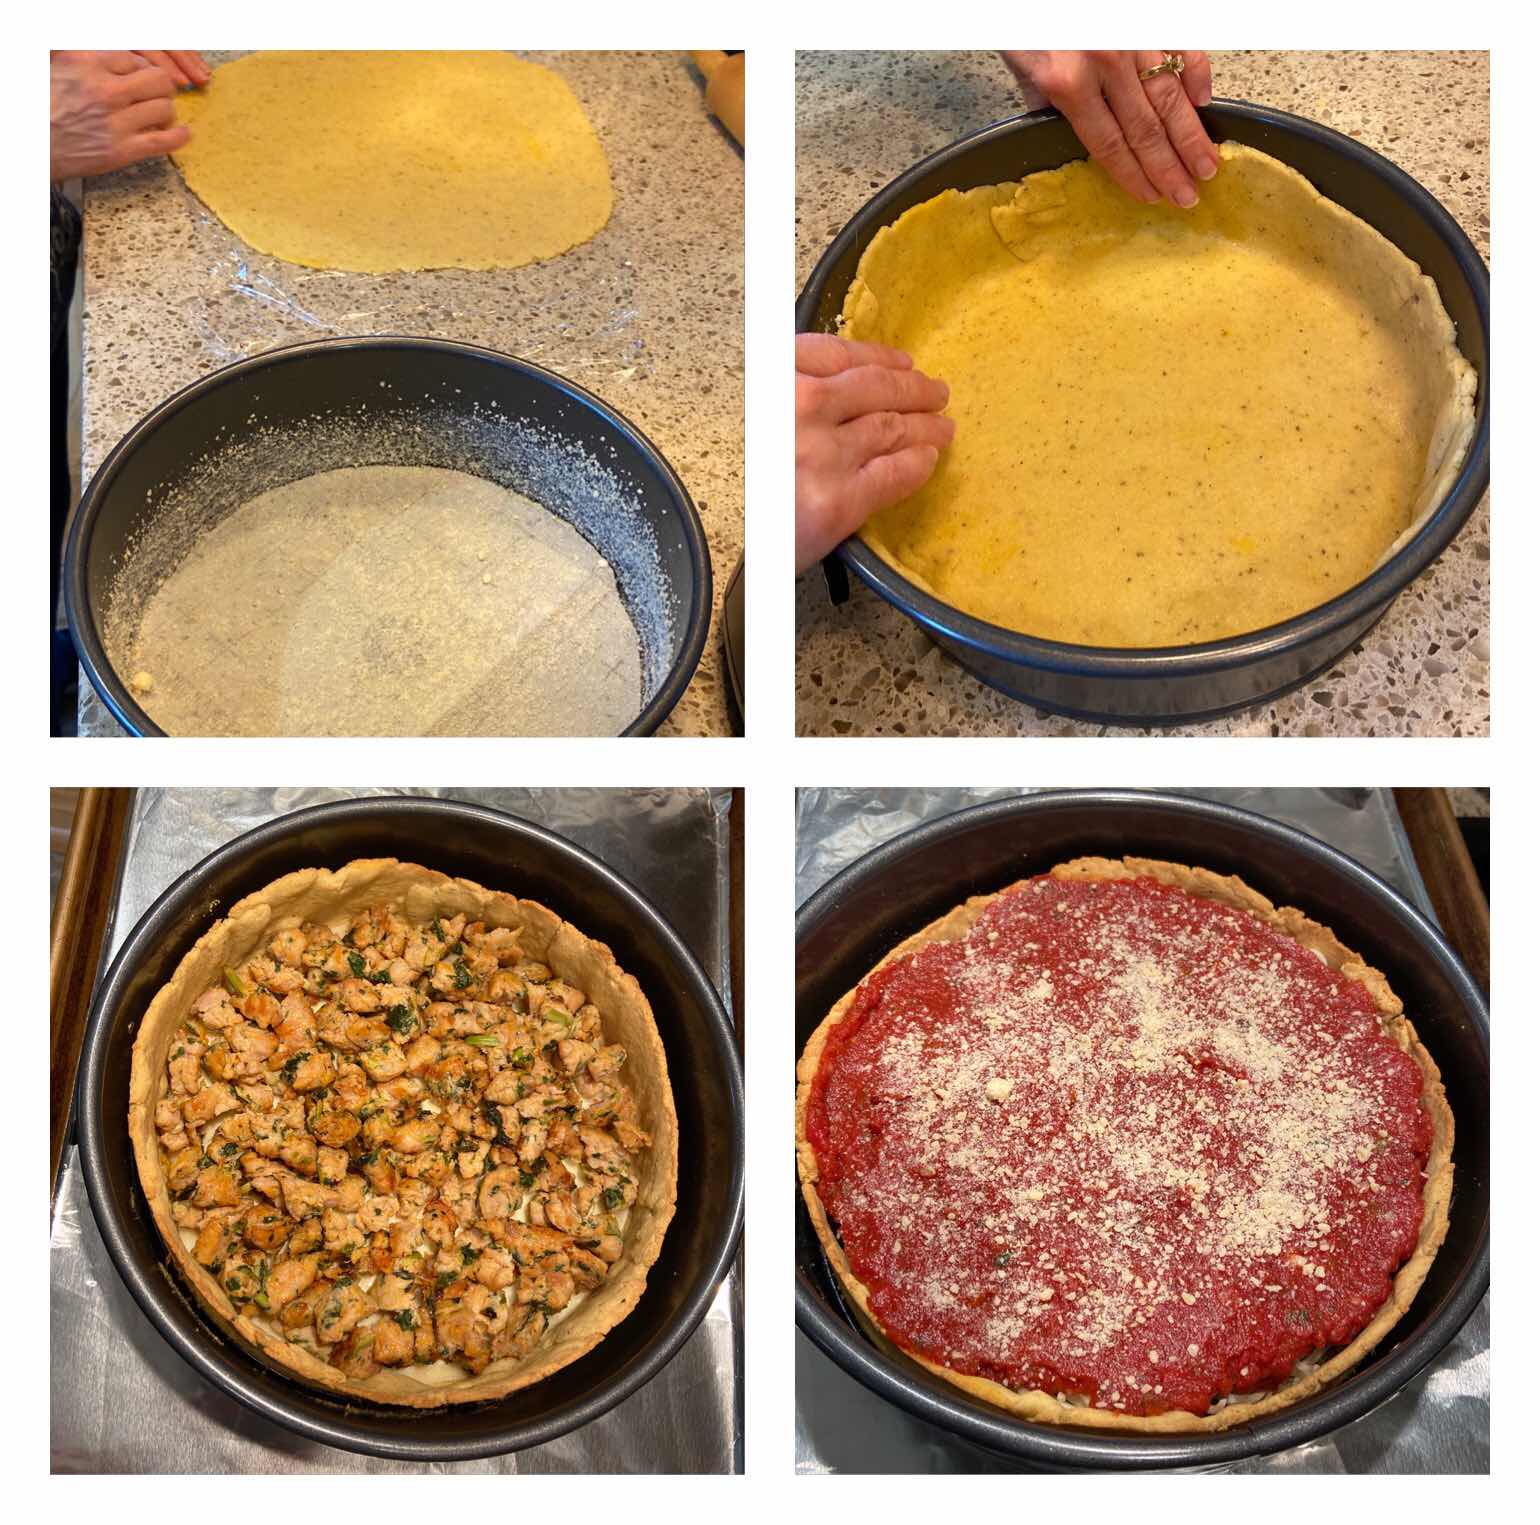
4. Place the dry ingredients for the crust into the food processor and pulse to combine. Add the olive oil, egg and water and process on low until the dough comes together and forms into a ball. Roll the dough out between two pieces of plastic wrap (or parchment paper) into a 12-inch circle. Remove the top piece of plastic wrap and turn the dough into your prepared springform pan, dough side down. Remove the remaining layer of plastic wrap and then, with your fingers, gently press the dough into the pan. “Cut and paste” the dough evenly in the pan and part way up the sides (just tear and press where needed). Once the dough is pressed into the pan, prick the bottom with a fork.

5. Pre-bake the crust in the preheated 350 degree oven for 15 minutes. Remove the crust from the oven and allow to cool for a few minutes before filling. Meanwhile, increase the oven temperature to 410 degrees.

6. Into the pre-baked crust, put down a layer of sliced provolone cheese to cover the entire bottom of the crust. Spread the cooked sausage and any other optional fillings you desire on top of the provolone cheese in an even layer. Next, add a layer of shredded mozzarella over the fillings. Top the layer of shredded cheese with the drained and seasoned chunky tomato sauce, spreading with the back of a spoon to cover the cheese layer entirely. Finally, sprinkle the sauce with 3/4 cup grated Parmesan cheese.

Pizza crust and layering fillings7. Place the pan on a baking sheet (in case the filling leaks). Bake for 30-35 minutes or until the Parmesan cheese has turned a golden color and the melted mozzarella cheese you can see below the sauce is bubbly.

8. Remove the pizza from the oven and allow to cool for at least 10 minutes before slicing. Enjoy!

Slice of Deep Dish Pizza
Nutritional Information per 1/6th of pizza: 588 calories, 13.5 g carbohydrates (5.1 g dietary fiber, 3.2 g sugars), 41.8 g total fat (15.6 g saturated fat, 0 g trans fat), 123 mg cholesterol, 1292 mg sodium,  651.4 mg calcium, 169 mg potassium, 2 mg iron, 169 ug Vit A, 38.9 g protein. Net carbs per serving: 8.4 grams

Photos and recipe by Kathy Sheehan, copyright 2020
All rights reserved. Please do not duplicate without the author’s permission. 

Sunday, February 16, 2020

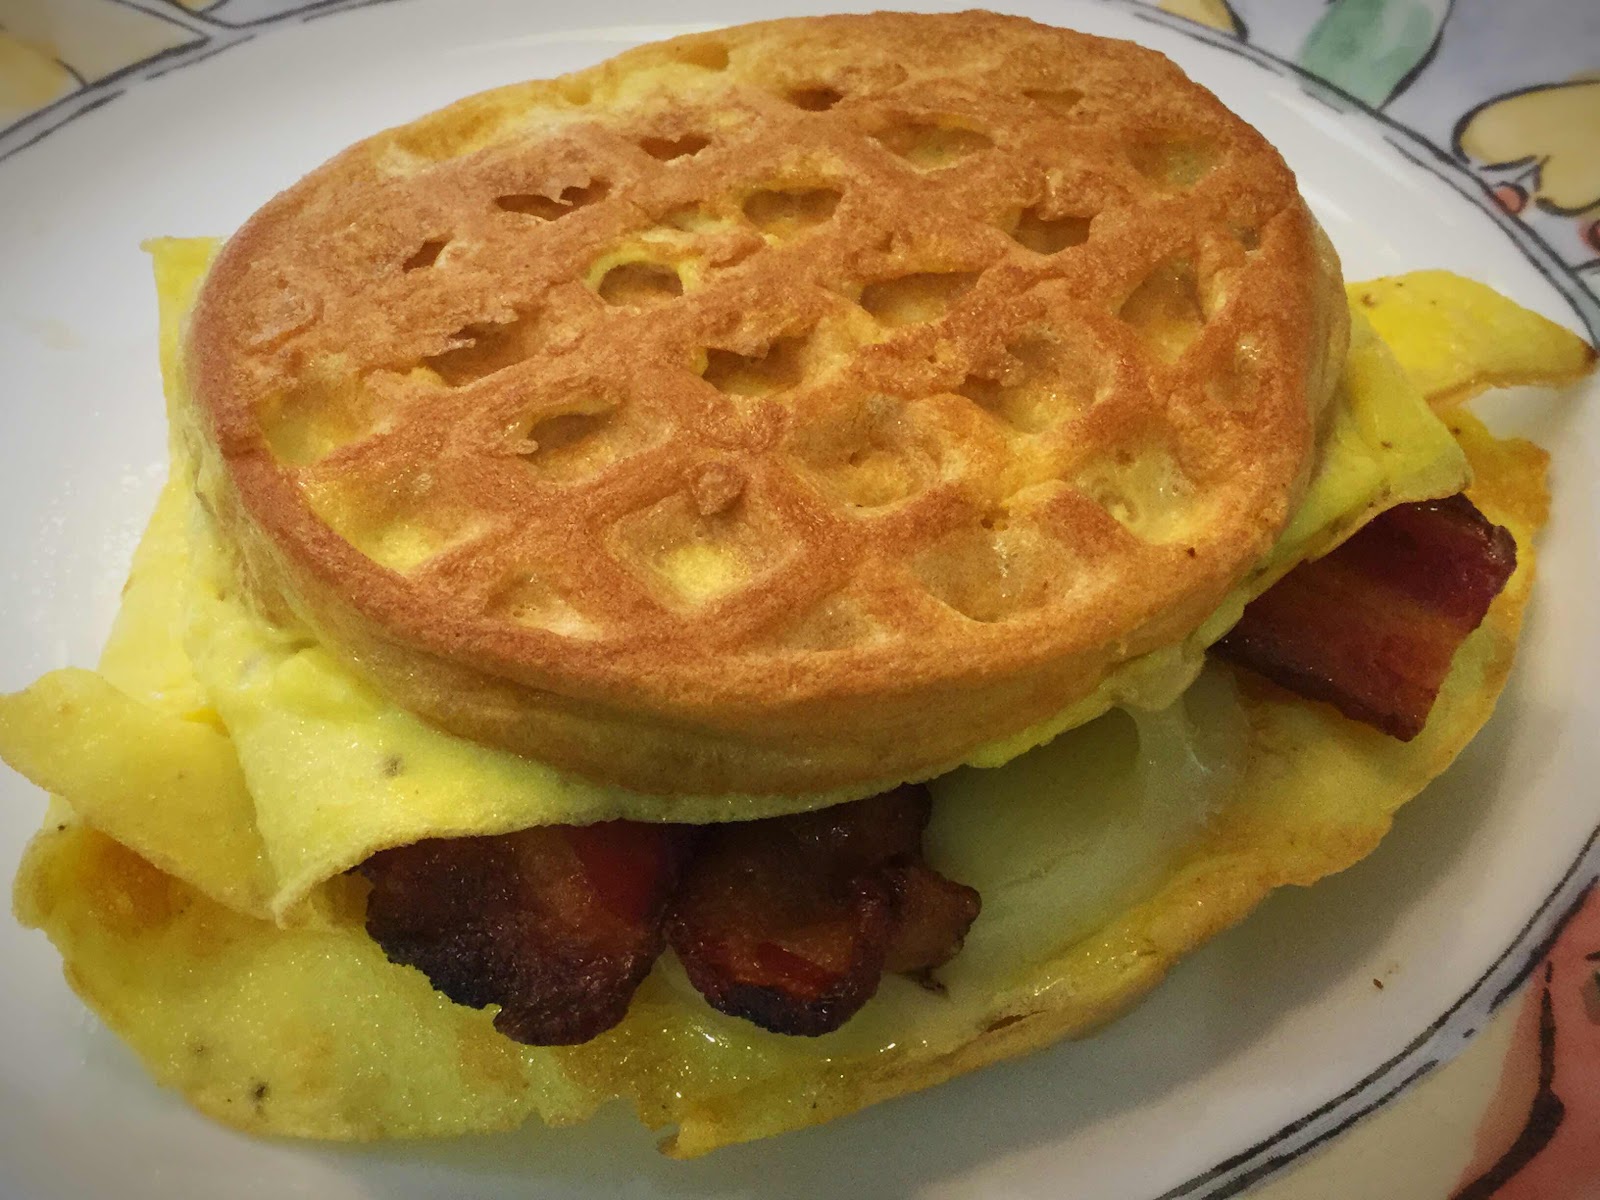
Keto French Toast Chaffle Breakfast Sandwich (or Monte Cristo!)

Keto French Toast Chaffle Breakfast Sandwich
As I do often, I woke up in the middle of the night but, instead of turning over and going right back to sleep, I started thinking. I had seen a video going around on Facebook using this cooking technique for making a french toast sandwich, so I thought “Why can’t I do that with chaffles?” The excitement of this idea took over my mind and I didn’t go back to sleep for hours! When morning arrived, I leapt out of bed and ran down to the kitchen to try out this recipe. It was worth the poor night’s sleep!! This breakfast sandwich is SO GOOD and, when drizzled with a little sugar free syrup, it tastes like a Monte Cristo! For greater convenience, it’s a good idea to make your White Bread Chaffles ahead of time. (I triple or quadruple the recipe and make a batch of 6-8 at a time; they keep well in the refrigerator and are always available as a bread or hamburger bun substitute whenever you need them.)

Click on the YouTube video to see how to make this amazing breakfast sandwich:


Keto French Toast Chaffle Breakfast Sandwich (or Monte Cristo!)
Makes 1 sandwich

White Bread Chaffle Ingredients:
1 egg (or two egg whites)
1 tablespoon mayonnaise, sour cream or ricotta cheese
1 tablespoon almond flour (or coconut flour)
1/8 teaspoon baking powder
1 teaspoon water

Other Ingredients for Sandwich:
2 eggs, beaten
A pinch of salt and pepper to taste
1 teaspoon almond milk
1 ounce cheese of choice, sliced
2 pieces of bacon, cooked and halved
Sugar free syrup (optional)

1. First, make the chaffles by whisking the chaffle ingredients together. Divide the batter and spoon 3-4 tablespoons onto a hot, preheated mini waffle maker, close the lid and cook for at least 4 minutes. Remove to a wire rack and repeat with the remaining batter. This recipe makes 2 chaffles.

2. Meanwhile, whisk together the 2 eggs, salt, pepper and teaspoon of almond milk; set aside. Have the sliced cheese and bacon ready to go.

3. Melt some coconut oil or butter in a 10” non-stick skillet. Place over medium-low heat and add the whisked eggs. Dip the smooth side of one chaffle into the egg, turn over and place the egg-covered chaffle on one side of the skillet in the egg mixture (if your chaffle has a rough side, make sure it is up). Repeat with second chaffle and place in the egg mixture next to the first chaffle. You want the two chaffles in a line, in the center of the egg mixture. While on medium-low, cover and cook for a couple of minutes until the egg is just set.

4. As a whole unit, turn the chaffles and egg circle over to cook the second side. Top chaffles with slices of cheese and bacon. Fold the egg “wings” into the center over the chaffles and filling. Carefully, fold one chaffle to rest on top of the other chaffle (like a book with filling). Allow the chaffle on the bottom to continue cooking until nicely browned. Flip over to the second side to brown.

5. Remove sandwich to a serving plate and drizzle with sugar free syrup, if desired. Eat with a fork and enjoy!

Keto Monte Cristo Breakfast Sandwich
Nutritional Information: 546 calories, 3 g carbohydrates (0.8 g dietary fiber, 0.8 g sugars), 43.9 g total fat (14.8 g saturated fat, 0 g trans fat), 612 mg cholesterol, 912 mg sodium, 341 mg calcium, 354 mg potassium, 3 mg iron, 335 mg Vit A, 33.6 g protein. Net carbs per serving: 2.2 grams

Photos, video and recipe by Kathy Sheehan, copyright 2020
All rights reserved. Please do not duplicate without the author’s permission. 
Friday, May 10, 2019

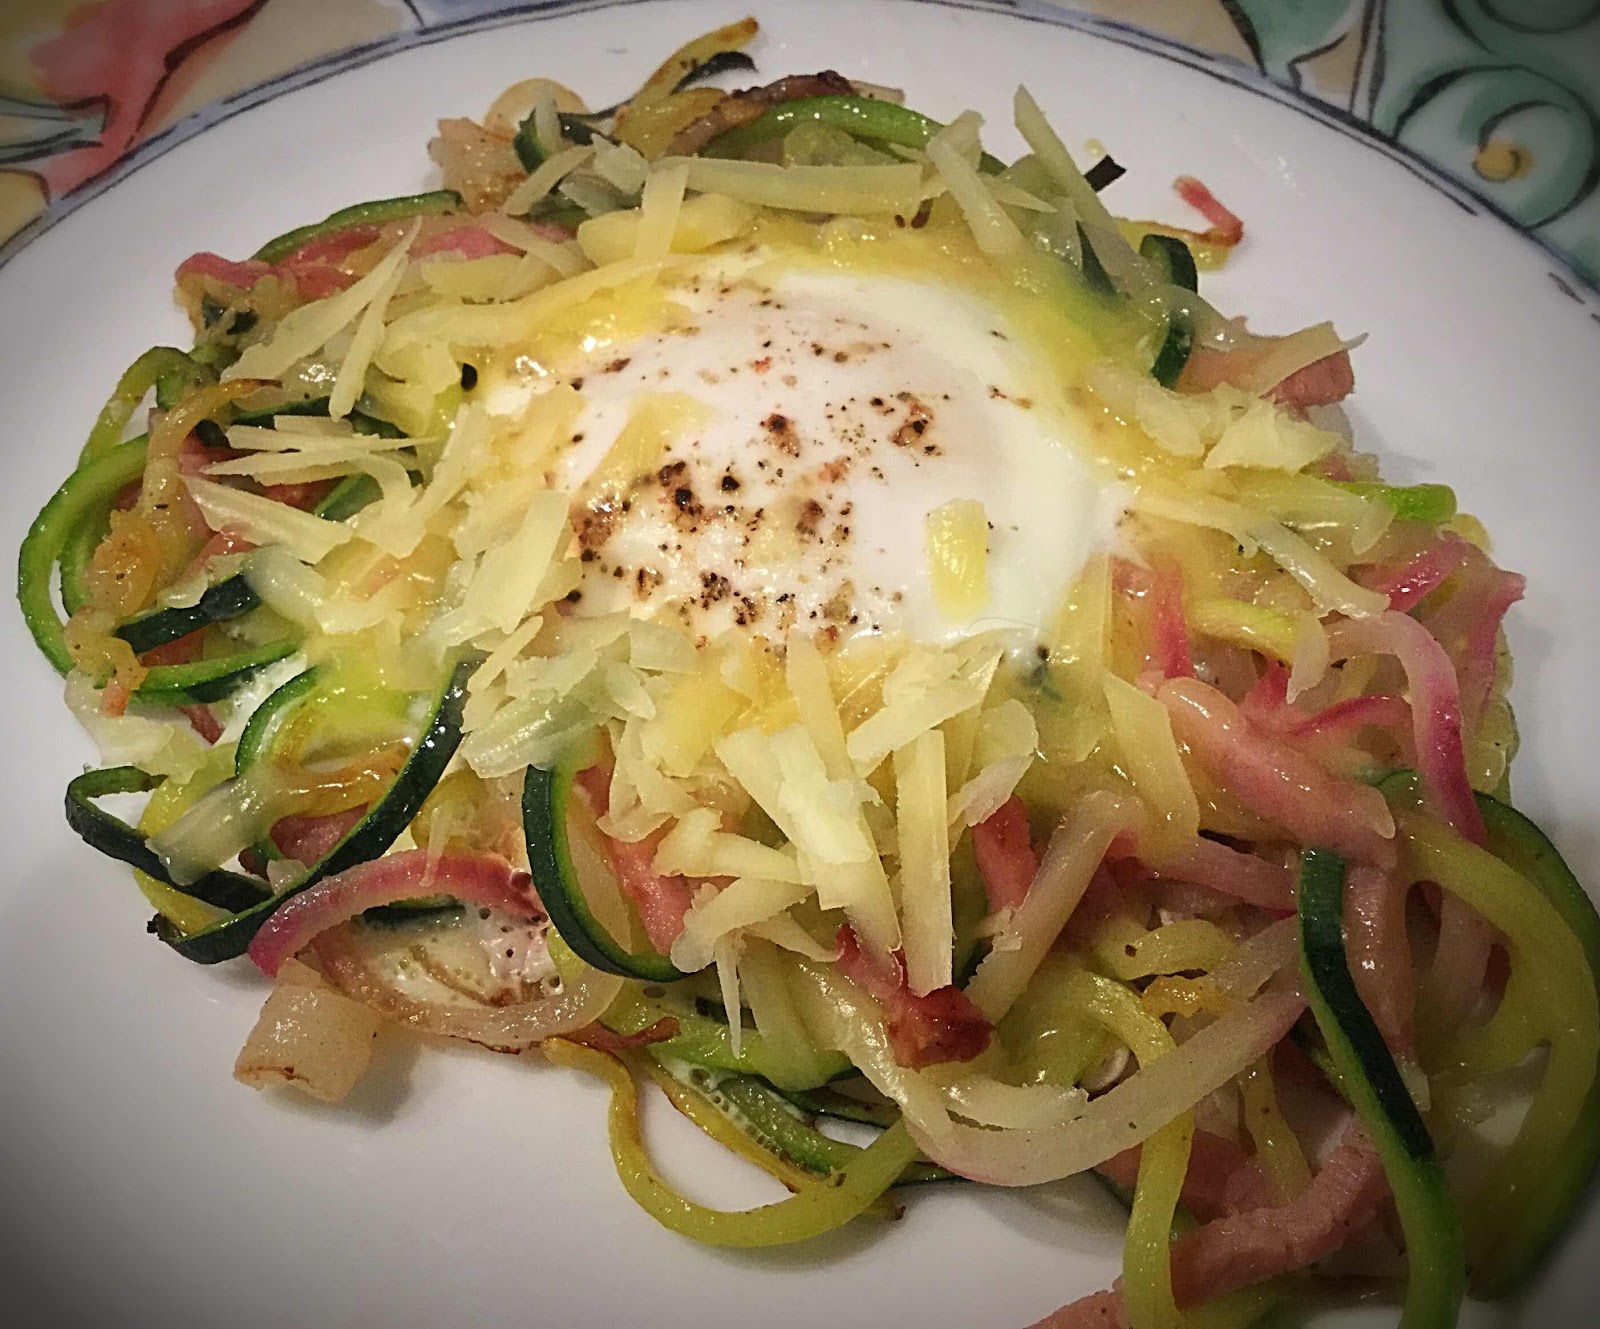
Low Carb Egg in a Zoodle Nest

Low Carb Egg in a Zoodle Nest
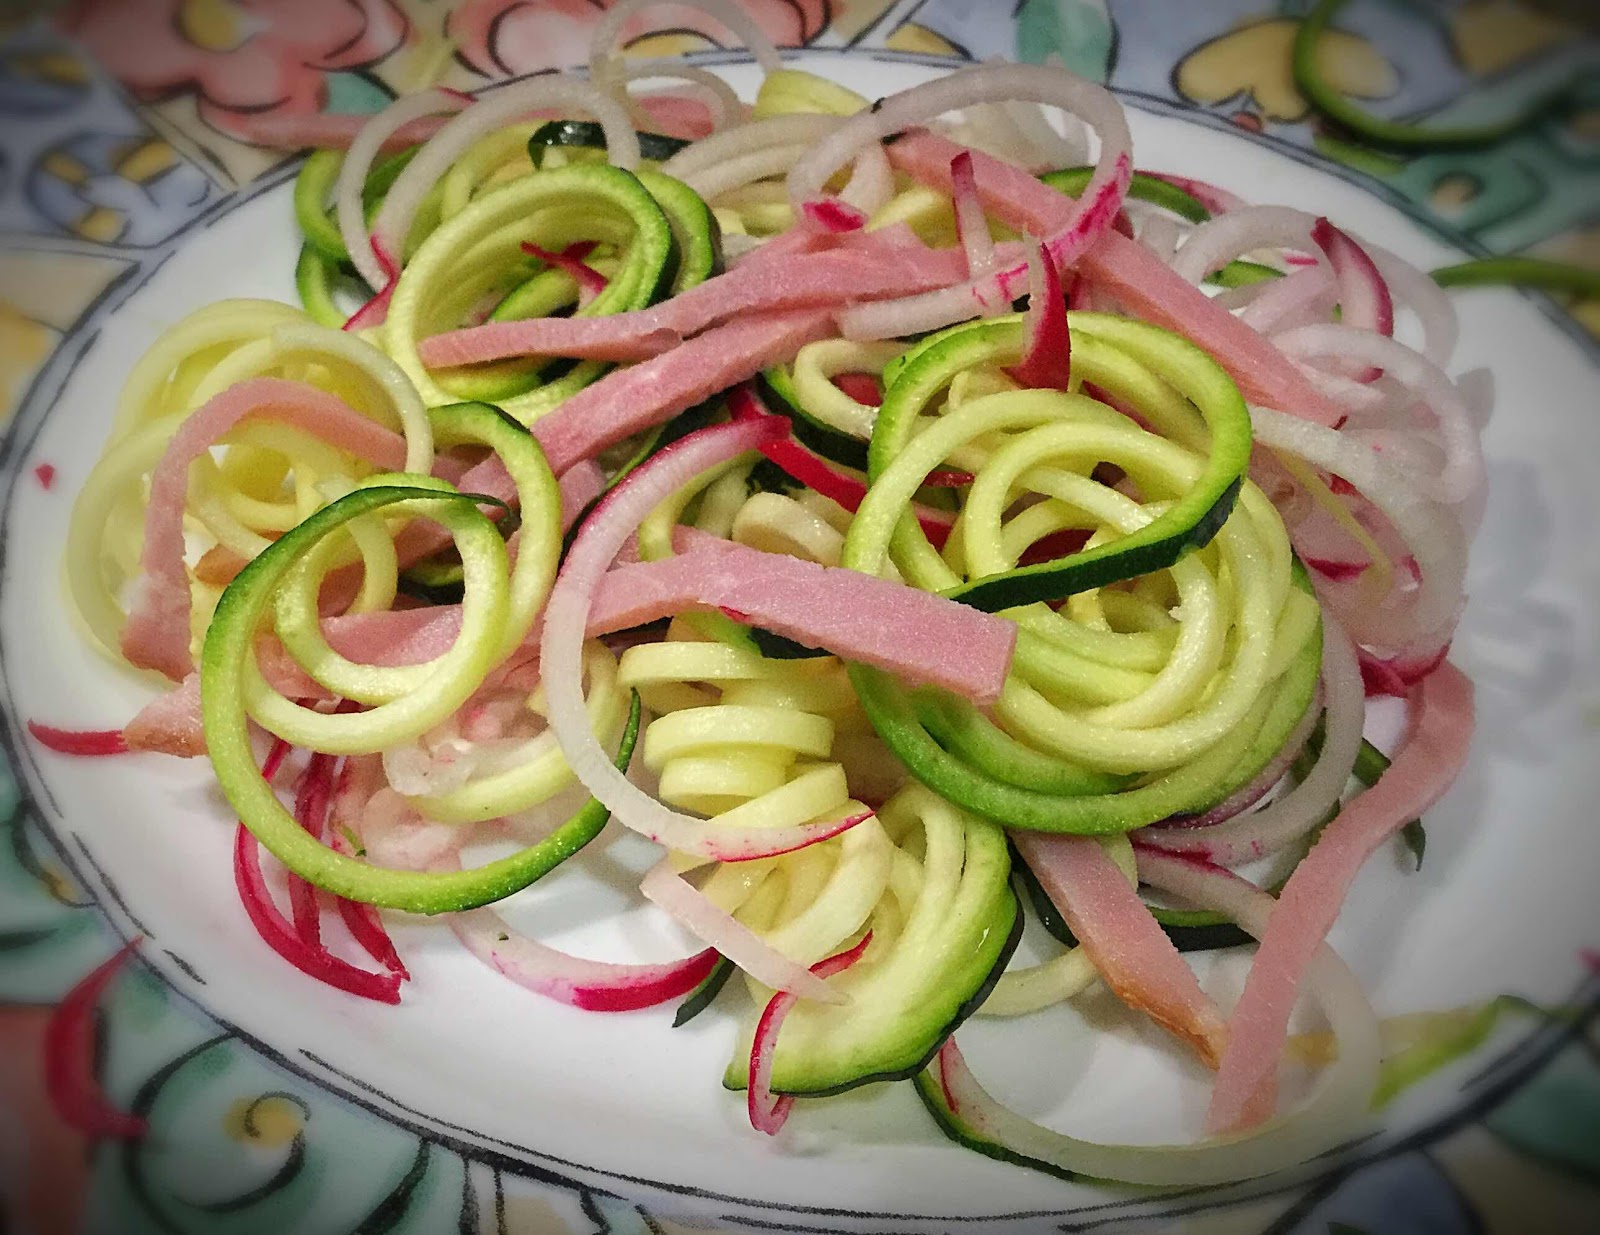
Before my diagnosis of celiac disease and switching to a gluten free diet, one of my favorite breakfasts was Egg in a Nest. Here is a very satisfying alternative recipe that highlights low carb vegetables and thinly sliced ham “noodles” to form the nest. This is a quick and very easy meal that is perfect for breakfast, lunch or a light dinner. It’s made convenient if you use pre-spiralized vegetable noodles that are becoming more commonplace in the produce or frozen section of many grocery stores. I spiralized zucchini and red radishes to create these colorful noodles that are perfect for springtime, but feel free to substitute your favorite veggie noodles instead. Although this recipe makes one serving, simply increase the amounts listed to make as many nests as you desire. This flavorful egg dish is as fun to make as it is to eat!

Low Carb Egg in a Zoodle Nest
Makes 1 serving

1/2 medium zucchini, spiralized into noodles (about 1 cup)
2-3 red radishes, spiralized into noodles (about 1/2 cup)
1/2 ounce deli ham, cut into long, thin strips
1 tablespoon butter or avocado oil
1 large egg
1/2 ounces cheddar or your favorite cheese, shredded (1/4 cup)
Salt and pepper to taste

1. Toss the vegetable noodles and ham strips together. Melt the butter or avocado oil in a skillet over medium heat. Add the zoodle and ham mixture to the pan and sauté until the vegetables are beginning to soften and the ham is fragrant and starting to brown lightly.

Vegetable and Ham Noodles
2. Form the zoodle mixture into a nest, creating a small depression in the center. Crack an egg into the center of the nest and season with salt and pepper. Put a lid on the skillet and allow the steam from the vegetables to cook the egg to your liking.

3. Gently remove the nest from the skillet to a serving plate and sprinkle the shredded cheese around the yolk of the egg. Serve immediately.

Nutritional Information per serving: 165 calories, 4.8 g carbohydrate (1.3 g dietary fiber, 3.3 g sugars), 10.3 g total fat (4.9 g saturated fat, 0 g trans fat), 206 mg cholesterol, 440 mg sodium, 149 mg calcium, 368 mg potassium, 1 mg iron, 20 mg Vit C, 13.6 g protein. Net carbs per serving: 3.5 grams

Photos and recipe by Kathy Sheehan, copyright 2019
All rights reserved. Please do not duplicate without the author’s permission. 
Sunday, March 18, 2018

Low Carb Ham Loaf

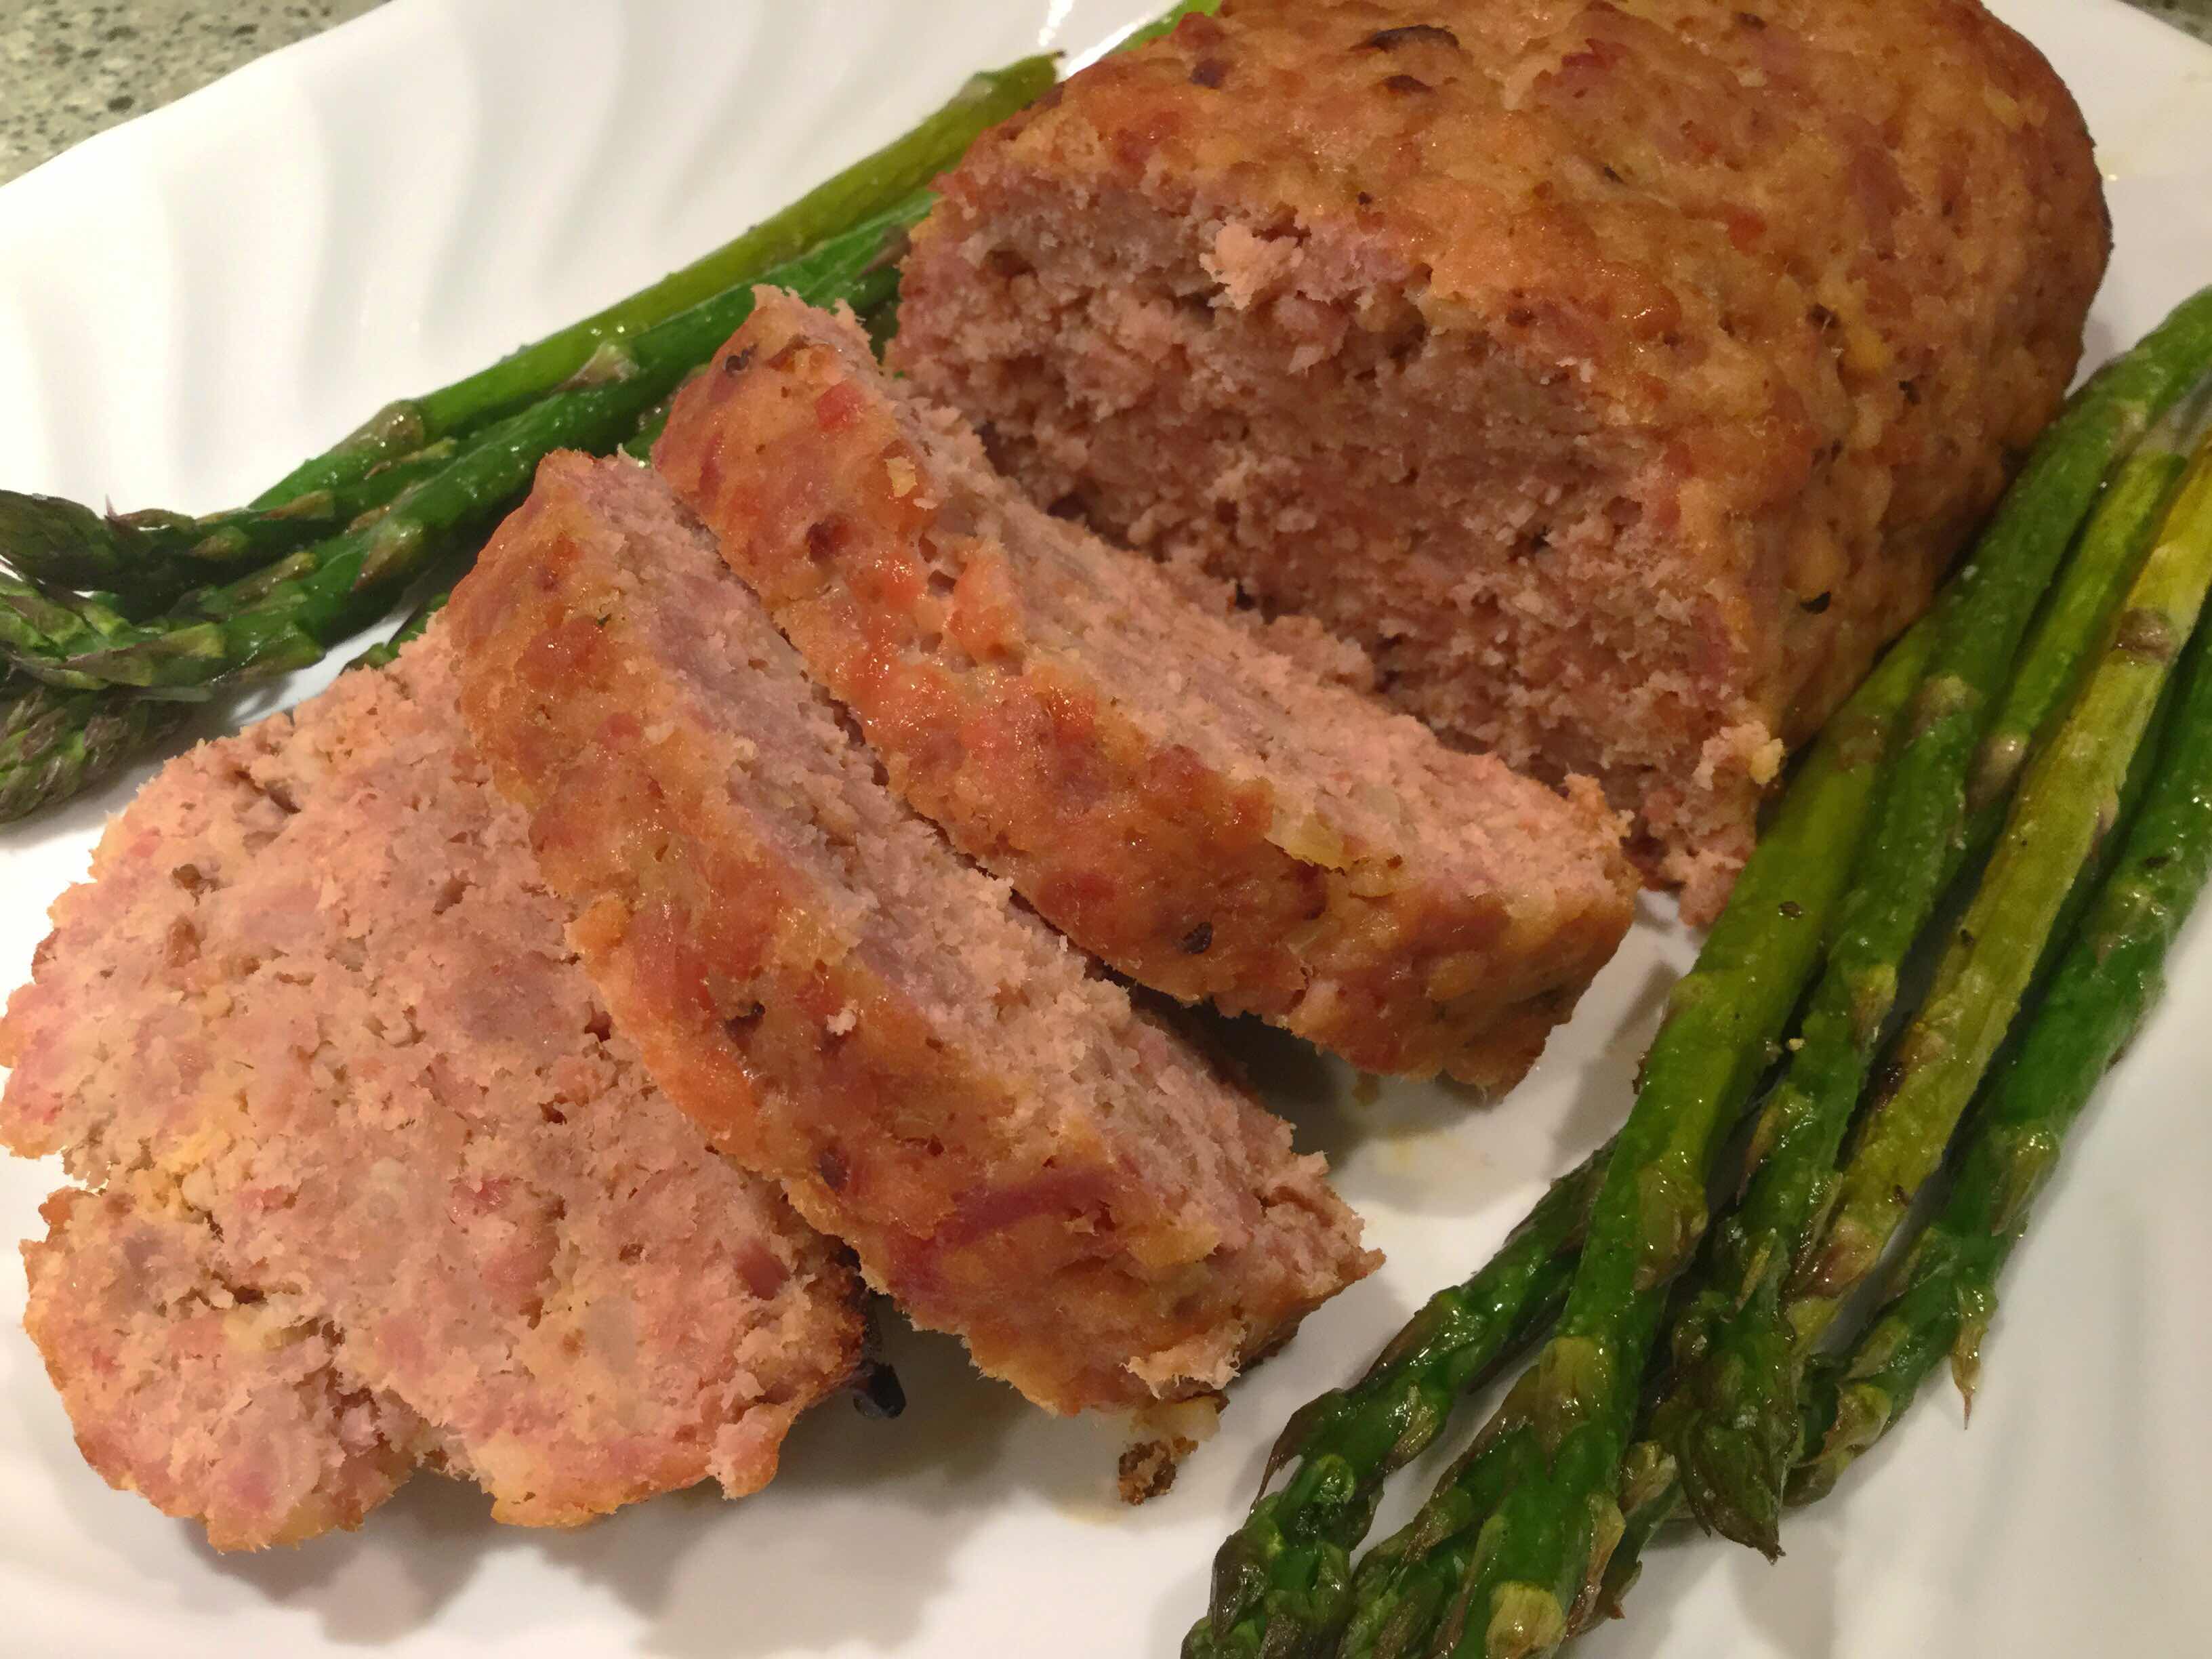
Low Carb Ham Loaf
My grandmother, Gaga was famous for her delicious Ham Loaf and it continues to be one of my fondest memories of visiting her apartment and family gatherings. The problem with her recipe is that it contained 1-1/2 cups of bread crumbs, 1 cup of milk and 1/4 cup of brown sugar! Ouch! My low carb remake has all the same flavors but just 1/4th the carbs of the original recipe! I had to experiment a bit to discover the perfect substitute for the breadcrumbs, which lightens up the loaf and gives it the proper texture. Some low carb meatloaf recipes call for almond flour to replace the crumbs, but the result is too heavy and dense. I discovered that plain riced cauliflower is the key! It absorbs flavor from the other ingredients so you won’t even know it’s there, but the end result is perfection. My family is so delighted to have this cherished heirloom favorite on our table again!

Low Carb Ham Loaf
Makes 16 servings

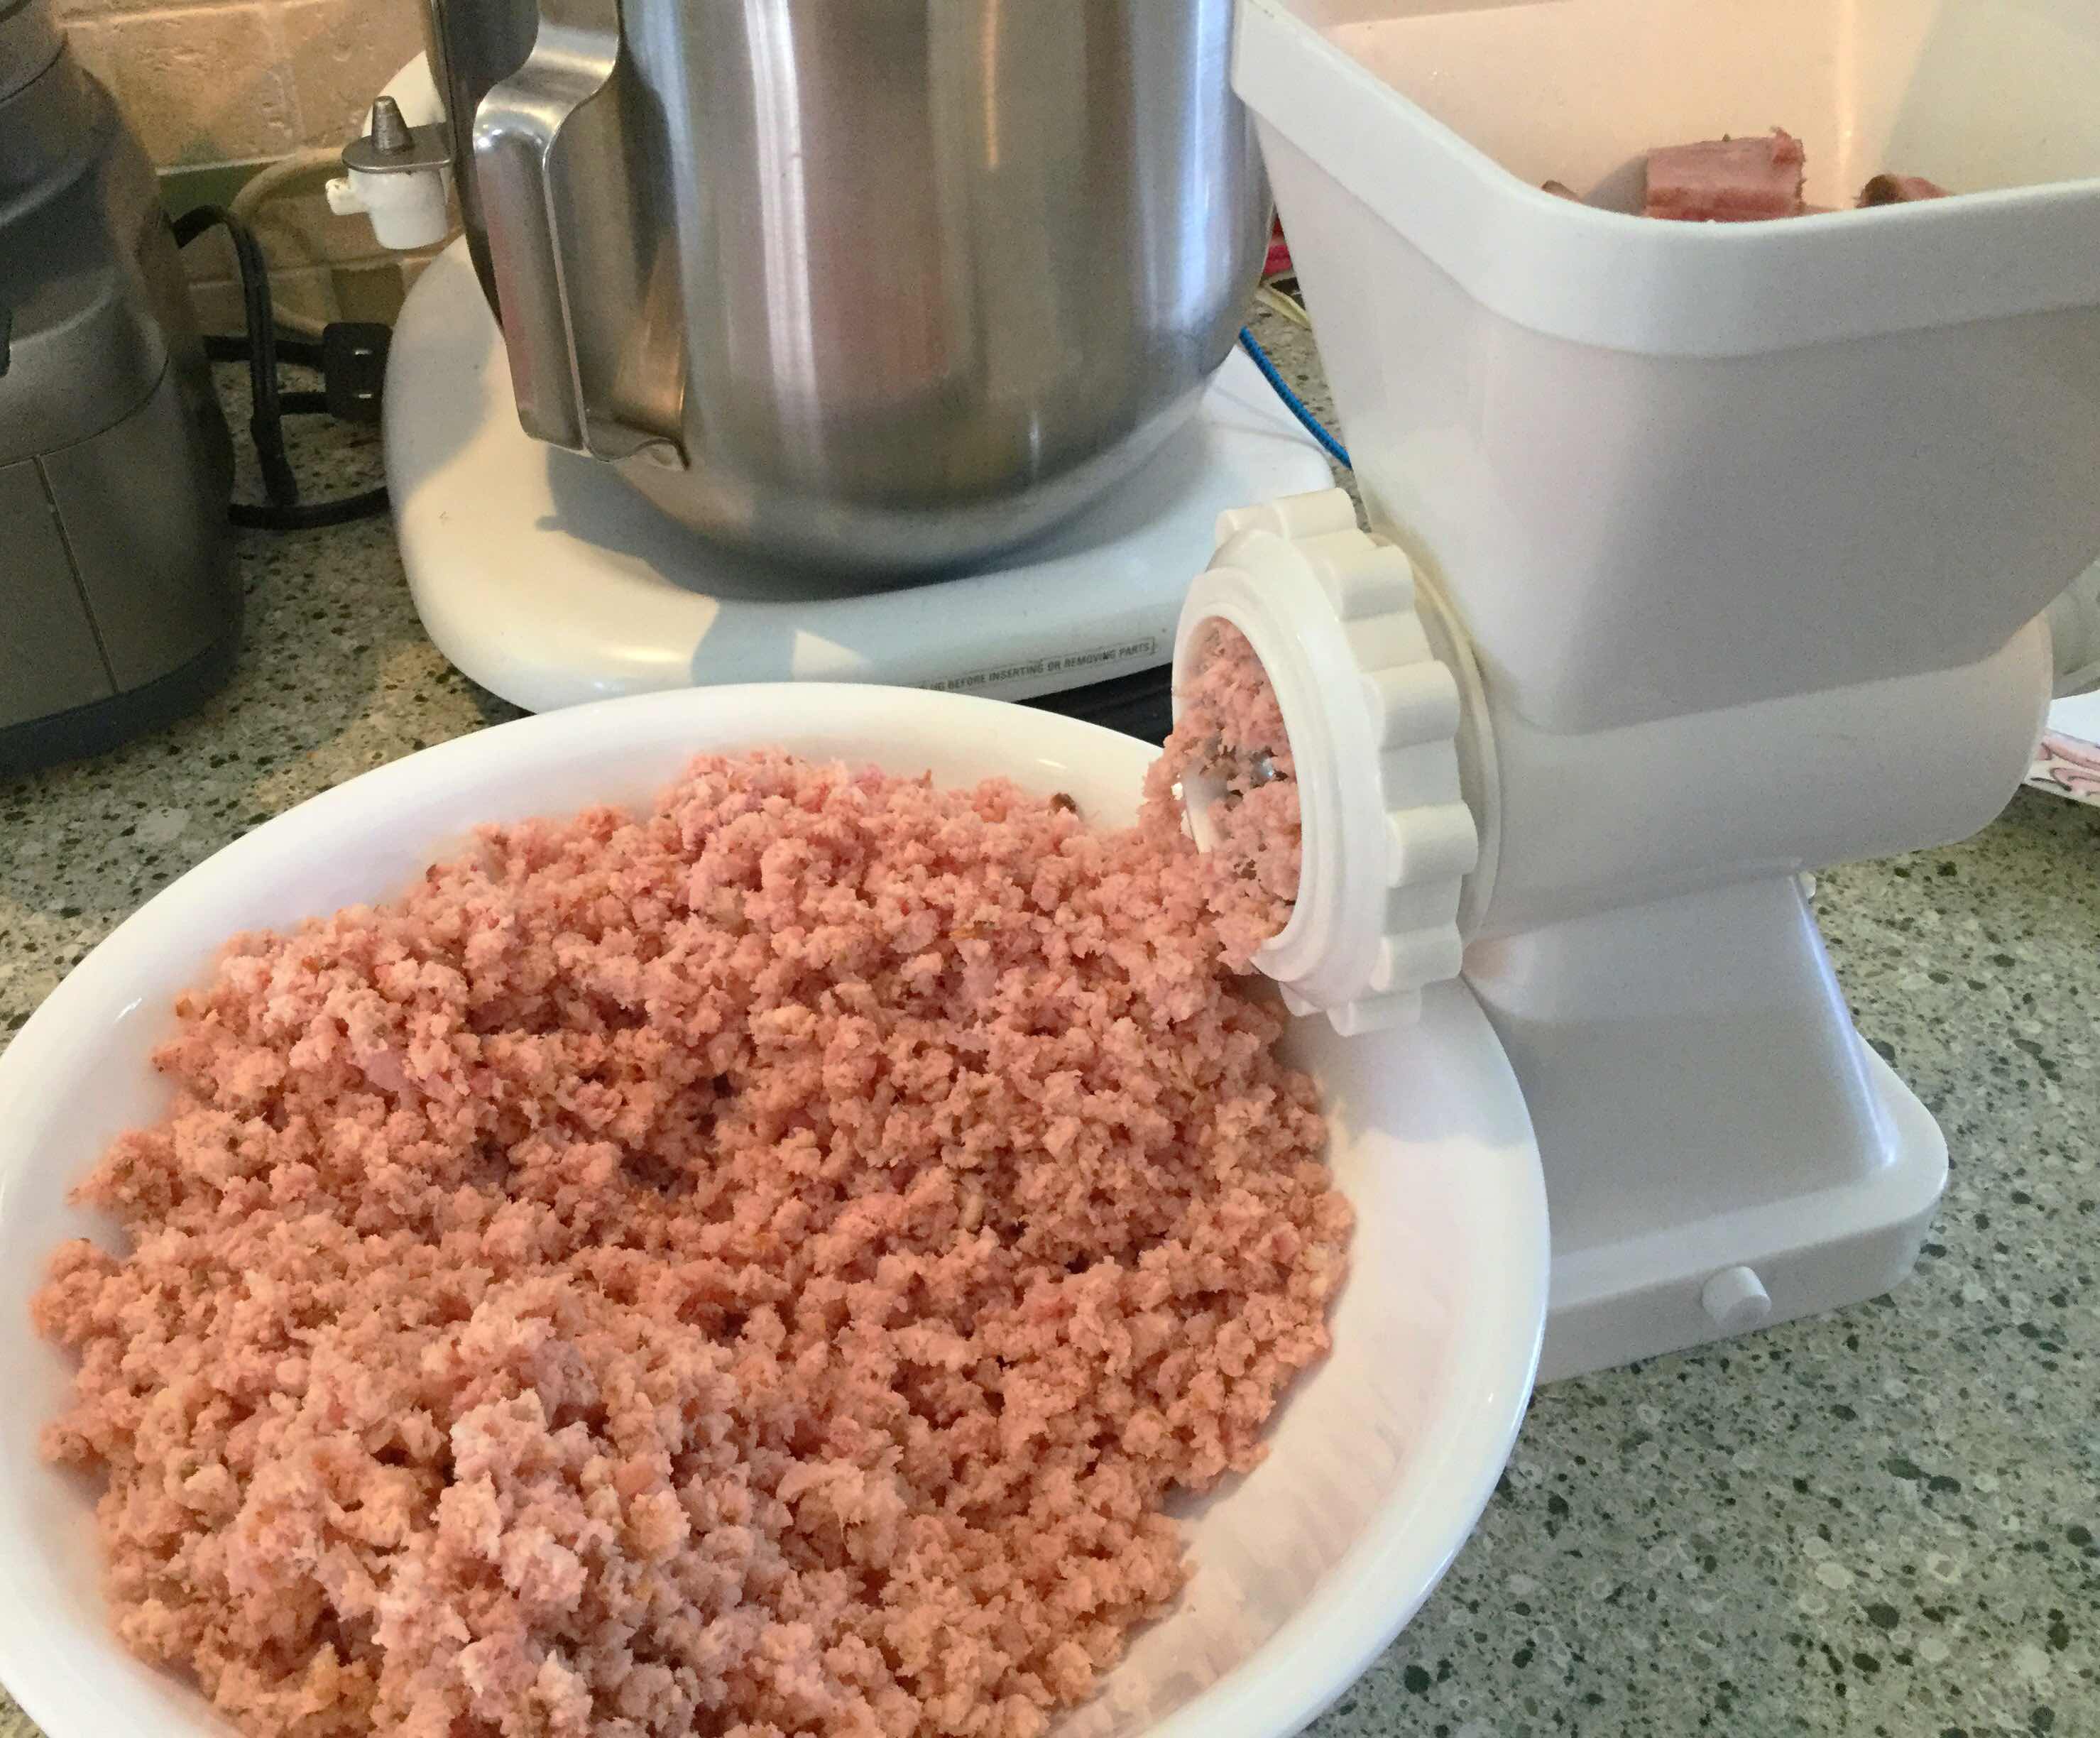
2 pounds fully cooked ham, ground (I used Kentucky Legend)
1 pound ground pork
1 cup cauliflower rice, thawed
1 tablespoon prepared yellow mustard
3 tablespoons granulated erythritol (I used Golden LaKanto Monkfruit sweetener)
3/4 teaspoon blackstrap molasses 
2 eggs, beaten

Grinding Ham
1. Preheat the oven to 350 degrees F. Put the cooked ham through a grinder. An alternative is to pulse in a food processor in multiple small batches until the ham is minced into tiny pieces, but not so fine that it turns to paste.

2. Mix together all of the ingredients in a large bowl until well combined. Shape into a loaf (or 2 smaller loaves). Place the loaf into a covered roaster or place the loaf on a cookie sheet and tent with foil. (If you formed two loaves, you can freeze one for later, just thaw before cooking.)

Shaping the loaf
3. Bake for 50 minutes. Uncover and continue baking until nicely browned.

4. Remove from oven and rest for about 10 minutes before slicing. Store any leftovers in the refrigerator for up to 5 days. (Leftovers are excellent for breakfast or dinner when sliced and grilled in a skillet.)

Nutritional Information per slice: 157 calories, 2.7 g carbohydrate (0.2 dietary fiber, 1.3 g sugars, 2.2 g sugar alcohols), 9.6 g total fat (3.4 g saturated fat, 0 g trans fat), 74 mg cholesterol, 683 mg sodium, 10.7 mg calcium, 94 mg potassium, 36 mg Vit A, 15.8 g protein. Net carbs per serving: 2.5 grams.

Photos and recipe by Kathy Sheehan, copyright 2018
All rights reserved. Please do not duplicate without the author’s permission.
Wednesday, April 26, 2017

Low Carb Zucchini Lasagna (or Hearts of Palm)


It's been eight years since I posted a lasagna recipe and, now that I'm living gluten and grain free, it's time for an updated version. My husband brought home two gorgeous, organic zucchini the other day and my plan was to spiralize them and make spaghetti. But because today was a cold and rainy spring day in Maine, I decided to make a warm and comforting baked lasagna instead. Instead of pasta noodles, I cut my zucchini lengthwise into narrow slices and used them between the layers of cheese and sauce. (You can substitute hearts of palm noodles in place of the zucchini.) It's important to place the zucchini slices between paper towels and leave at room temperature for at least an hour (or longer) to allow the moisture to be drawn out of this watery vegetable before assembling the casserole. The ricotta cheese mixture and meat sauce can be made a day or two ahead so, when it's time to assemble and bake, the prep time is minimal. Whether made with zucchini or hearts of palm noodles, this recipe is definitely a keeper! The lasagna was so delicious and, because it is a complete and balanced meal by itself, you don't even need to worry about a side dish. Keep life simple!

Low Carb Zucchini Lasagna (or Hearts of Palm)
Makes 6 servings

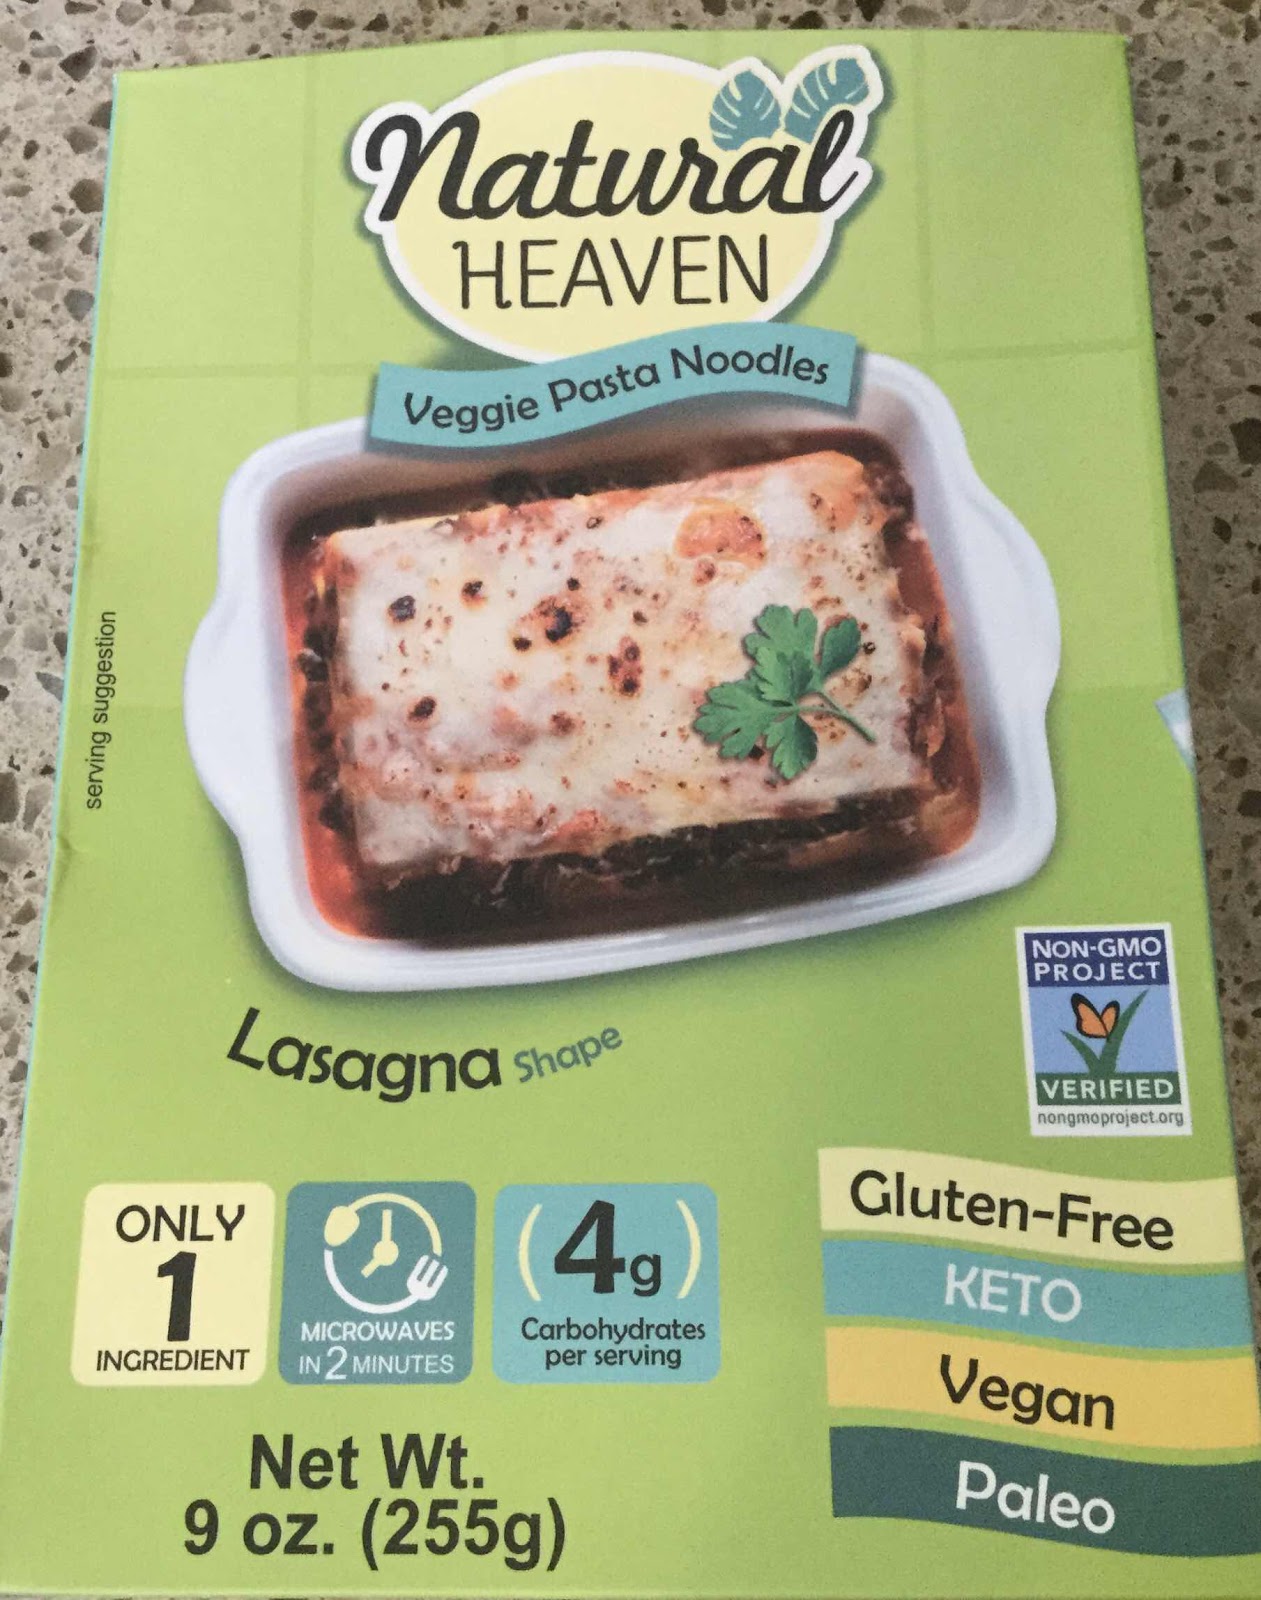
2 large zucchini, about 9 inches long or 9 oz package of hearts of palm lasagna noodles (drained, rinsed and dried), such as Palmini or Natural Heaven brand)
1 cup shredded mozzarella cheese

Ricotta Cheese Filling:
15 oz. of whole milk or part-skim ricotta cheese
1 cup of chopped fresh spinach (or 1/2 cup frozen, squeezed and drained of moisture)
1/4 cup grated Parmesan cheese
1/2 teaspoon dried basil
1 teaspoon of Italian herb seasoning
1/8 teaspoon nutmeg
1/4 teaspoon black pepper
2 cloves garlic, minced (or 1/2 teaspoon garlic powder)
1 egg, slightly beaten

Meat Sauce:
3/4 pound of sweet Italian sausage, casings removed (or substitute ground beef)
2 cups marinara or your favorite pasta sauce, no sugar added

1. Prepare the zucchini ahead of time by slicing lengthwise into thin slices (about 3/16-inch wide). If you have one, a mandoline works well to make even, thin slices, otherwise cut with a large knife. Lay the slices in a single layer on several layers of paper towel, sprinkle very sparingly with salt and cover with several more layers of paper towel. If desired, you can place a baking sheet over them and weight it with canned goods or other objects. Allow the zucchini slices to remain at room temperature between the paper towels for at least one hour (or longer) to draw out the excess moisture. Wipe off any excess salt before assembling the lasagna. (If using hearts of palm noodles, you can skip this step.)
Step by Step Pictorial

2. In a medium bowl, mix together the Ricotta Cheese Filling ingredients and stir until well combined. Set aside. (If making ahead, refrigerate until you're ready to assemble the lasagna.)

3. In a large skillet, brown the sausage and add the pasta sauce. Stir to combine and set aside. (This can be made ahead and refrigerated, if desired.)

4. Preheat oven to 375 degrees Fahrenheit. To assemble the lasagna, spray a baking pan with non-stick spray or grease with coconut oil or butter. Spoon in about 1/2 cup of the pasta sauce (no sausage) and spread to cover the bottom of the pan. Lay down a layer of the zucchini slices or hearts of palm noodles, overlapping just slightly, until the bottom of the pan is covered. Spread 1/3 of the ricotta filling over the zucchini or noodles and spread into an even layer, covering the slices. Top with 1/3 of the meat sauce and spread to edges. Sprinkle sauce with 1/4 cup shredded mozzarella cheese.

5. Repeat with a layer of zucchini slices or noodles, 1/3 of the ricotta filling, 1/3 of the meat sauce and 1/4 cup mozzarella.

6. Repeat a final time with a layer of zucchini slices or noodles, the remaining ricotta filling, the remaining meat sauce and sprinkle with the remaining 1/2 cup mozzarella.

7. Cover with the pan lid or tightly with foil (spray the foil with non-stick spray to prevent the cheese from sticking). Bake for 50-60 minutes. Remove foil and continue baking for 10 minutes until cheese is bubbly and beginning to brown. Remove from oven and allow to rest for at least 10-15 minutes before slicing and serving.

Natural Heaven Hearts of Palm Lasagna Noodles
Nutritional Information per serving made with zucchini (1/6th of recipe): 482 calories, 14 g carbohydrate (3 g dietary fiber, 6.8 g sugars), 36.6 g total fat (15.5 g saturated fat, 0 g trans fat), 120 mg cholesterol, 968 mg sodium, 376 mg calcium, 560 mg potassium, 277 mg Vit A, 1 mg iron, 26.8 g protein. Net carbs per serving: 11 grams

Nutritional Information made with hearts of palm noodles (1/6th of recipe): 478 calories, 10.1 g carbohydrate (1.7 g dietary fiber, 3.4 g sugars), 36.2 g total fat (15.4 g saturated fat, 0 g trans fat), 120 mg cholesterol, 981 mg sodium, 369 mg calcium, 386 mg potassium, 1 mg iron, 708 mg Vit A, 26.4 g protein. Net carbs per serving: 8.4 grams.

Photos and recipe by Kathy Sheehan, copyright 2017, updated 2020
All rights reserved. Please do not duplicate without author's permission.

Saturday, October 1, 2016

Butternut Squash Noodles Topped with Sausage and Brussel Sprouts

Today was cloudy, dark and cold...in other words, a perfect Maine autumn day to stay in and nap! It was so hard to get motivated to make a healthy meal tonight. My almost bare refrigerator didn't help matters either. So, I forced myself to go down to the local Farm Stand with the challenge of making dinner from whatever they had available. I hit the jackpot! Beautiful winter squashes, fresh brussel sprouts, apples, last-of-the-season green beans and zucchini, locally made marinaded beets, broccoli, a sweet potato and a bunch of romaine--all locally grown, even some organic Sweet Italian Sausage! I'm set for a few days. Tonight's dinner was spontaneous and quick to throw together, but so delicious! The addition of fresh, slivered sage from my herb garden really made the dish POP! This meal is a wonderful combination of fall flavors.

Butternut Squash Noodles Topped with Sausage and Brussel Sprouts
Makes 2 servings

2 teaspoons coconut oil
1 organic Sweet Italian sausage link, casing removed
1-1/2 cups of chopped or slivered brussel sprouts
3 cups of spiralized butternut squash noodles
2 tablespoons butter
4 fresh sage leaves, rolled and then cut into slivers (chiffonade)
Salt and pepper to taste

1. Spiralize the butternut squash into spaghetti-length noodles and chop the brussel sprouts; set aside.

2. In a large, heavy skillet over medium heat, add the coconut oil and sausage. Break up and cook the sausage, add the brussel sprouts and sauté until the brussel sprouts are tender-crisp and beginning to turn golden.  Remove this mixture to a plate and set aside while you cook the noodles.

3. Turn the heat to medium-low and add the butter to the skillet. Allow the butter to brown slightly before adding the butternut squash noodles to the pan. Sauté until the squash begins to soften and add the sage, salt and pepper.  Stir frequently, allowing the sage to crisp up a bit by "frying" in the hot butter. When the noodles are sufficiently softened, but not limp, divide the noodle mixture between two serving plates.

4.  Turn up the heat to medium and add the sausage mixture to the skillet for a minute or two to heat through. Spoon over the butternut squash noodles and serve immediately.

Nutritional Information per serving: 338 calories, 23.7 g carbohydrate (5.5 g dietary fiber, 4.6 g sugars), 24.3 g total fat (11.6 g saturated fat, 0 g trans fat), 70 mg cholesterol, 470 mg sodium, 125.8 mg calcium, 764 mg potassium, 10.3 g protein.  Net carbs per serving: 18.2 grams

Recipe by Kathy Sheehan, copyright 2016
All rights reserved. Please do not duplicate without author's permission.

Wednesday, August 10, 2016

Slow Cooker Pork Chops with Carrots and Apples


I love my Crock Pot and use it often. Even if I'm at home for the day, I love the aroma wafting though the house and knowing that all I have to do is lift the lid from the slow cooker and dinner is ready. This recipe in particular smells wonderful while it's cooking and it's so easy to throw together. The combination of pork and apples is a classic and by cooking them in a crock pot, the pork chops turn out moist and tender. To reduce some carbs, I recommend using a green Granny Smith apple, instead of a higher sugar variety. With a side of probiotic-rich homemade sauerkraut, this is a comforting and healing meal.

Slow Cooker Pork Chops with Carrots and Apples
Makes 2-4 servings, depending on the size of your pork chops

1 tablespoon coconut oil
2 large, thick, center cut, boneless pork chops (organic or antibiotic free)
1 large onion, sliced
2 cups carrots, thickly sliced (I use multi-colored carrots)
1 Granny Smith apple, cut into slices and sprinkled with lemon juice
2 teaspoons fresh thyme (or 1 teas dried)
1-1/2 tablespoons fresh rosemary, chopped (or 2 teas dried)
Salt and pepper

1. In a heavy skillet, heat the oil on medium-high. Season the chops with salt and pepper and brown on both sides.

2. In the crock pot, add the sliced onion and carrots and season with a little salt and pepper. Place the pork chops on top of the vegetables and sprinkle with the chopped herbs.

Top vegetables with browned pork chops.

3.  Spread the sliced apples on top of the pork and put the lid on the Crock Pot. Set the slow cooker to high (or 350-degrees Fahrenheit) and cook for 3 hours. Test meat and, if it's tender and the internal temperature is at least 165-degrees, turn off slow cooker.  If additional cooking is needed, continue cooking covered for another 30 minutes.  Serve pork with vegetables and spoon any sauce over the chops for added flavor.

Scatter apple slices over all before cooking.

Nutritional Information per serving (with 1/2 cup vegetables): 341 calories, 24 g carbohydrate (4 g dietary fiber, 16.2 g sugars), 16.2 g total fat (6.1 g saturated fat, 0 g trans fat), 70 mg cholesterol, 174 mg sodium, 31.7 mg calcium, 228 mg potassium, 24.2 g protein. Net carbs per serving: 20 grams

Recipe by Kathy Sheehan, copyright 2016
All rights reserved. Do not replicate without written permission.

Wednesday, September 17, 2014

Lamb Chops with Orange, Rosemary and Butter Sauce


I'm celebrating tonight after a good doctor's visit that brought excellent news!  My lab results show that the changes I've made in my diet to reduce carbs combined with moderate protein and increased fat over the past five months are working.  My A1c dropped to 5.8 and I'm being taken off all diabetic medication!  This is a special recipe for a special occasion.  Lamb can be a bit pricey, but if you choose a shoulder blade instead of a the smaller chop, you'll save money and get a tasty cut of meat.  Ever since experiencing lamb during a trip to Iceland a few months ago, I've fallen in love!  Honestly, the best free range lamb on the planet comes from Iceland.  I was thrilled to see Icelandic lamb available for a limited time at my local Whole Foods Market.  I had to create the best recipe, since it's a rare treat, and this definitely meets with my approval.  If you can't get good lamb, this sauce is equally delicious over pork chops or chicken.

Lamb Chops with Orange, Rosemary and Butter Sauce
Makes 2 servings

2 shoulder blade lamb chops (about 6 oz each)
Salt and pepper
onion powder
1 tablespoon ghee or butter*
1 teaspoon orange zest
2 tablespoons freshly squeezed orange juice
1/4 cup chicken stock*
2 tablespoons high fat coconut milk or heavy cream*
1 teaspoon chopped fresh rosemary (or 1/2 teas dried)
1/4 teaspoon xanthan gum or low carb Thick It Up thickener (or 1/2 teas cornstarch or arrowroot)

1. Generously season the chops with salt and pepper, and lightly sprinkle with onion powder; set aside.

2.  In a heavy saucepan, melt the ghee or butter over medium heat.  Add the chops and cook, without turning, for at least 5 minutes.  When browned, turn and continue cooking for another 3 minutes.  Cover and cook for 2-3 minutes or until done to your taste.

3.  Meanwhile, zest the orange and chop the rosemary; set aside.  Cut the orange and squeeze 2 tablespoons of the fresh juice into a small bowl.  Add the stock and coconut milk to the juice; stir until blended.

4.  When the lamb chops are done, remove them to a serving plate.  Add the juice and stock mixture to the pan and whisk.  Add the zest and rosemary.  While whisking (important), sprinkle the xanthan gum into the sauce and stir until thickened.  (In order to prevent the xanthan gum from lumping, I use a small shaker top bottle and lightly sprinkle it while whisking vigorously.  Do not add it all at once because it might turn lumpy.  If using cornstarch or arrowroot, stir into a tablespoon or two of chicken stock until smooth, then add to the sauce in the pan.)

5.  Divide the butter sauce equally over the two chops and serve immediately.

Nutritional information per serving: 500 calories, 3 g carbohydrate (0.3 g dietary fiber, 1.9 g sugar), 37.6 g total fat (17.2 g saturated fat, 0 g trans fat), 144 mg cholesterol, 344 mg sodium, 59.2 mg calcium, 490 mg potassium, 35.4 g protein.  Net carbs per serving: 2.7 grams

* For those with food allergies: To create a dairy free version, use ghee (clarified butter) and coconut milk.  If gluten is a problem for you, choose a certified gluten free chicken stock.

Recipe by Kathy Sheehan, copyright 2014

Monday, February 8, 2010

Navy Beans and Ham

Here is a recipe that brings back pleasant memories from my childhood. I remember spending the night at my grandmother Gaga's apartment (fondly called "the pink palace") where we would share a warm, comforting meal of her delicious navy beans and ham soup. This simple meal we often would have together because she was the kind of person that would make your favorite dish when she knew you were coming over for a visit. I always loved that about her! Although it's been a couple of decades since she past away, I can't help but think of Gaga every time I make this meal. I've changed her recipe a bit, using less sugar and making it much thicker than soup, but the taste satisfies my memory. I enjoy mine with a slice of homemade cornbread to soak up the wonderful, rich broth.

There is another story about this family favorite. My daughter was 3 or 4 years old and had always been satisfied with the meals placed before her. That particular night, it was her first experience with Gaga's navy beans with ham and, to our surprise, when she finished her bowl she held it up and asked for more. It was the first time she had ever asked for a second helping of any food. I agree, this delicious recipe deserves an encore! It is so good, you won't make it just once. Like for me, it may become one of your favorites, too!

Navy Beans and Ham
(Serves 8)

1 pound dried navy (small white beans) or great northern beans
½ tablespoon baking soda
1 teaspoon dried mustard
3 tablespoons sugar
1 whole onion
Leftover ham bone with some meat (or pieces of leftover ham)
½ tablespoon salt or to taste

1. Pick through and rinse dried beans. Place in a large mixing bowl and cover with cold water (at least 3 inches over top of beans) and soak overnight or for at least 4 hours until plump.

2. Drain and rinse beans and place in a large Dutch oven or heavy oven-proof pot with lid. Cover with fresh water and bring to a boil. Boil for about 15-20 minutes or until skins split and curl when you blow on them. Bring pot over to the sink, add baking soda and stir. Beans will bubble and release their gas. (Do this over the sink in case the liquid bubbles over the top of the pot.) Drain and rinse beans in a colander. Return beans to pot.

3. Preheat oven to 275-degrees. Add fresh water until beans are just covered. Add dried mustard and sugar; stir to combine. Add onion that has been peeled of outer papery skin, but leave whole so it will not fall apart while cooking. Add ham bone or ham pieces to pot and cover. Cook in oven for 2 hours.

4. Remove ham bone from beans and remove any meat and cut into bite-size pieces. Add ham to pot and add salt to taste. Test beans for doneness. If additional cooking is required, return to oven and continue cooking until beans are soft and mealy. Total cooking time is usually between 2-3 hours, but may differ depending on altitude and type of bean used. Before serving, remove onion and discard.

Nutritional Information per serving: 253 calories, 38.9 g carbohydrate, 3 g total fat, 0.7 g saturated fat, 13.8 g fiber, 18.8 g protein.

Recipe by Kathy Sheehan, copyright 2010
Inspired by a recipe from the cooking notebooks of my grandmother, Grace Layman.

Friday, October 16, 2009

Pork Tenderloin with Leek and Mushroom Pan Sauce

This is a wonderfully rich tasting, but surprisingly light main dish that is perfect for company. Recently, I discovered another low-carb pasta that is delicious and much lower in carbohydrates than any I've ever tried, plus it has more fiber than whole wheat. It isn't often I splurge and eat pasta, but the nutritional content of Carba-Nada might just permit an occasional pasta meal to fit into my diet again! (If you can't find Carba-Nada, use Dreamfield's brand which is found in most supermarkets in the pasta aisle.)

Pork tenderloin is a lean meat and, when pounded into medallions, is quick cooking while remaining moist and incredibly tender. The sauted vegetables in this dish add a wonderful flavor to the creamy pan sauce. The leeks have a very mild onion taste without being too bold or overpowering and I find mushrooms to always be the perfect companion for sour cream. This recipe would be equally delicious made with turkey cutlets, chicken or even sole. I hope you'll give this savory, saucy meal a try soon and let me know what you think.

Pork Tenderloin with Leek and Mushroom Pan Sauce
served with Low-Carb Pasta
(Makes 4 servings)

1 pound pork tenderloin
Salt and freshly ground pepper
½ cup panko (Japanese bread crumbs)
2 teaspoons parsley, finely chopped
2 tablespoons olive oil
1 leek, white and light green portion, sliced
1½ cups mushrooms, sliced
2 teaspoons all-purpose flour
2 teaspoons Worcestershire sauce
2 tablespoons Marsala wine
½ cup + chicken stock
3 tablespoons light sour cream
6 ounces reduced-carb pasta (I suggest Dreamfield's or Carba-Nada)

1. Slice pork tenderloin into eight 1¼" slices and place cut side down onto plastic wrap. Cover with another piece of plastic wrap and pound each slice until about ½" thickness. Season both sides with salt and pepper.

2. In a 1 cup measure, place 2 teaspoons Worcestershire, 2 tablespoons Marsala wine, and enough chicken stock to reach ¾ cup mark; stir and set side.

3. If your panko is not finely ground, place it in a food processor and process until finely ground. Add chopped parsley, salt and pepper to season breadcrumbs. Lightly dredge pork tenderloin medallions in seasoned panko crumbs; set aside.

4. Boil water for pasta and prepare as directed on package. (If using Carba-Nada brand, it takes about 5 minutes, so add pasta to boiling water after pork medallions are browned and you are preparing pan sauce.)

5. Heat olive oil in a skillet over medium-high heat. Cook pork medallions about 3-4 minutes per side, until nicely browned. Remove to serving platter and cover with foil to keep warm.

6. Add leeks, mushrooms and a small amount of the chicken stock mixture to deglaze the bottom of the pan, stirring to loosen any brown bits from bottom of skillet. Saute leeks and mushrooms until beginning to soften, about 3 minutes. Sprinkle vegetables with 2 teaspoons of flour and cook for another minute. Add remaining chicken stock mixture to pan and stir to combine. Cook until bubbly and slightly thickened. Remove from heat and add light sour cream to sauce and stir until smooth and creamy.

7. Divide pasta equally among four serving plates. Top each with two pork medallions. Divide and spoon mushroom sauce equally over each.

Nutritional Information per serving with low-carb pasta: 369.7 calories, 33.1 g carbohydrate, 11.8 g total fat, 2.6 g saturated fat, 5.3 g fiber, 32.3 g protein.

Nutritional Information per serving of meat and sauce (no pasta): 264.7 calories, 15.1 g carbohydrate, 11 g total fat, 2.6 g saturated fat, 0.8 g fiber, 23.3 g protein.

Original recipe by Kathy Sheehan, copyright 2009