Showing posts with label tomato. Show all posts

Saturday, March 26, 2022

The Ultimate Keto Grilled Cheese Egg in a Nest

Ultimate Keto Grilled Cheese Egg In a Nest
I have recently discovered the best keto bread recipe I’ve ever tried! (Click here for the recipe.) Now, I have real bread that I can use in a variety of ways in my meals. I have always loved Egg In a Nest, but this recipe takes it a step further. It has all the best flavors of a grilled cheese and tomato sandwich with Egg In a Nest! By itself, it makes a great quick and easy meal. Of course, you can use any keto bread that you like in place of homemade, but be aware the nutritional information may change depending on the bread you use.

The Ultimate Keto Grilled Cheese Egg In a Nest
Makes 1 serving

2 slices of keto bread (I used this recipe for Cloud Bread Loaf)
1 teaspoon yellow mustard
2 teaspoons butter, softened (I prefer salted butter)
1 slice tomato
1 ounce sliced cheese (I prefer sharp cheddar)
1/2 teaspoon olive or avocado oil
1 egg
Salt and pepper to taste
1 ounce shredded cheddar cheese

Equipment Needed: small biscuit cutter
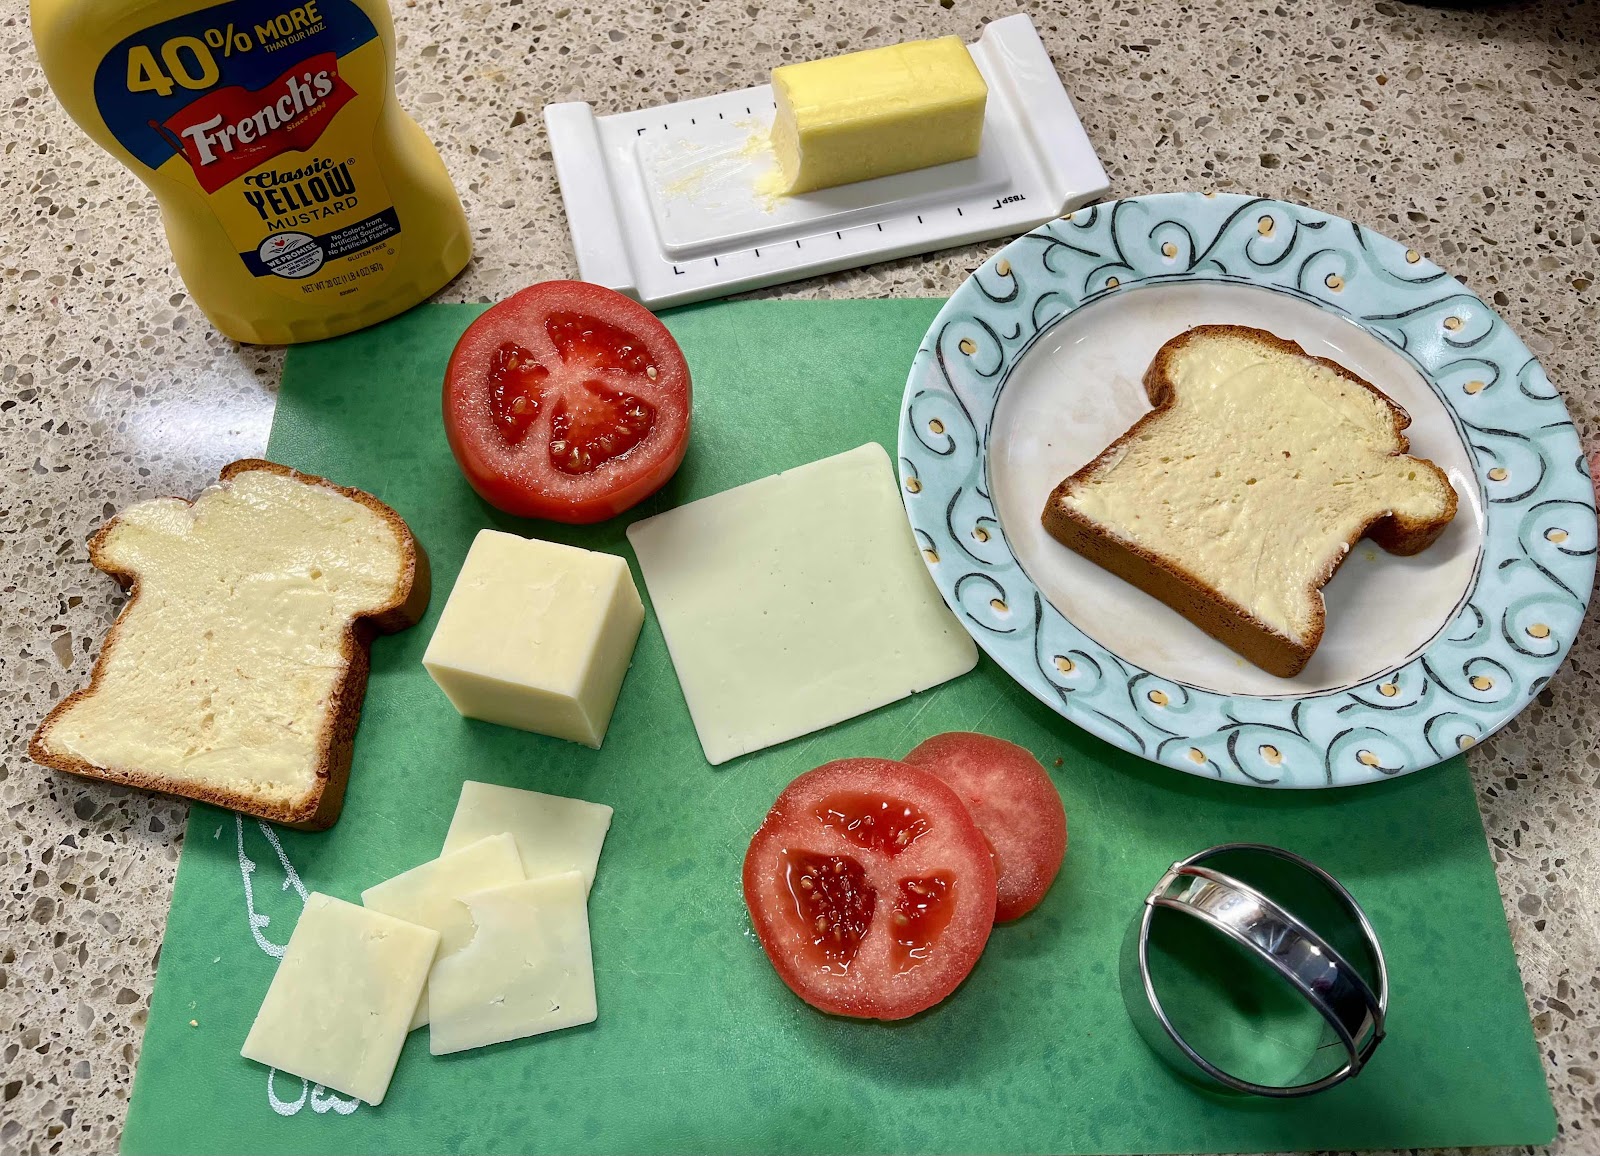
Ingredients needed
1. Spread the mustard on both slices of the bread, on the side that will become the inside of the grilled cheese sandwich. Spread the softened butter on both sides of the bread, on the sides that will become the outside of the grilled cheese sandwich.
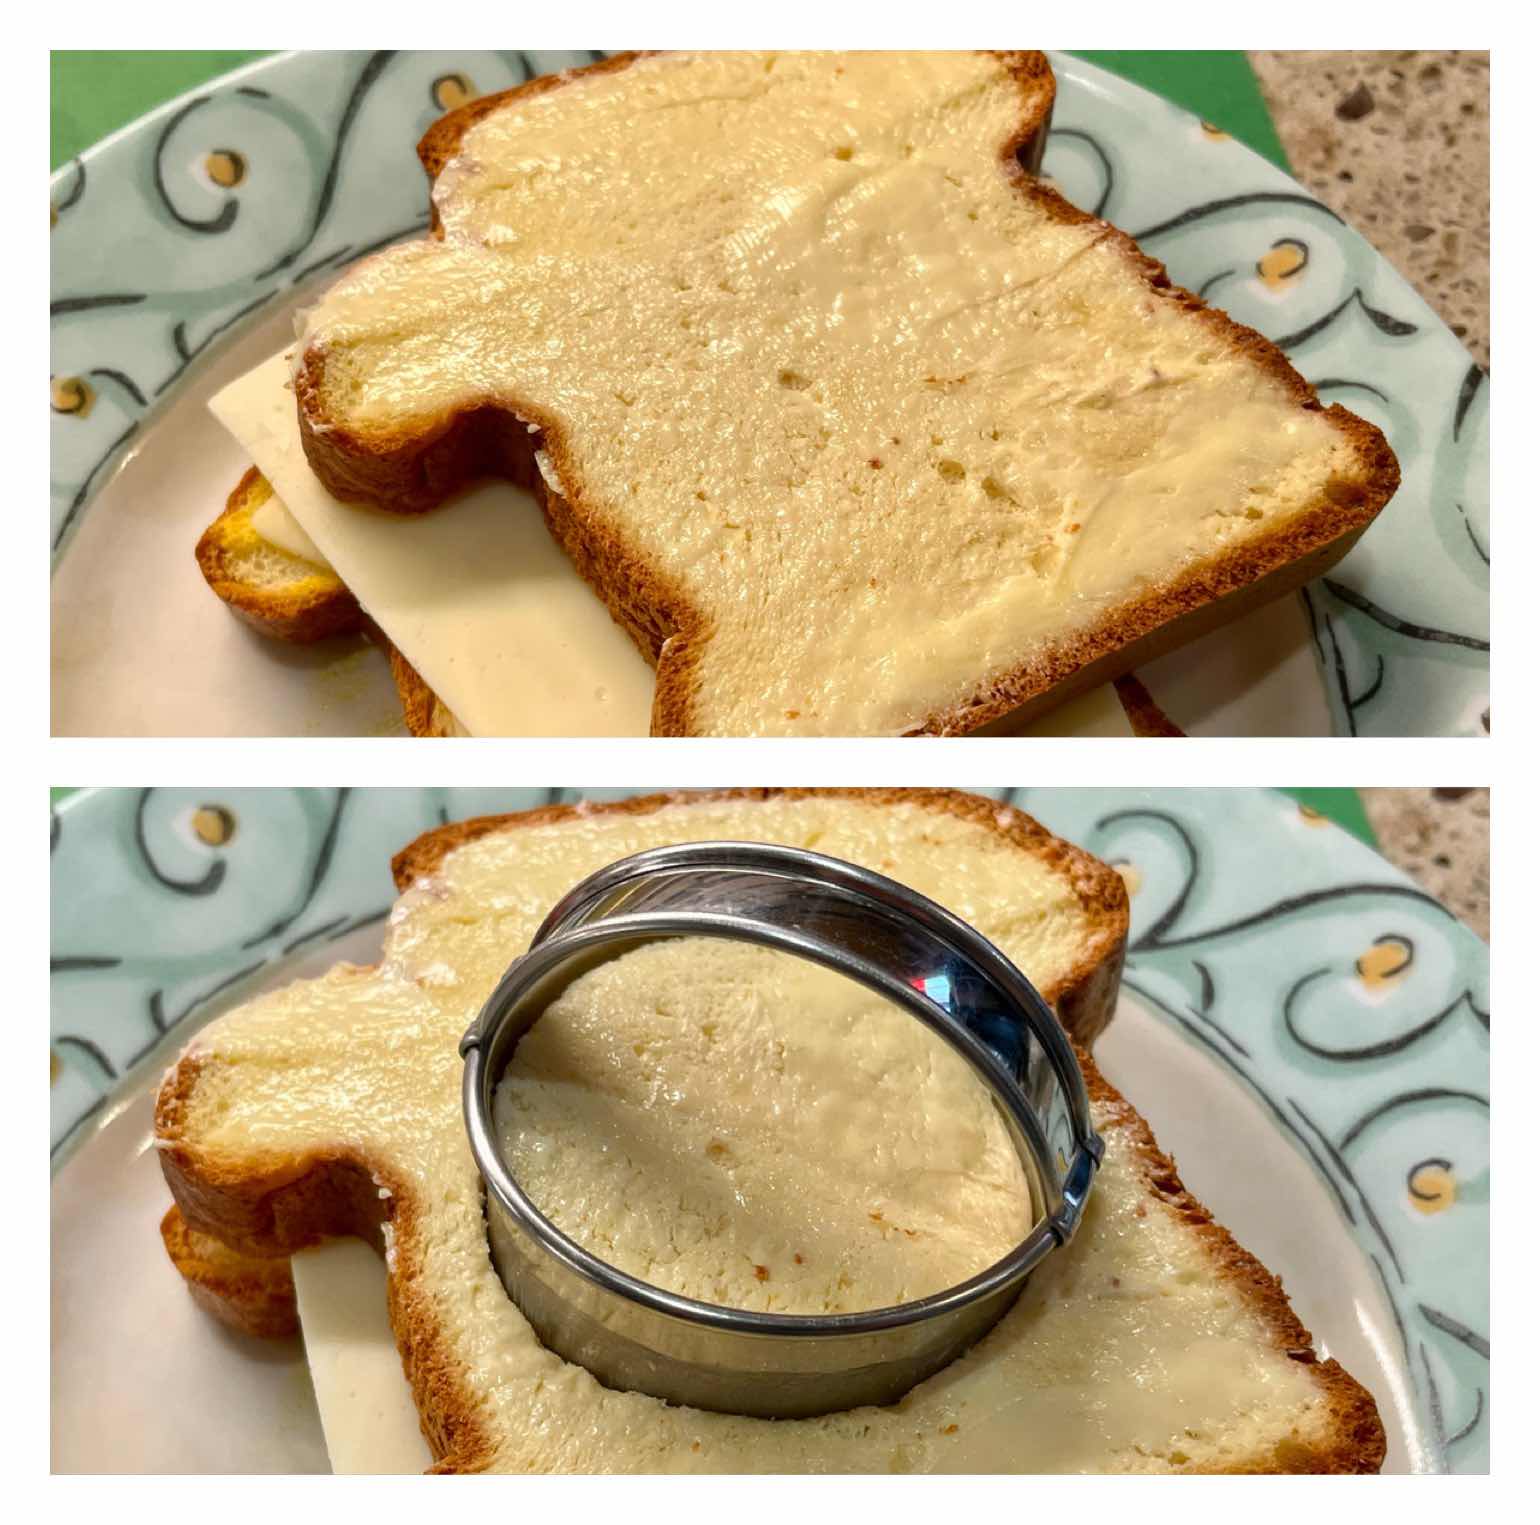
Make cheese sandwich
2. Place one slice of bread, butter side down, on a small plate or cutting board. Top with cheese and place the remaining slice of bread, butter side up, onto the cheese. Use the small biscuit cutter to cut a hole in the center of the cheese sandwich. Save the center circle to be grilled along side the Egg in a Nest.

Cut tomato to fit hole
3. If your tomato slice is larger than the hole you created, use the biscuit cutter to make it the correct size. You want it to fit inside the circle.
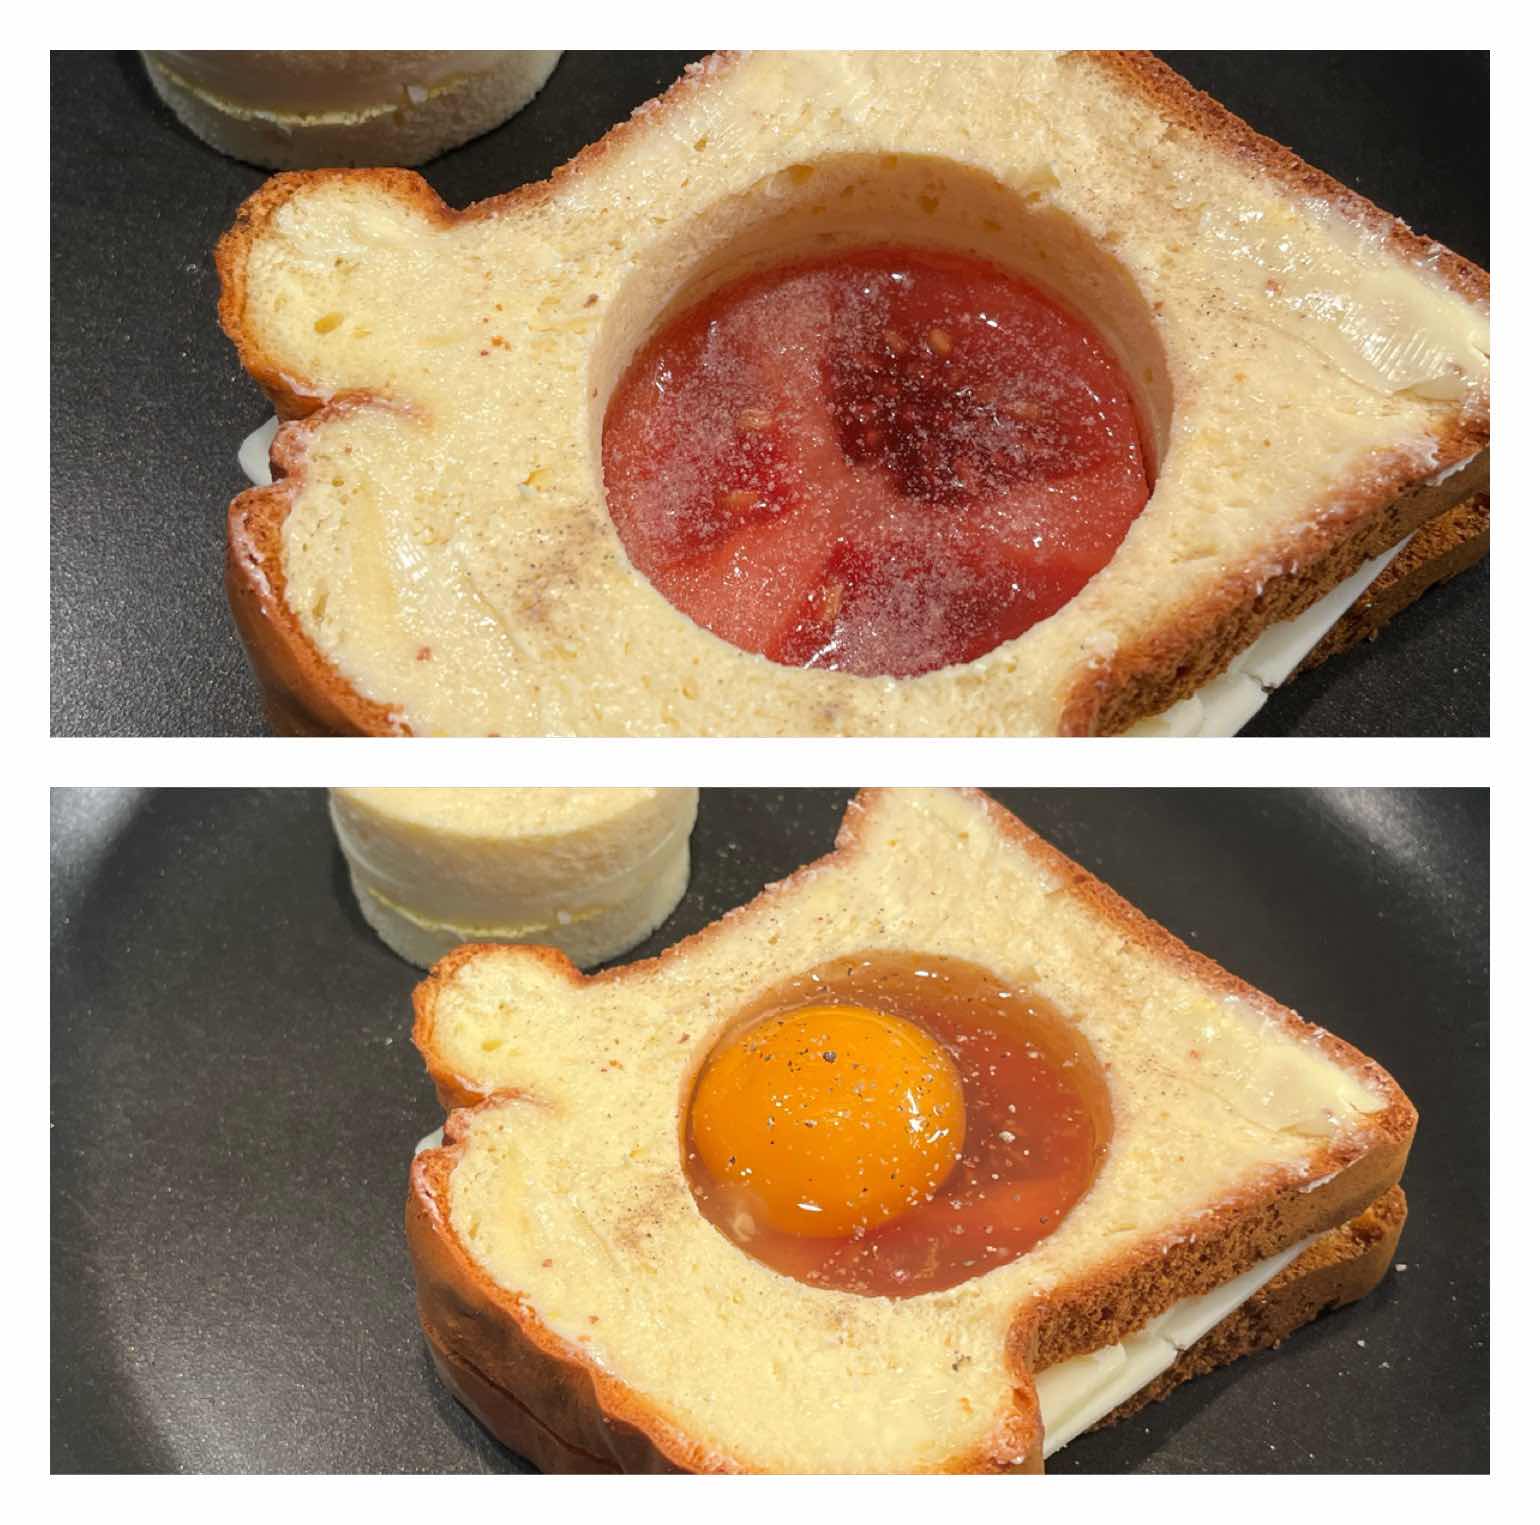
Place tomato in hole and top with egg
4. Place the cheese sandwich, with the hole in it, into a non-stick skillet (I start with a cold skillet). Drizzle 1/2 teaspoon of oil into the hole, then insert the tomato slice into the hole. Season with salt and pepper to taste. Crack an egg over the tomato slice and again season the egg with salt and pepper. Turn the heat to low (or medium-low). Cover the skillet with a lid to trap the heat and help melt the cheese. Grill until the bread has browned nicely. At the same time, grill the round cheese sandwich that you cut from the center.
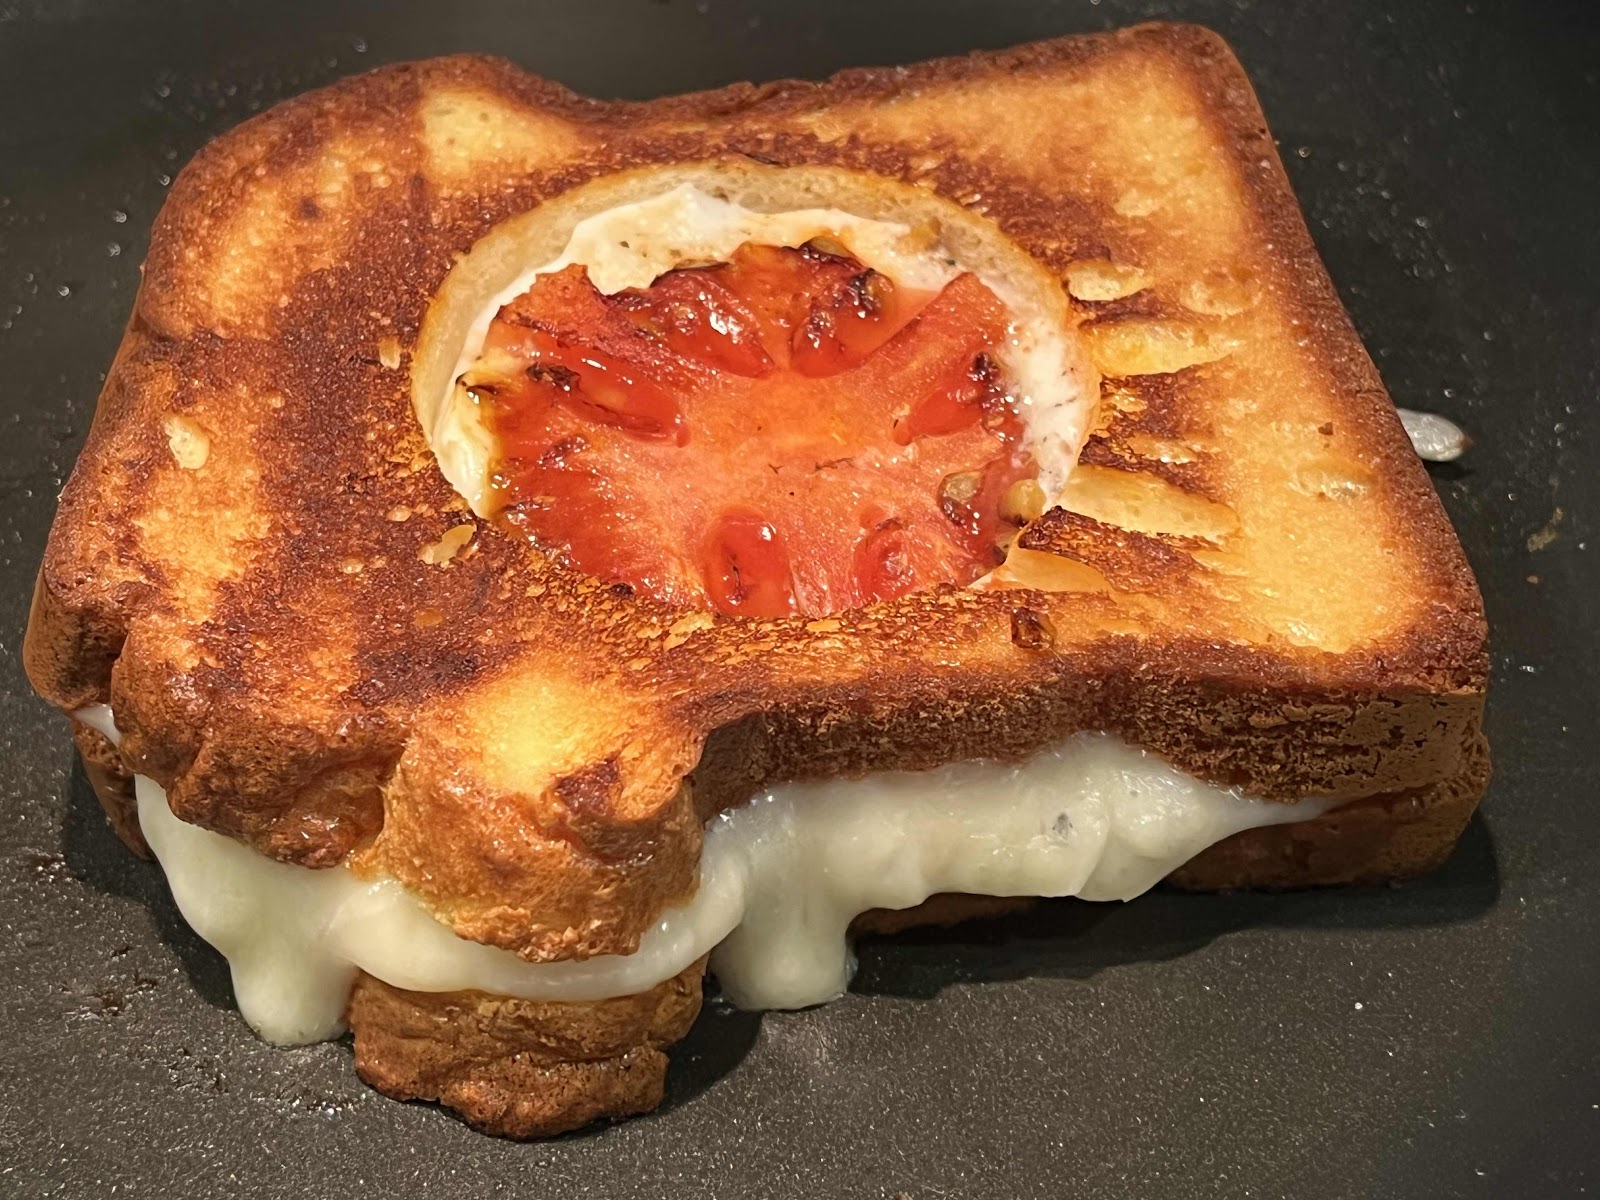
Flip Egg In a Nest
5. With a spatula, carefully flip the sandwich and continue grilling on the second side until the bread has browned and the egg is done to your liking. (Again, I like to cover the skillet to trap the heat.) Flip the small round cheese sandwich and brown the second side, as well.

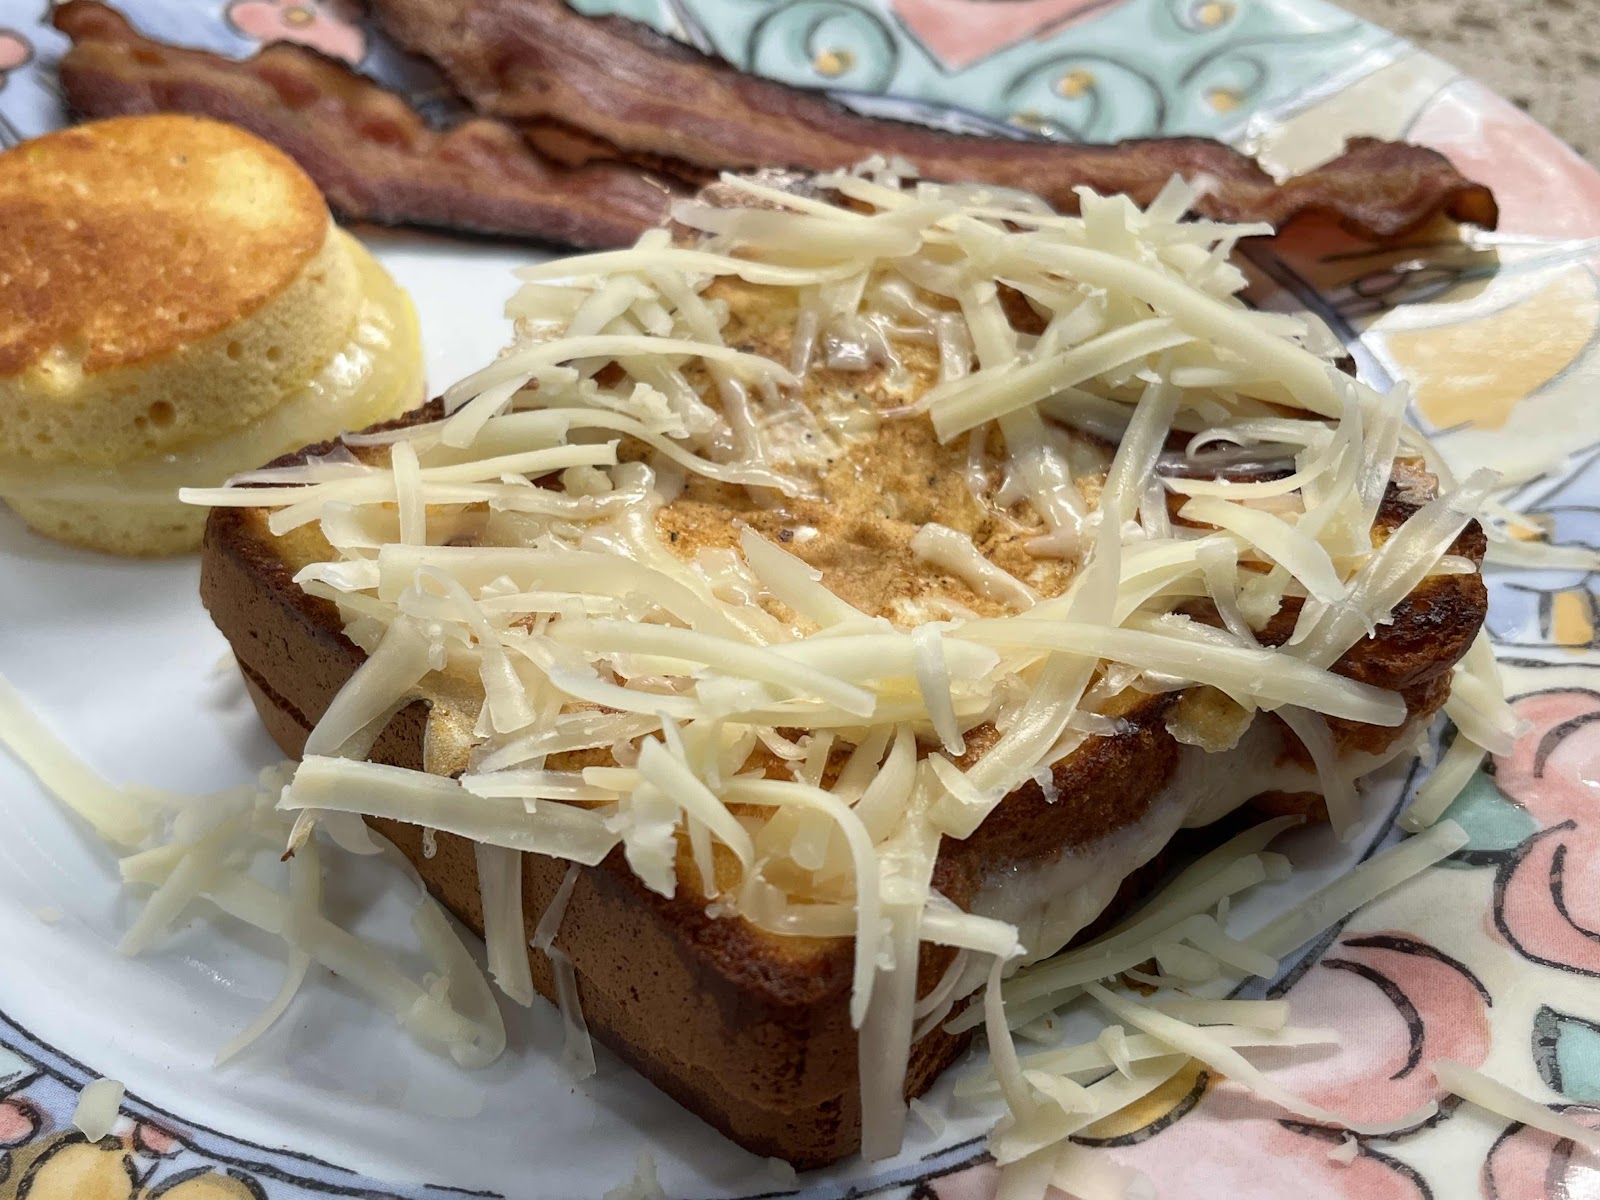
Grilled Cheese Egg In a Nest
6. Remove the Egg In a Nest and the round grilled cheese sandwich to a serving plate. Sprinkle the shredded cheese over the Egg In a Nest and serve! YUM!

Nutritional Information per serving (made with 2 slices Cloud Bread Loaf): 603 calories, 3.6 g carbohydrate (2.4 g dietary fiber, 2.9 g sugars), 49.8 g total fat (20 g saturated fat, 0 g trans fat), 428 mg cholesterol, 690 mg sodium, 466.9 mg calcium, 254 mg potassium, 533 IU Vit A, 3 mg Vit C, 3 mg iron, 36.7 g protein. Net carbs per serving: 1.2 grams

Photos and recipe by Kathy Sheehan, copyright 2022
All rights reserved. Please do not duplicate without the author’s permission.

Saturday, December 4, 2021

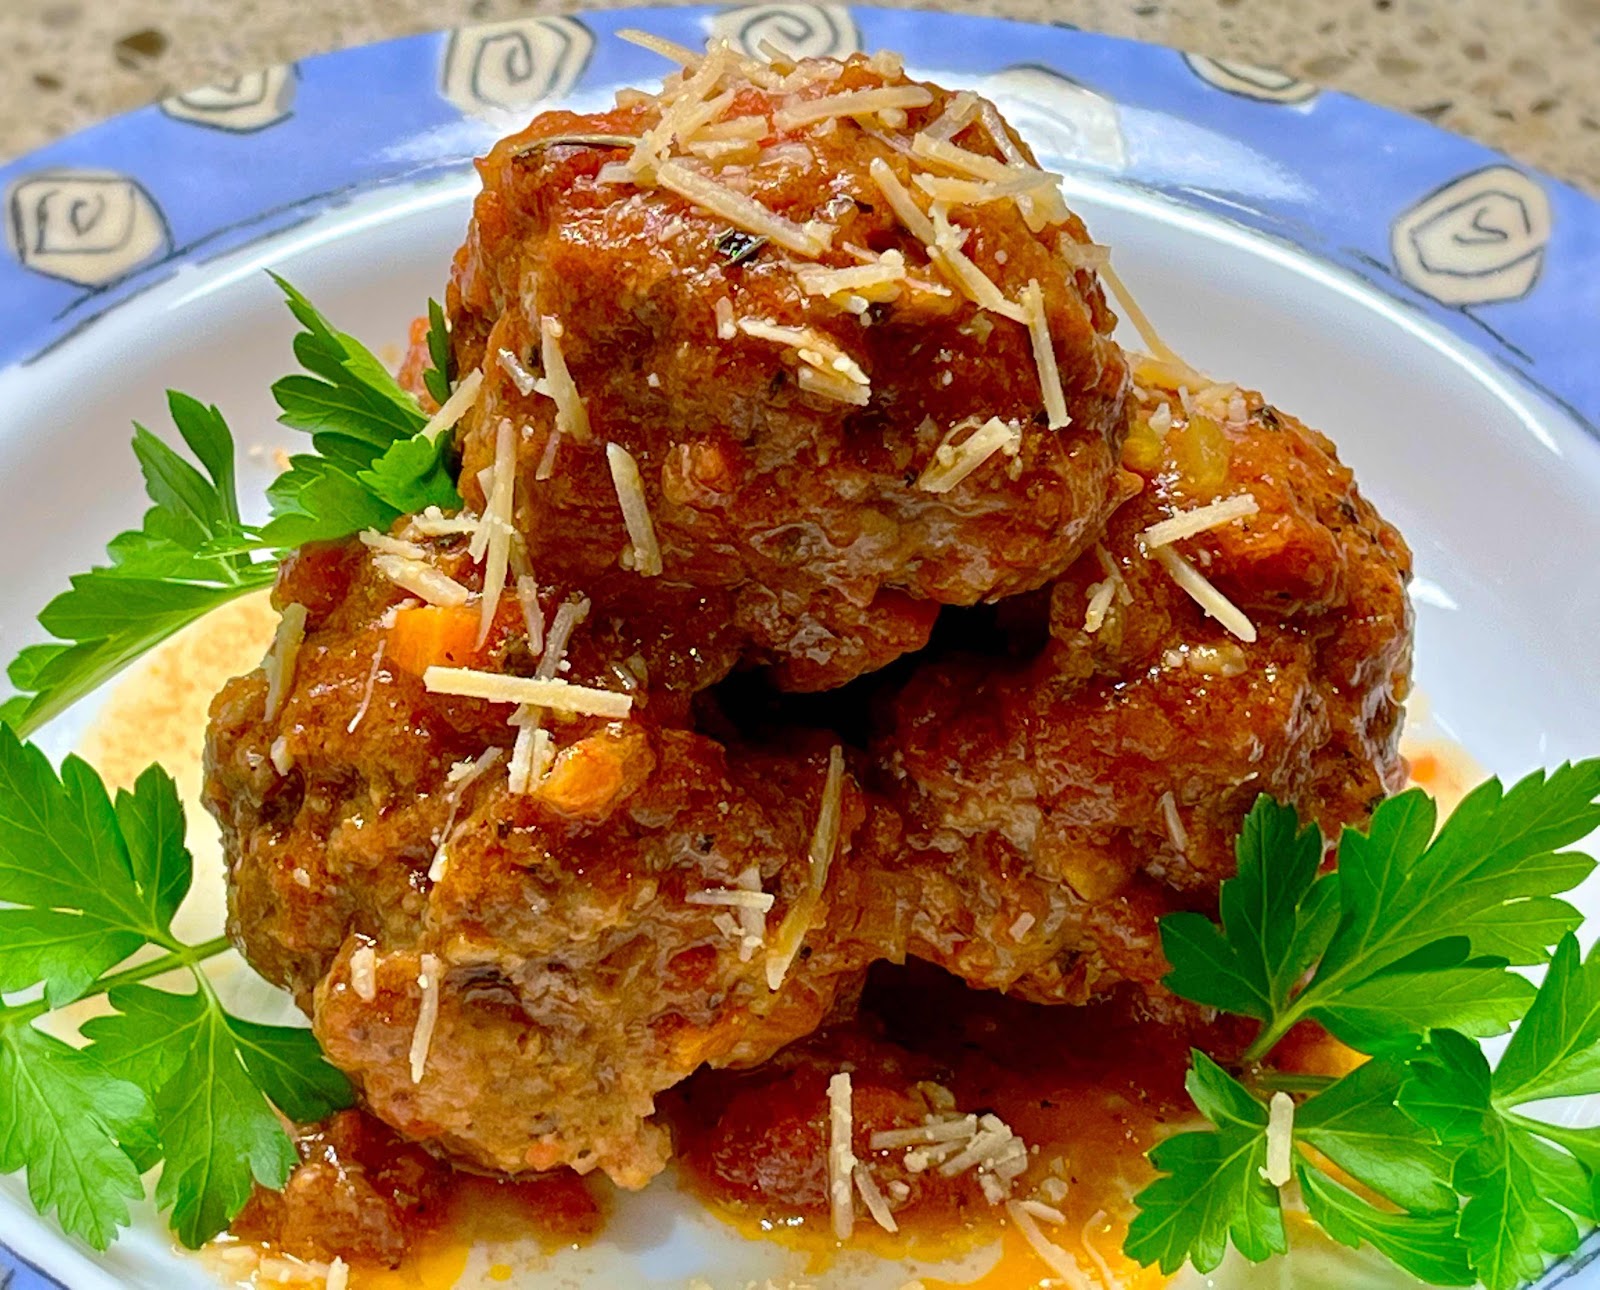
Keto Braised Italian Meatballs

Braised Italian Meatballs
One year, when I vacationed in Italy, I found a restaurant that served the best meatballs I had ever tasted. They were tender and so flavorful! Since then, I discovered that braising meatballs, instead of baking or browning them in a skillet, is the best method for cooking them. Braising is a method of cooking in which the meat is simmered in a cooking liquid or, in this case, a delicious sauce. It is safe to add raw meat to the braising liquid as long as it continues simmering until the meatballs are cooked through. These are hearty, good-sized meatballs so, for me, two are plenty! The sauce is a light tomato-based sauce that also has wine and beef broth. As the meatballs cook in the sauce, a twofold exchange is going on: First, the meatballs become more flavorful by absorbing the sauce as they cook. Secondly, the sauce reduces and deepens in flavor as the meat releases its juices. I think you’ll agree with me that these tender and delicious meatballs are some of the best you’ve ever had!

Keto Braised Italian Meatballs
Makes 6 servings

Meatballs:
1/2 pound ground pork
1 pound ground beef
2 slices of low carb bread (or 2 chaffles), lightly toasted or dried out
1/2 cup riced cauliflower, thawed and excess liquid removed
1 egg
1 cup parmesan cheese, grated
1 teaspoon dried Italian herb seasoning
3/4 teaspoon fennel seeds

Sauce:
1 can (14.5 or 15 oz) diced tomatoes (with liquid), blitzed in a food processor to make a smooth sauce (or 1-1/2 cups tomato sauce)
1 tablespoon tomato paste
2 tablespoons olive oil
1/4 cup carrots, finely chopped
1/4 cup onions, finely chopped
1 stalk celery, finely chopped
2 cloves garlic, minced
1/4 teaspoon salt
1/2 teaspoon black pepper
1/2 teaspoon zero-carb brown sugar substitute, such as Swerve Brown
1 tablespoon fresh sage leaves, chopped (if using dried herbs, use 1/2 the amount called for)
1 tablespoon fresh thyme, chopped
1 tablespoon fresh parsley, chopped 
1/2 cup dry white wine
1 cup beef stock

1. Tear the dried low carb bread (or chaffles) into pieces and place in a food processor. Add the drained riced cauliflower and pulse together until crumbs; set aside.

2. Placed the ground pork and beef into a large bowl and mix well. Mix in the bread or chaffle crumbs, the egg and mix. Add the grated cheese, herbs and fennel seeds and mix well with your hands until all the ingredients are well distributed.

3. Using your hands, shape into meatballs about 2-1/2 inches in diameter or use slightly less than 1/3 cup measuring cup to form 12 equal-sized meatballs. Set aside. (This step can be done one day ahead and refrigerated. Allow the meatballs to sit at room temperature for at least 30 minutes before cooking.)

4. To make the sauce: Pour the diced tomatoes and tomato paste into the food processor and blitz until it forms a smooth sauce. Measure to make sure you have at least 1-1/2 cups of tomato sauce (a little more is fine); set aside.

5. Add the olive oil to a wide, deep, heavy sauce pan and warm over medium heat. Add the carrots, celery and onion. Stir and cook for 2 minutes. Add the garlic and stir briefly until fragrant.

6. Add the salt, pepper, brown sugar substitute, sage, thyme and parsley. Stir well and cook for 2 minutes. Stir in the wine and cook for 2 minutes. Add the tomato sauce mixture and beef stock; stir to combine. Increase heat to medium-high and bring to a boil. After reaching a boil, add the meatballs and return to a boil. Reduce the heat to medium-low or low and simmer, uncovered, for 35 minutes.

7. Carefully, remove the meatballs to a serving plate or bowl with a slotted spoon. If necessary, continue to boil and reduce the sauce until it reaches the desired consistency. For extra flavor and color, you may garnish with chopped chives or parsley.

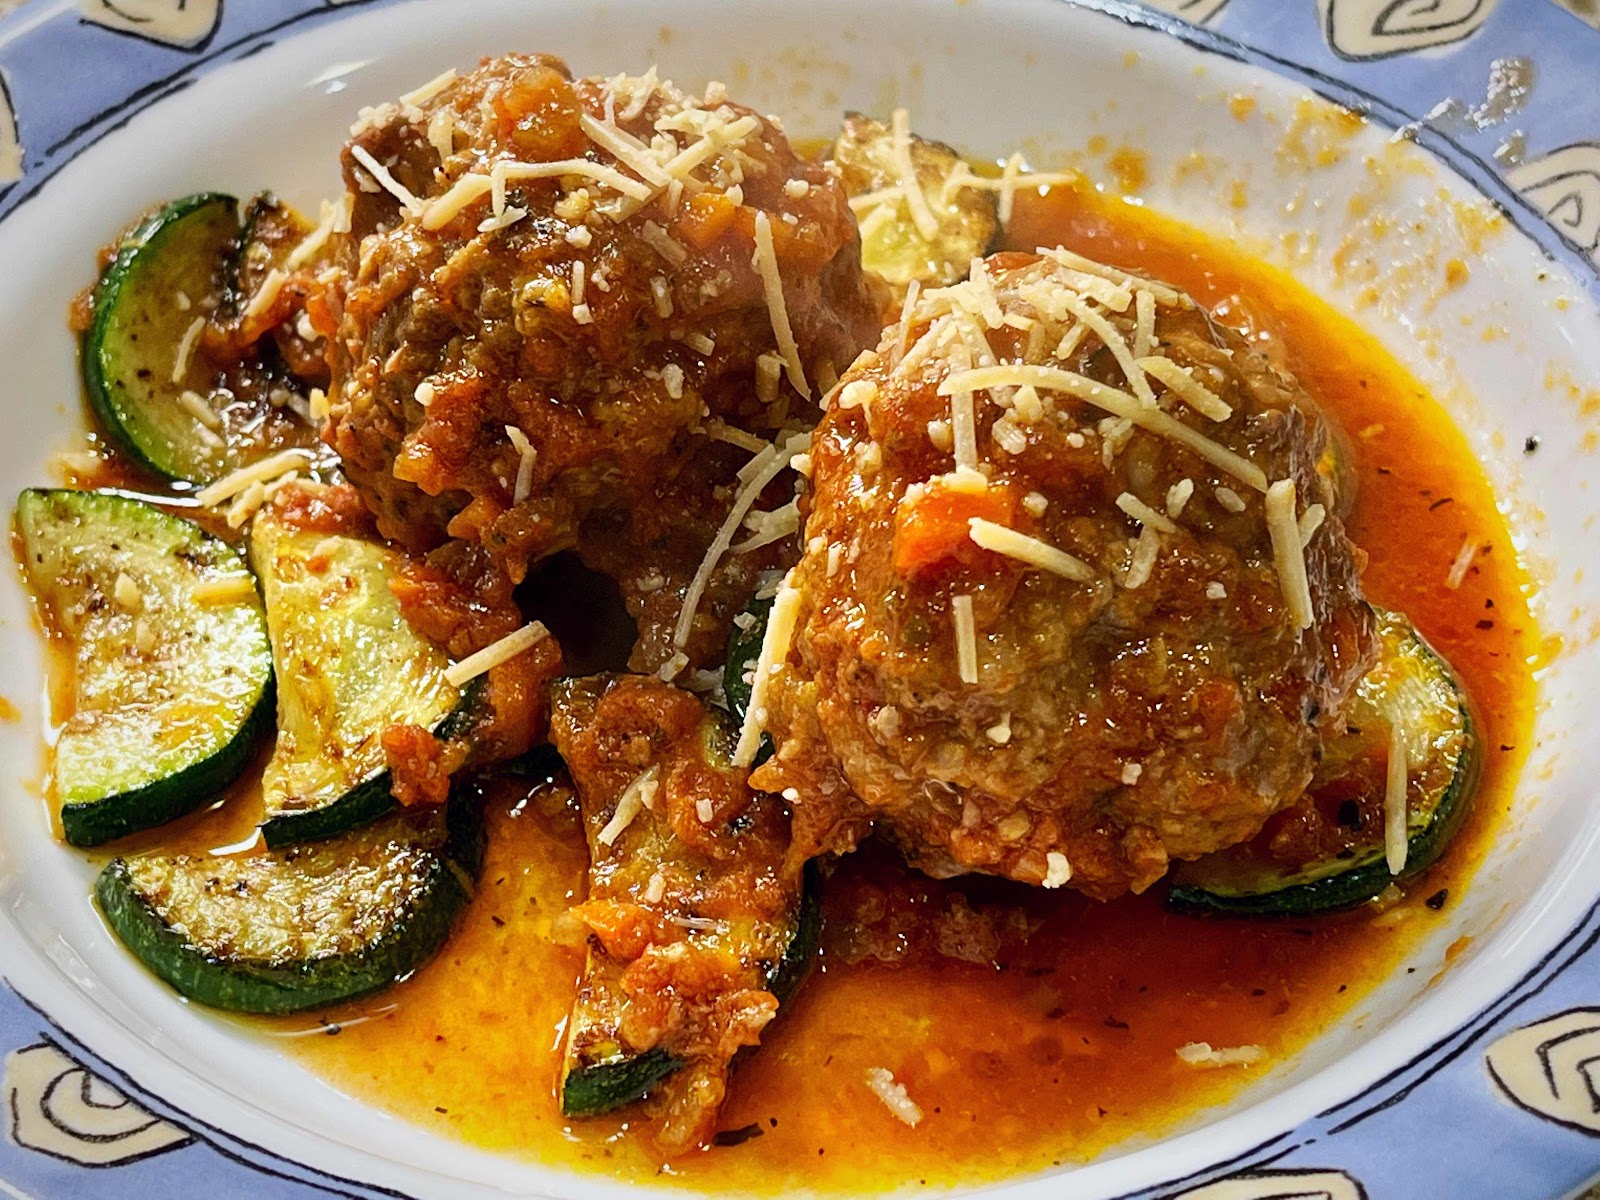
Braised Meatballs with Zucchini
Nutritional Information per 2 meatballs with 1/2 cup sauce: 548 calories, 6 g carbohydrate (1.5 g dietary fiber, 2.8 g sugars), 33.1 g total fat (11.8 g saturated fat, 0 g trans fat), 191 mg cholesterol, 754 mg sodium, 235.5 mg calcium, 456 mg potassium, 11 mg iron, 416 IU Vit A, 12 mg Vit C, 53.8 g protein. Net carbs per serving: 4.5 grams

Photo and recipe by Kathy Sheehan, copyright 2021
All rights reserved. Please do not duplicate without the author’s permission.
Saturday, August 8, 2020

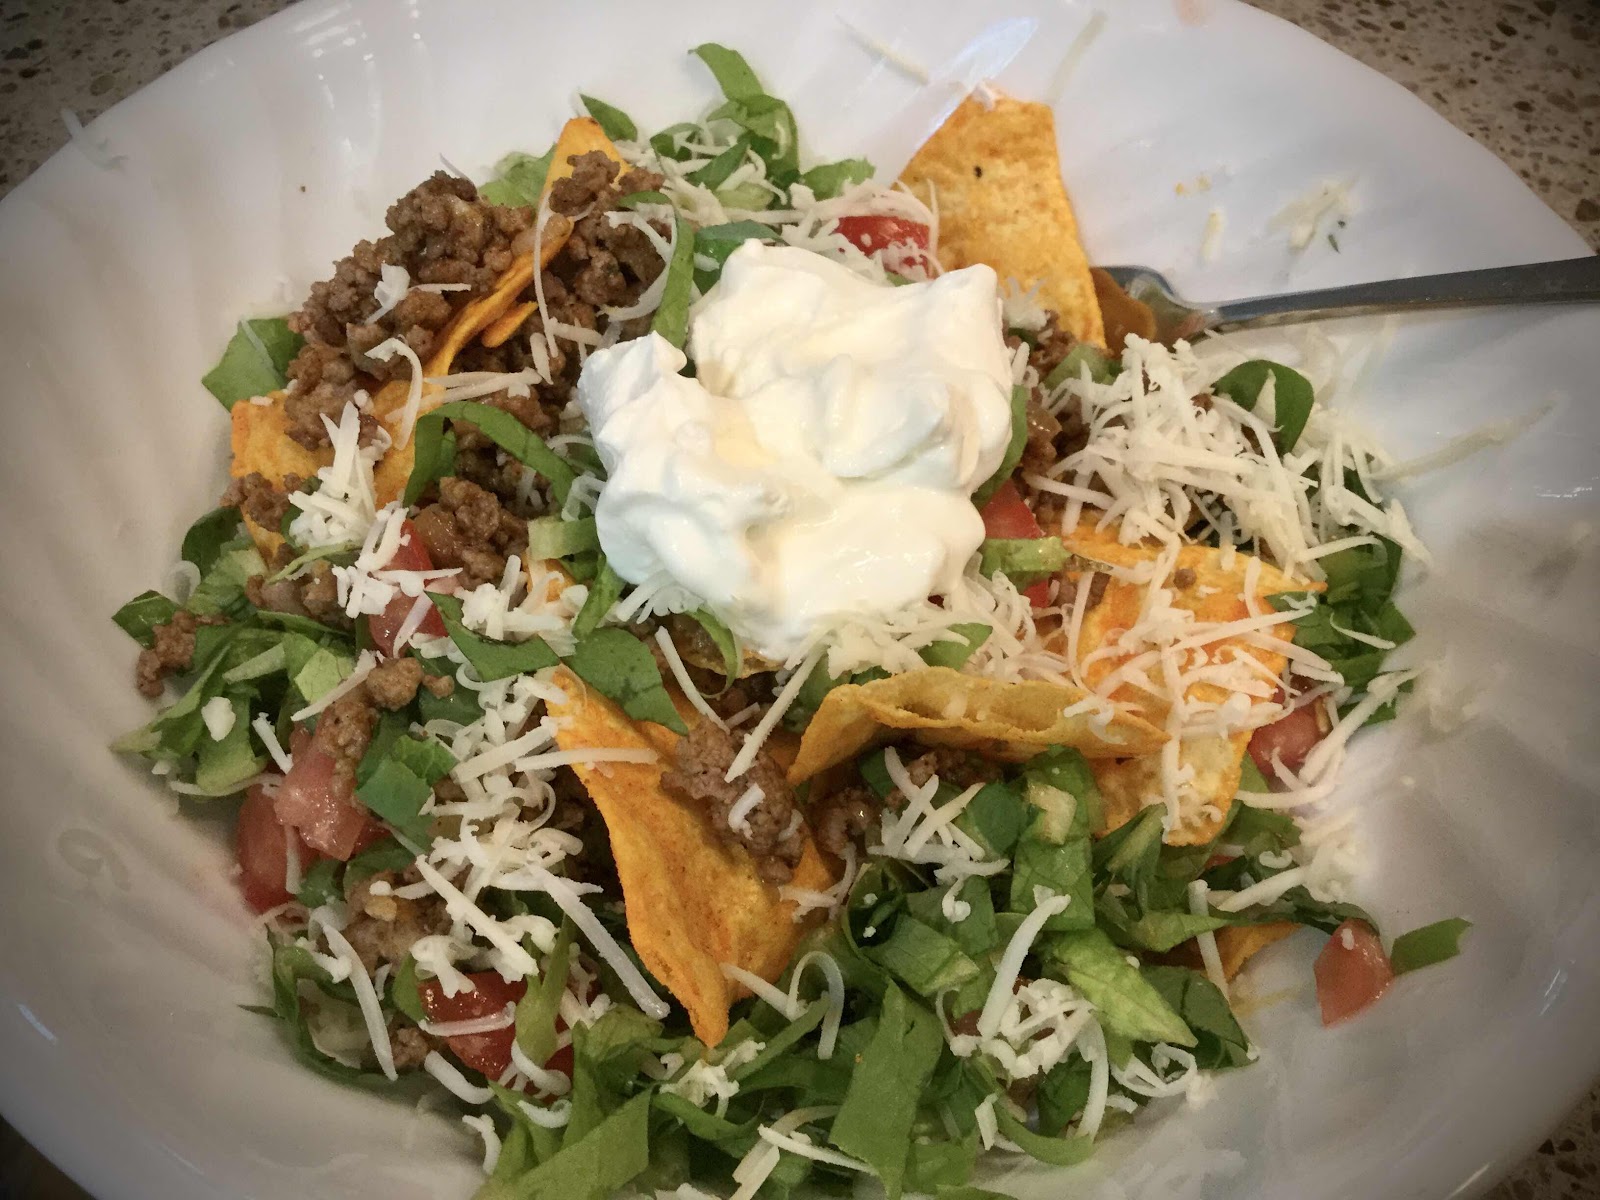
Taco Salad with Quest Protein Chips

Taco Salad with Quest Protein Chips
Here’s an easy dinner that is entirely satisfying and tastes just like a higher carb version. The secret is to use Quest Protein Tortilla-Style Chips in place of corn tortilla chips (I chose Nacho Cheese flavor, but you can substitute your favorite). This delicious salad has become a hands-down favorite on my keto diet, especially when I don’t feel like cooking!

Taco Salad with Quest Protein Chips
Makes 1 serving

3 oz. ground beef
1-2 teaspoons taco seasoning, to taste
1 tablespoon water
1 tablespoon chopped onion
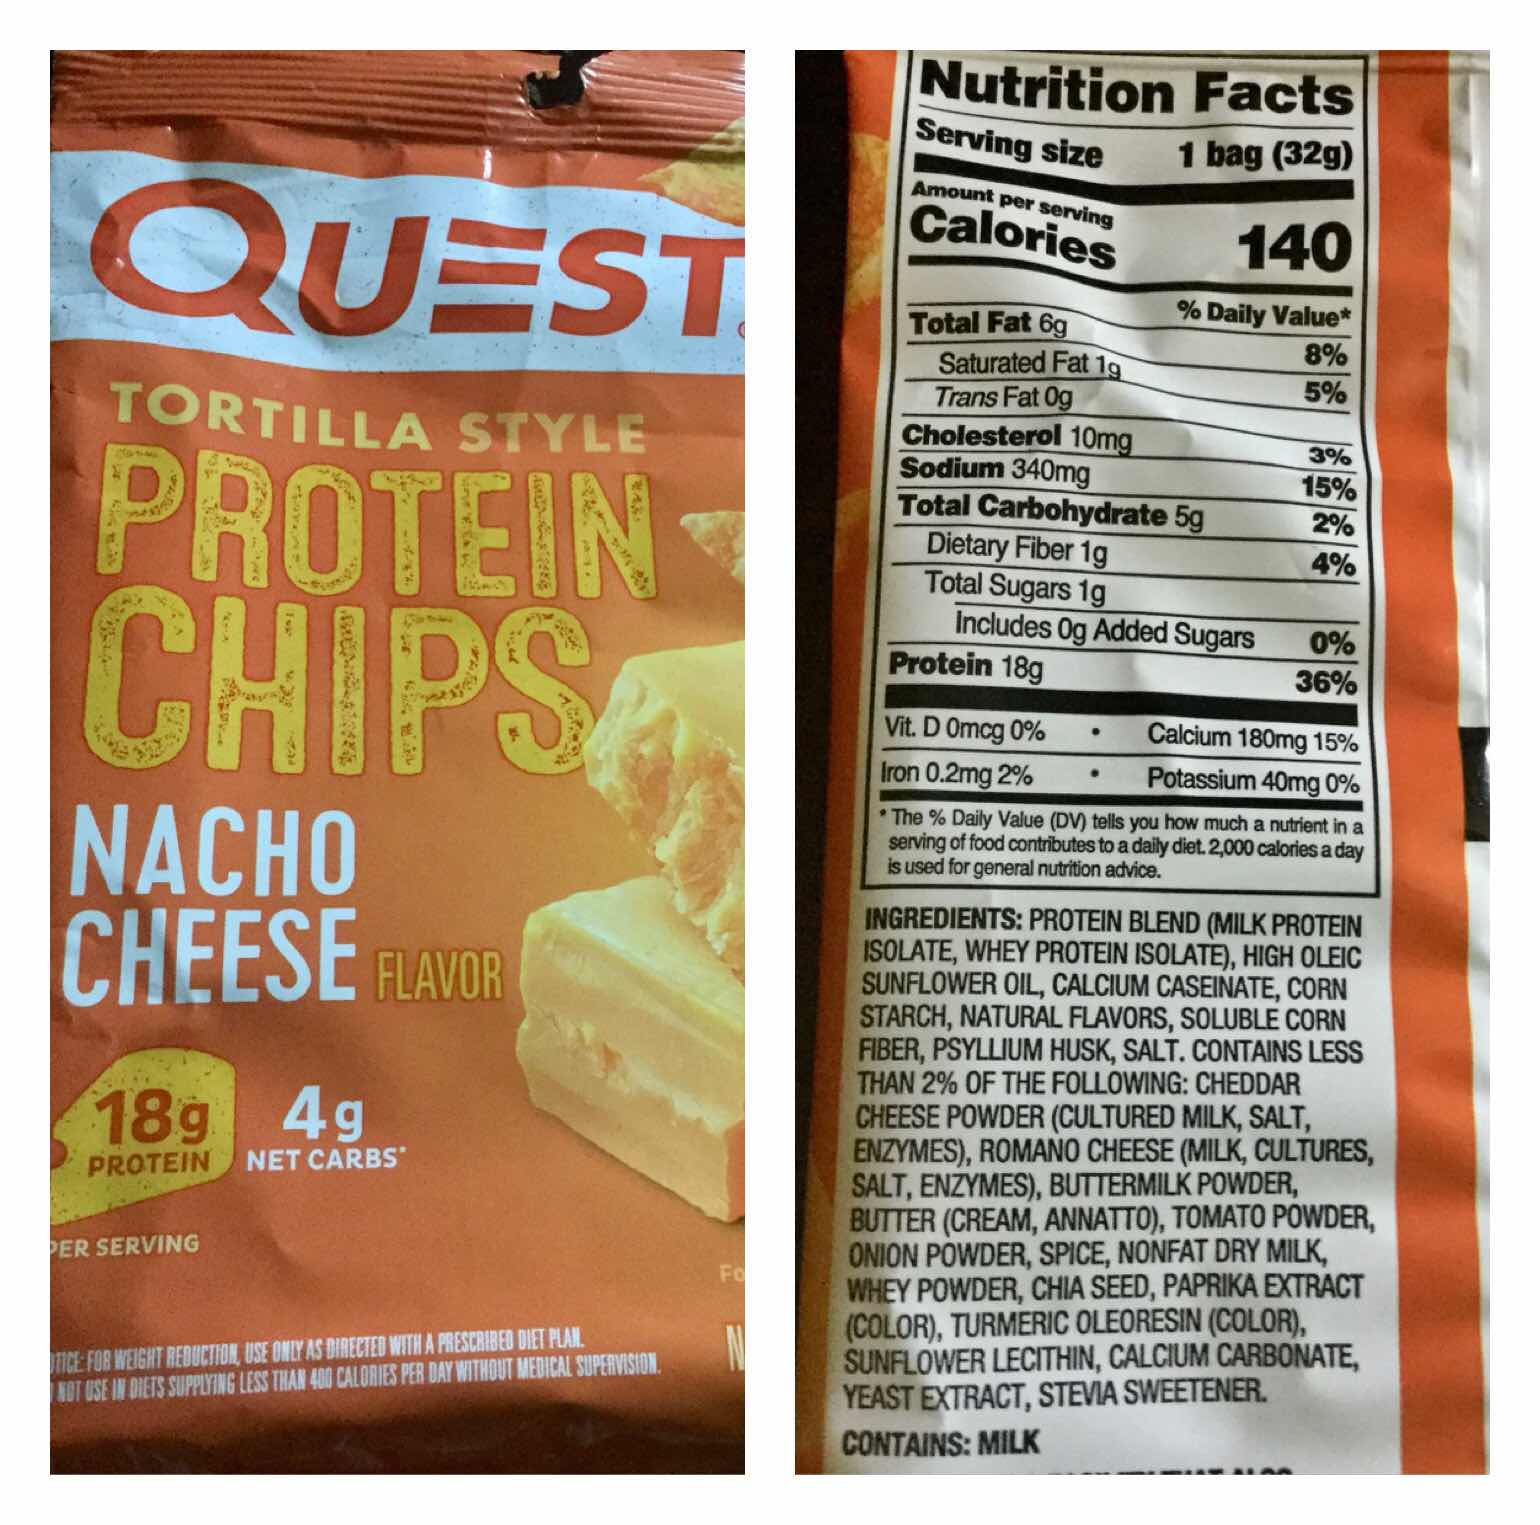
1 bag Quest Protein Tortilla-style Chips, Nacho Cheese (see image below)
1 cup lettuce, torn into bite-size pieces
1/4 cup chopped tomato
1/2 oz. shredded cheddar cheese
2 tablespoons sour cream

1. In a skillet over medium heat, brown the ground beef. Add the taco seasoning to taste. Add the water and chopped onion; stir to combine.

2. Pour the entire bag of Quest Protein chips into a large serving bowl. Top with the seasoned beef, lettuce, chopped tomato and shredded cheese. Dollop with sour cream and serve.

Quest Protein Chips
Nutritional Information: 445 calories, 9.6 g carbohydrates (2.2 g dietary fiber, 2.9 g sugars), 28.5 g total fat (12.2 g saturated fat, 0 g trans fat), 93 mg cholesterol, 498 mg sodium, 335 mg calcium, 505 mg potassium, 2 mg iron, 614 ug Vit A, 12 mg Vit C, 38.8 g protein. Net carbs per serving: 7.4 grams

Photos and recipe by Kathy Sheehan, copyright 2020
All rights reserved. Please do not duplicate without the author’s permission. 
Tuesday, May 12, 2020

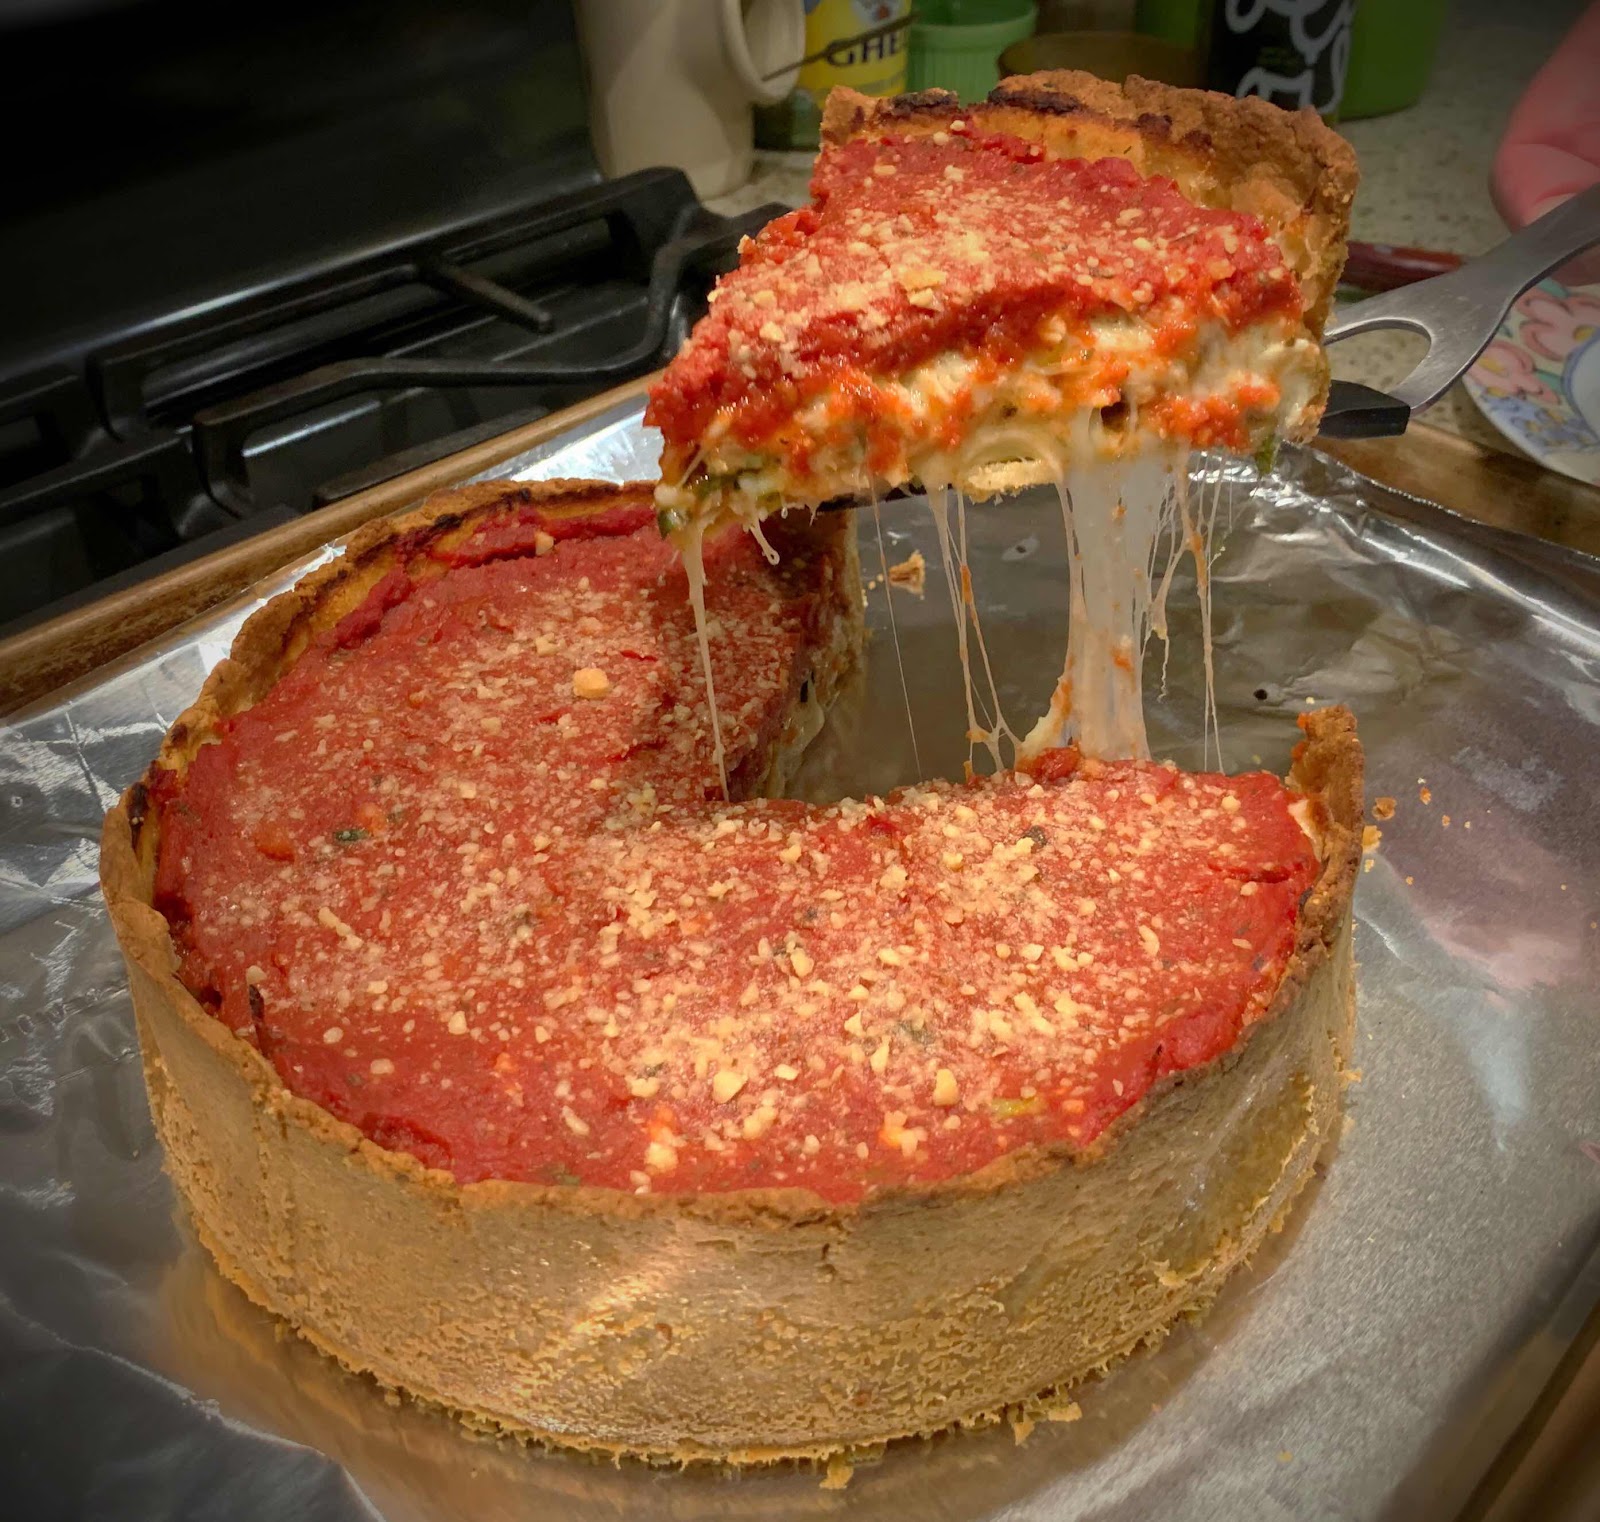
Low Carb Deep Dish, Chicago-Style Sausage Pizza

Low Carb Deep Dish, Chicago-style Pizza
This is one of the most outstanding recipes I’ve ever made and tastes so much like the real thing, no one will be able to tell it’s low carb and gluten free. The dough comes together quickly in a food processor and really holds up during the baking process. The result is a crisp crust overflowing with gooey, melted cheese, savory Italian sausage and tangy tomato sauce in every bite. Believe me, if you like Uno’s Pizza, you and your family will be delighted with this copy-cat recipe. Fill the pizza with any fillings you desire to make it your own.

Low Carb Deep Dish, Chicago-Style Sausage Pizza
Makes 6 servings

Sauce:
26 oz. box of Pomi chopped tomatoes, drained of excess liquid (yields about 1 1/4 cup)
3 cloves garlic, minced
3/4 teaspoon dried oregano
1/4 teaspoon salt (or to taste)

Pizza Crust:
3/4 cup almond flour
3 tablespoons Keto Birch Benders Pancake Mix (or more almond flour)
1/4 cup coconut flour
1 tablespoon psyllium husk powder (I use this Terrasoul brand)
1 teaspoon baking powder
1/4 teaspoon salt
3/4 teaspoon dried Italian herb seasoning
3 tablespoons olive oil (or avocado oil)
1 large egg
3 tablespoons cold water
2 tablespoons grated Parmesan cheese (for dusting inside of pan)

Filling:
6 ounces provolone cheese, sliced
1 pound Italian pork sausage
Sliced black olives (optional)
Sliced mushrooms, heated in skillet until they release their moisture (optional)
6 ounces mozzarella, shredded (whole milk cheese melts better!)

Topping:
3/4 cup grated Parmesan cheese

1. Preheat the oven to 350 degrees Fahrenheit. Grease a 9-inch springform pan very well and sprinkle with 2 tablespoons of finely grated Parmesan cheese, moving the pan around until the bottom and sides are coated; set aside.

2. If using mushrooms, heat over medium heat in a dry skillet until the mushrooms have released their moisture; remove to a bowl and set aside. Remove the sausage from their casings and sauté in the same skillet, breaking up into crumbles, until just cooked through. Drain on a plate that has been lined with several layers of paper towels to remove excess fat; set aside. 

3. Pour the chopped tomatoes into a fine-mesh strainer that has been placed over a bowl to catch excess liquid. Drain, stirring occasionally with a spoon, until most of the liquid has been removed. You want a thick, chunky sauce. Place the tomato sauce into a bowl and add the garlic, oregano and salt; stir to combine and set aside. (Discard or store the drained liquid in the refrigerator for another use.) 

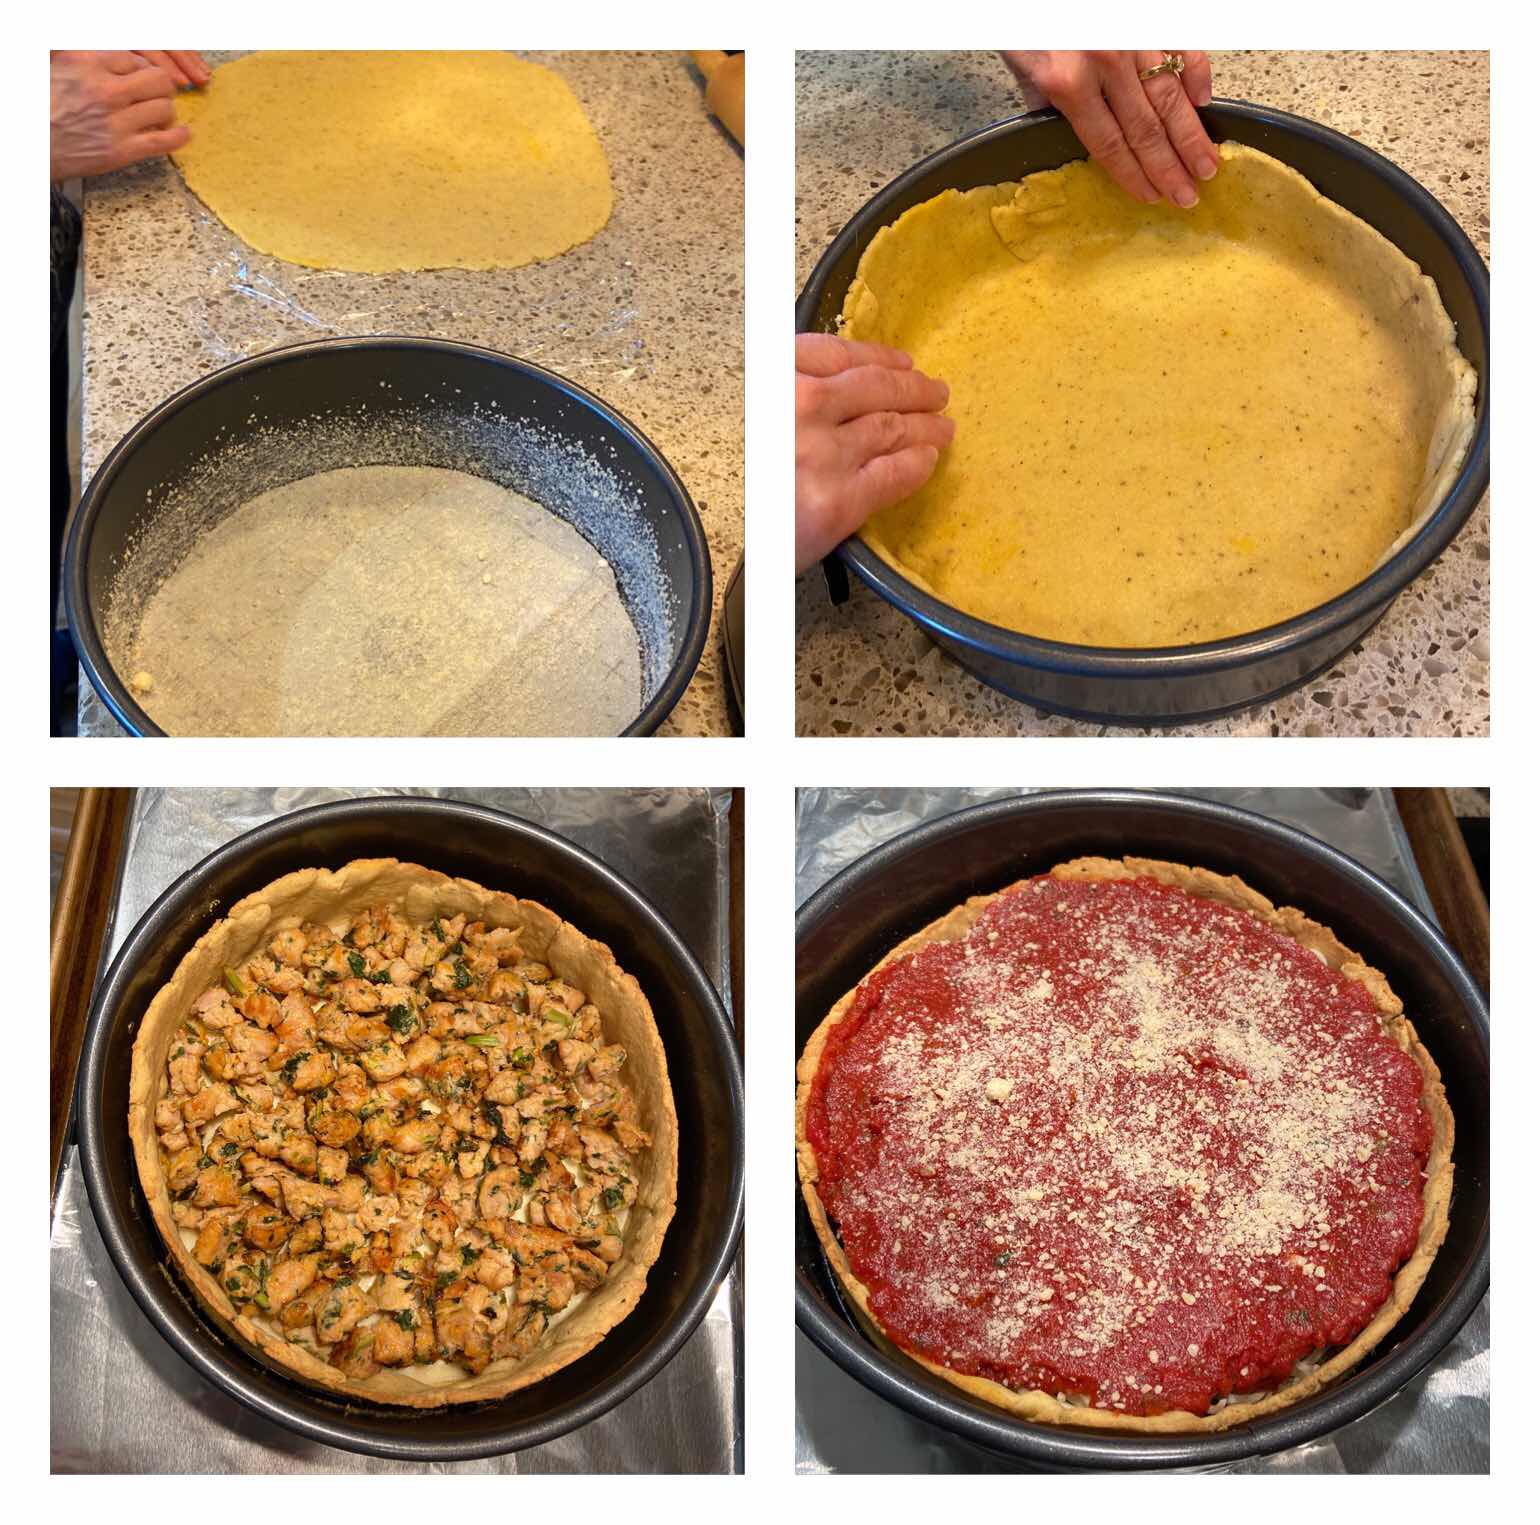
4. Place the dry ingredients for the crust into the food processor and pulse to combine. Add the olive oil, egg and water and process on low until the dough comes together and forms into a ball. Roll the dough out between two pieces of plastic wrap (or parchment paper) into a 12-inch circle. Remove the top piece of plastic wrap and turn the dough into your prepared springform pan, dough side down. Remove the remaining layer of plastic wrap and then, with your fingers, gently press the dough into the pan. “Cut and paste” the dough evenly in the pan and part way up the sides (just tear and press where needed). Once the dough is pressed into the pan, prick the bottom with a fork.

5. Pre-bake the crust in the preheated 350 degree oven for 15 minutes. Remove the crust from the oven and allow to cool for a few minutes before filling. Meanwhile, increase the oven temperature to 410 degrees.

6. Into the pre-baked crust, put down a layer of sliced provolone cheese to cover the entire bottom of the crust. Spread the cooked sausage and any other optional fillings you desire on top of the provolone cheese in an even layer. Next, add a layer of shredded mozzarella over the fillings. Top the layer of shredded cheese with the drained and seasoned chunky tomato sauce, spreading with the back of a spoon to cover the cheese layer entirely. Finally, sprinkle the sauce with 3/4 cup grated Parmesan cheese.

Pizza crust and layering fillings7. Place the pan on a baking sheet (in case the filling leaks). Bake for 30-35 minutes or until the Parmesan cheese has turned a golden color and the melted mozzarella cheese you can see below the sauce is bubbly.

8. Remove the pizza from the oven and allow to cool for at least 10 minutes before slicing. Enjoy!

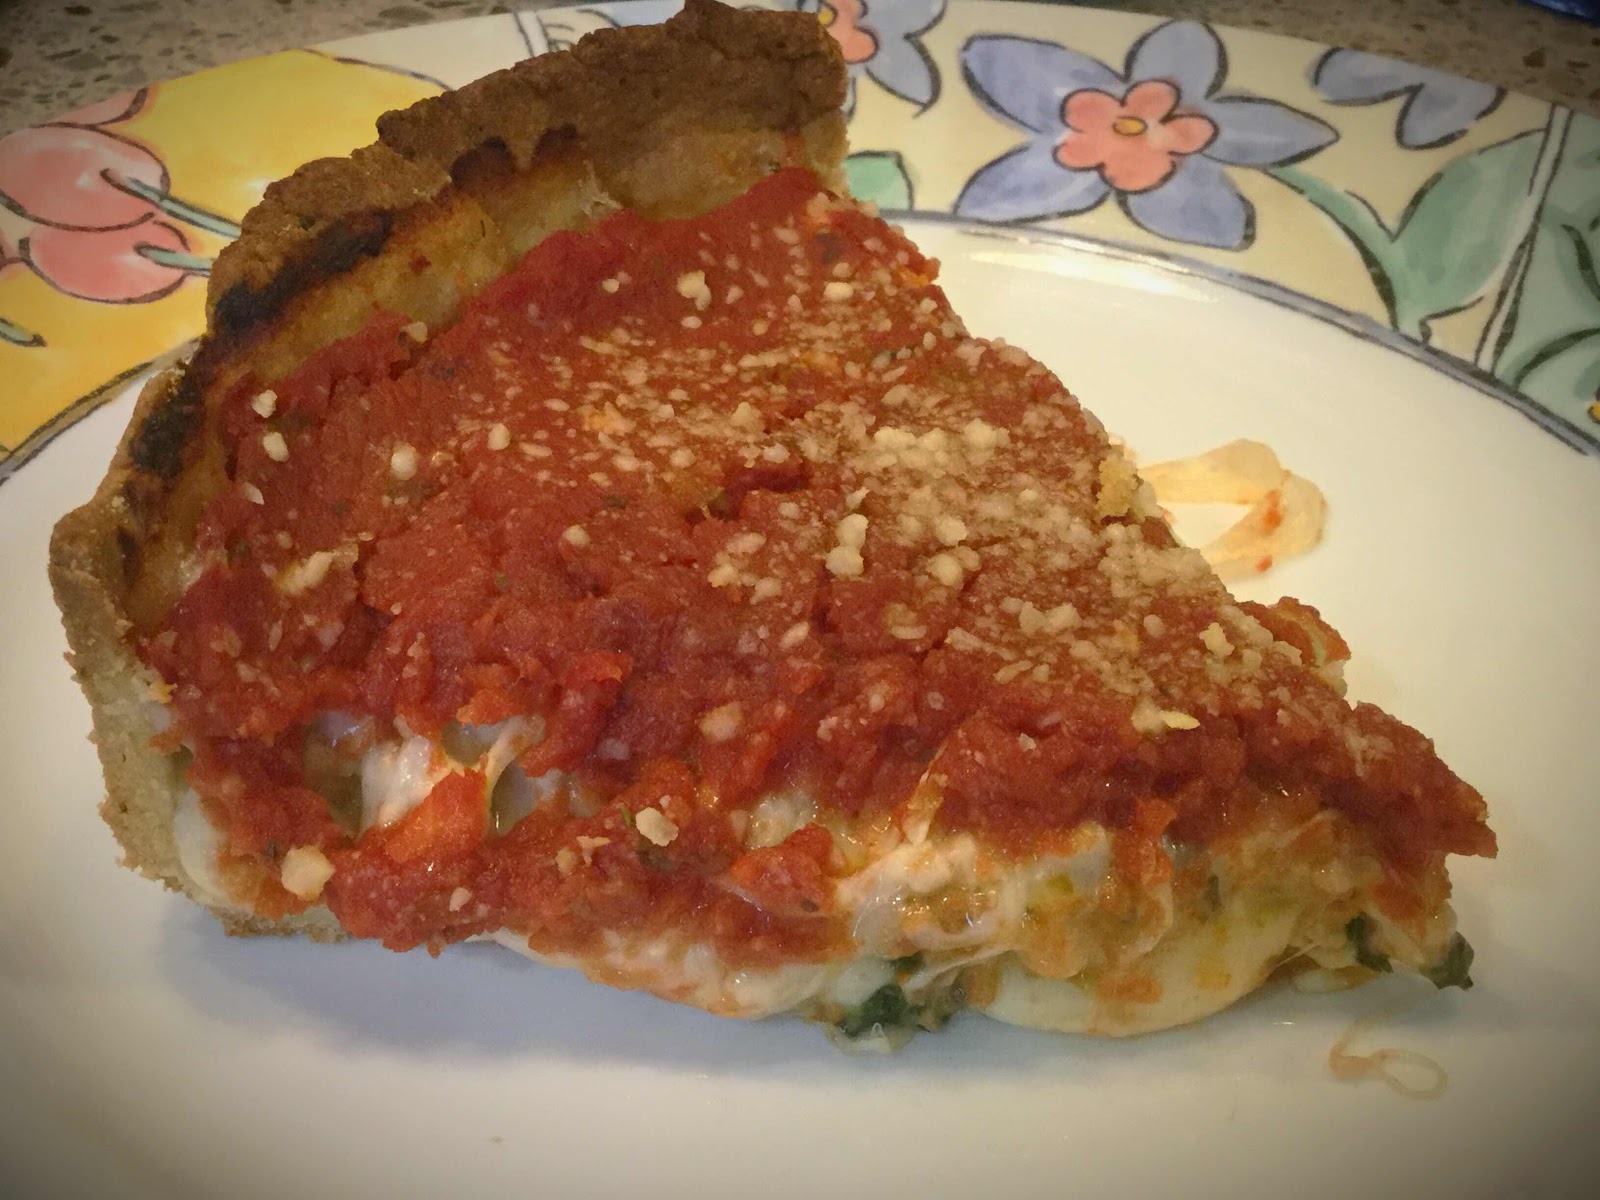
Slice of Deep Dish Pizza
Nutritional Information per 1/6th of pizza: 588 calories, 13.5 g carbohydrates (5.1 g dietary fiber, 3.2 g sugars), 41.8 g total fat (15.6 g saturated fat, 0 g trans fat), 123 mg cholesterol, 1292 mg sodium,  651.4 mg calcium, 169 mg potassium, 2 mg iron, 169 ug Vit A, 38.9 g protein. Net carbs per serving: 8.4 grams

Photos and recipe by Kathy Sheehan, copyright 2020
All rights reserved. Please do not duplicate without the author’s permission. 
Friday, June 15, 2018

Low Carb Taco Salad in a Grilled Cheese Bowl

Taco Salad in a Grilled Cheese Bowl
There are many variations of similar recipes online, but this salad is so much fun to make and eat, I had to share my own experience. I’ve seen other intriguing posts describing how to make taco shells with cheese, so I had to try it for myself. I prefer a taco salad in a bowl because it’s less messy to eat. This is an easy, foolproof, stovetop method that takes less than 10 minutes start to finish! Fill it with whatever taco salad fixings you like and, I think you’ll discover as I did, that the delicious, crispy grilled cheese bowl adds a lot of flavor to this festive salad!

Grilled Cheese Bowl
Makes 1 edible bowl

1/2 cup shredded cheddar cheese, or a blend (I used a Mexican blend)

1. Evenly spread 1/2 cup of shredded cheese into an 8-inch non-stick skillet.
2. Heat over medium heat until the cheese is bubbly and turns a dark golden brown. (Do not stir or disturb the cheese during the cooking process.) Watch carefully so the cheese doesn’t burn, but you’re looking for a dark golden color that indicates it’s well done and will be crispy when cooled.
3. Meanwhile, place an inverted 8 ounce bowl onto a plate.
4. Remove skillet from the heat and allow the bubbling cheese to cool slightly, but not harden. Drape the still warm and flexible cheese disk over the inverted bowl and gently press down the sides to create a bowl shape.
5. Allow to cool for a few minutes until the cheese hardens. Remove the cheese bowl from your mold, fill and enjoy!


Low Carb Taco Salad in a Grilled Cheese Bowl
Makes 1 serving

1 Grilled Cheese Bowl (see above)
1 cup of chopped romaine or iceberg lettuce
3 ounces of cooked ground beef seasoned with 3/4 teaspoon of taco seasoning
1/4 avocado, cut into cubes
4 grape tomatoes, chopped
1-2 teaspoons of chopped red onion
1-2 teaspoons of chopped fresh cilantro or parsley
1 teaspoon shredded cheddar cheese
2 tablespoonfuls of sour cream

Place all of the salad ingredients into the Grilled Cheese Bowl and enjoy!

Nutritional Information per salad in cheese bowl: 534 calories, 12.9 g carbohydrate (4.7 g dietary fiber, 3.8 g sugars), 41.2 g total fat (20.8 g saturated fat, 0 g trans fat), 128 mg cholesterol, 588 mg sodium, 473.4 mg calcium, 661 mg potassium, 2 mg iron, 3345 mg Vit A, 20 mg Vit C, 30.3 g protein. Net carbs per serving: 8.2 grams

Recipe and photos by Kathy Sheehan, copyright 2018
All rights reserved. Please do not duplicate without the author’s permission. 
Wednesday, April 26, 2017

Low Carb Zucchini Lasagna (or Hearts of Palm)


It's been eight years since I posted a lasagna recipe and, now that I'm living gluten and grain free, it's time for an updated version. My husband brought home two gorgeous, organic zucchini the other day and my plan was to spiralize them and make spaghetti. But because today was a cold and rainy spring day in Maine, I decided to make a warm and comforting baked lasagna instead. Instead of pasta noodles, I cut my zucchini lengthwise into narrow slices and used them between the layers of cheese and sauce. (You can substitute hearts of palm noodles in place of the zucchini.) It's important to place the zucchini slices between paper towels and leave at room temperature for at least an hour (or longer) to allow the moisture to be drawn out of this watery vegetable before assembling the casserole. The ricotta cheese mixture and meat sauce can be made a day or two ahead so, when it's time to assemble and bake, the prep time is minimal. Whether made with zucchini or hearts of palm noodles, this recipe is definitely a keeper! The lasagna was so delicious and, because it is a complete and balanced meal by itself, you don't even need to worry about a side dish. Keep life simple!

Low Carb Zucchini Lasagna (or Hearts of Palm)
Makes 6 servings

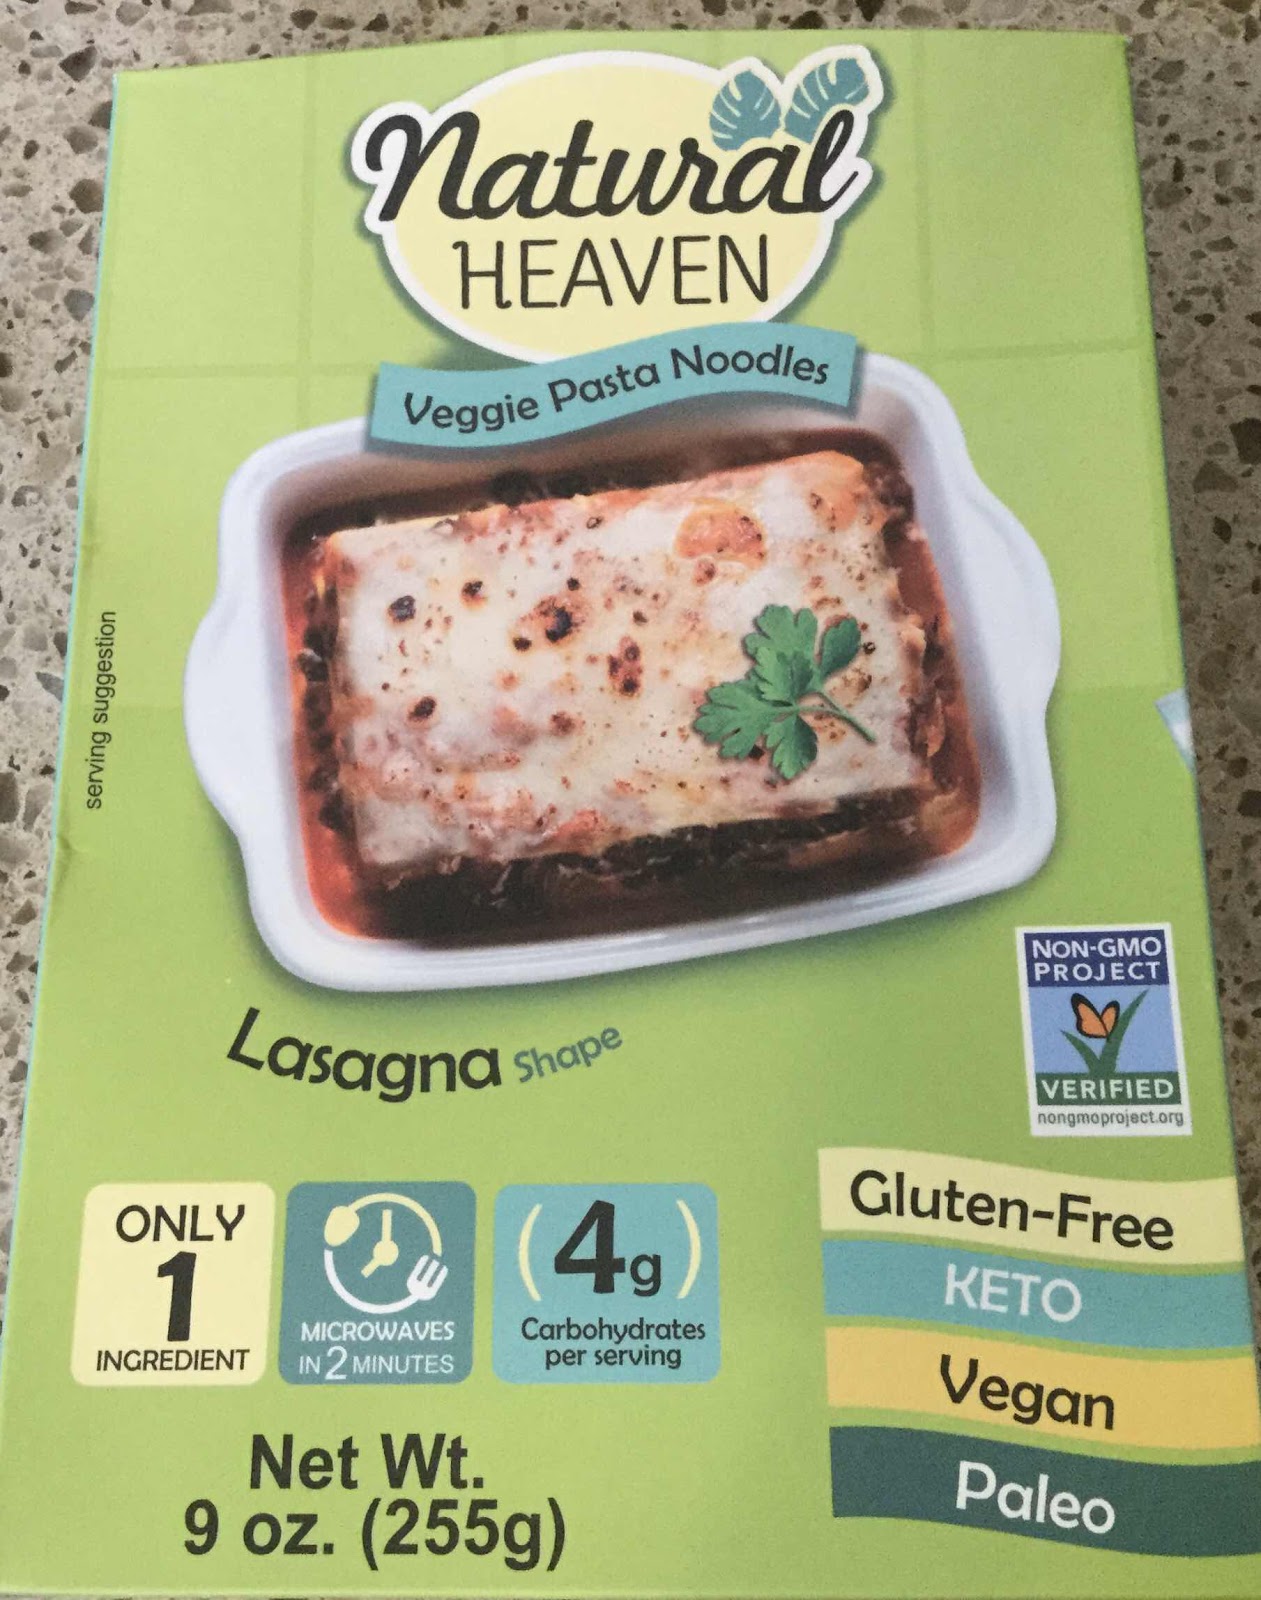
2 large zucchini, about 9 inches long or 9 oz package of hearts of palm lasagna noodles (drained, rinsed and dried), such as Palmini or Natural Heaven brand)
1 cup shredded mozzarella cheese

Ricotta Cheese Filling:
15 oz. of whole milk or part-skim ricotta cheese
1 cup of chopped fresh spinach (or 1/2 cup frozen, squeezed and drained of moisture)
1/4 cup grated Parmesan cheese
1/2 teaspoon dried basil
1 teaspoon of Italian herb seasoning
1/8 teaspoon nutmeg
1/4 teaspoon black pepper
2 cloves garlic, minced (or 1/2 teaspoon garlic powder)
1 egg, slightly beaten

Meat Sauce:
3/4 pound of sweet Italian sausage, casings removed (or substitute ground beef)
2 cups marinara or your favorite pasta sauce, no sugar added

1. Prepare the zucchini ahead of time by slicing lengthwise into thin slices (about 3/16-inch wide). If you have one, a mandoline works well to make even, thin slices, otherwise cut with a large knife. Lay the slices in a single layer on several layers of paper towel, sprinkle very sparingly with salt and cover with several more layers of paper towel. If desired, you can place a baking sheet over them and weight it with canned goods or other objects. Allow the zucchini slices to remain at room temperature between the paper towels for at least one hour (or longer) to draw out the excess moisture. Wipe off any excess salt before assembling the lasagna. (If using hearts of palm noodles, you can skip this step.)
Step by Step Pictorial

2. In a medium bowl, mix together the Ricotta Cheese Filling ingredients and stir until well combined. Set aside. (If making ahead, refrigerate until you're ready to assemble the lasagna.)

3. In a large skillet, brown the sausage and add the pasta sauce. Stir to combine and set aside. (This can be made ahead and refrigerated, if desired.)

4. Preheat oven to 375 degrees Fahrenheit. To assemble the lasagna, spray a baking pan with non-stick spray or grease with coconut oil or butter. Spoon in about 1/2 cup of the pasta sauce (no sausage) and spread to cover the bottom of the pan. Lay down a layer of the zucchini slices or hearts of palm noodles, overlapping just slightly, until the bottom of the pan is covered. Spread 1/3 of the ricotta filling over the zucchini or noodles and spread into an even layer, covering the slices. Top with 1/3 of the meat sauce and spread to edges. Sprinkle sauce with 1/4 cup shredded mozzarella cheese.

5. Repeat with a layer of zucchini slices or noodles, 1/3 of the ricotta filling, 1/3 of the meat sauce and 1/4 cup mozzarella.

6. Repeat a final time with a layer of zucchini slices or noodles, the remaining ricotta filling, the remaining meat sauce and sprinkle with the remaining 1/2 cup mozzarella.

7. Cover with the pan lid or tightly with foil (spray the foil with non-stick spray to prevent the cheese from sticking). Bake for 50-60 minutes. Remove foil and continue baking for 10 minutes until cheese is bubbly and beginning to brown. Remove from oven and allow to rest for at least 10-15 minutes before slicing and serving.

Natural Heaven Hearts of Palm Lasagna Noodles
Nutritional Information per serving made with zucchini (1/6th of recipe): 482 calories, 14 g carbohydrate (3 g dietary fiber, 6.8 g sugars), 36.6 g total fat (15.5 g saturated fat, 0 g trans fat), 120 mg cholesterol, 968 mg sodium, 376 mg calcium, 560 mg potassium, 277 mg Vit A, 1 mg iron, 26.8 g protein. Net carbs per serving: 11 grams

Nutritional Information made with hearts of palm noodles (1/6th of recipe): 478 calories, 10.1 g carbohydrate (1.7 g dietary fiber, 3.4 g sugars), 36.2 g total fat (15.4 g saturated fat, 0 g trans fat), 120 mg cholesterol, 981 mg sodium, 369 mg calcium, 386 mg potassium, 1 mg iron, 708 mg Vit A, 26.4 g protein. Net carbs per serving: 8.4 grams.

Photos and recipe by Kathy Sheehan, copyright 2017, updated 2020
All rights reserved. Please do not duplicate without author's permission.

Friday, April 21, 2017

Low Carb, Grain Free Cheese and Onion Enchiladas

  
This is a super simple, low-carb meal that can be assembled ahead and then baked just prior to serving. I recently made several trays of enchiladas for a large gathering and everyone raved and asked for the recipe. The tortillas (or Mexican-style crepes) were made a day or two ahead and the red sauce was whipped up in the blender in a matter of minutes, so it took no time at all to prepare a delicious and satisfying meal for a party of over a dozen people. The nice part was that I assembled the enchiladas in their baking pans on the morning of the event, then just popped them in the oven to bake later, which allowed me to socialize with my guests instead of being stuck in the kitchen. Served with a big salad, some non-GMO corn chips for the carb-eaters and a simple dessert, the evening was a huge success and I never broke a sweat! Cinco de Mayo is coming up on May 5th. If you're looking for a stress-free, festive meal to feed your family or a crowd, then this is the recipe for you.

Grain Free, Mexican-Style Tortillas (or Crepes)
Makes 6 tortillas

1/4 cup mild-flavored nut butter (room temperature), such as cashew, macadamia or almond
2 large eggs
3 tablespoons milk (or non-dairy milk)
1 tablespoon melted butter, ghee or coconut oil
1/8 teaspoon sea salt
1/2 teaspoon chili powder
1/2 teaspoon ground cumin
1/8 teaspoon onion powder
1/4 teaspoon dried oregano
1/8 teaspoon black pepper
Melted butter or coconut oil for cooking

Whisk together all of the ingredients until the nut butter is fully incorporated and the batter is smooth (it will be somewhat thin). Using a small sauté pan, heat over medium-low heat and brush a thin layer of the melted butter or coconut oil around the inside of the heated pan to prevent sticking. (I used an inexpensive, 8" non-stick omelet pan which only required a thin coating of oil. Adjust this amount if needed for your pan.) While holding the heated pan off the heat in your dominant hand, quickly pour a scant 1/4 cup of batter into the center of the pan and immediately begin to swirl the batter around to create a round, very thin tortilla. Keep swirling until the batter firms up in the shape you desire. (To see my YouTube video demonstrating this crepe-making technique, click here: https://www.youtube.com/watch?v=jhzXjJ2HVeM). Replace pan onto the heat and cook the tortilla for about 1 minute until slightly brown around the edges. Very carefully flip the tortilla and cook the second side for about 45 seconds. Remove tortilla to a plate to cool. Repeat until all the batter is gone. Set aside tortillas until you're ready to assemble the enchiladas. For storage, place a piece of parchment paper between each tortilla to prevent them from sticking together. These can be made 1-2 days ahead and refrigerated, although bring to room temperature before rolling the enchiladas for the greatest flexibility. 

Nutritional Information per tortilla (no filling): 117 calories, 2.3 g carbohydrate (0.6 g dietary fiber, 0.2 g sugar) 10.8 g total fat (3.2 g saturated fat, 0 g trans fat), 66 mg cholesterol, 50 mg sodium, 24 mg calcium, 52 mg potassium, 3.4 g protein. Net carbs per serving: 1.7 grams


Easy Blender Enchilada Red Sauce
Makes 2-1/2 cups (10 servings)

2 (8 ounce) cans tomato sauce (no sugar added)
1/2 cup water
1/4-1/2 teaspoon stevia powder (or 2-4 teaspoons erythritol sweetener), to taste
1/2 teaspoon onion powder
1/2 teaspoon garlic powder
1-3 tablespoons chili powder, to taste
1-2 teaspoons ground coriander, or to taste
1-2 teaspoons ground cumin, or to taste
1/8 teaspoon sea salt, optional or to taste

Place all of the ingredients in a blender and blend until smooth. (When a measurement range is given for a spice, start with the smallest amount and add more if you like yours spicier. I admit, I'm a wimp and like my sauce mild.) Taste and adjust seasonings, if necessary.

Nutritional Information per 1/4 cup serving (no salt added): 20 calories, 4 g carbohydrate (1.2 g dietary fiber, 1.7 g sugars), 0.2 g total fat (0 g saturated fat, 0 g trans fat), 0 mg cholesterol, 336 mg sodium, 5.3 mg calcium, 150 mg potassium, 0.6 G protein.  Net carbs per serving: 2.8 grams
 
Low Carb, Grain Free Cheese and Onion Enchiladas
Makes 6 enchiladas

6 Grain Free, Mexican-Style Tortillas, room temperature (see recipe above)
1-1/4 cups Easy Blender Enchilada Red Sauce (see recipe above)
1/2 pound sharp cheddar, cut into six 3/4" logs
1 cup shredded Cheddar-Monterey Jack Cheese Blend
6 green onions, chopped (separate white part from green part)

Place 1/2 cup of the Enchilada Red Sauce into a baking pan and spread around to cover the bottom of the pan. Take one cheddar cheese log, roll it inside one tortilla and place it into the sauce-covered baking pan. Repeat with remaining cheese logs and tortillas. Top each enchilada with about 3 tablespoons of the red sauce and spread with a spoon to cover. Evenly divide the white part of the chopped onion over the enchiladas, then sprinkle 1 cup of the Cheddar-Monterey Jack cheese over all.  Cover the pan tightly with foil and bake in a preheated 350-degree Fahrenheit oven for 30 minutes. Remove from oven and top with the chopped green onion and serve.

Nutritional Information per enchilada: 324 calories, 8 g carbohydrate (2 g dietary fiber, 2 g sugars), 25.8 g total fat (12.9 g saturated fat, 0 g trans fat), 86 mg cholesterol, 659 mg sodium, 437 mg calcium, 205 potassium, 1119 mg Vit A, 6 mg Vit C, 17 g protein. Net carbs per enchilada: 6 grams

Recipes by Kathy Sheehan, copyright 2017
All rights reserved. Please do not duplicate without author's permission.

Wednesday, October 5, 2016

Rainbow Chili


 A cool, autumn day calls for a comforting meal that is warming, all the way to my toes! This spicy meat chili has the added health benefit of assorted vegetables to nourish the body, but don't overlook the fact that their bright colors are appealing to the eye, as well. The purple of red cabbage, the bright orange of carrots, the bold red of tomatoes, the white of onion, the spring green of celery and the summer yellow of squash all come together in a rainbow of flavor! Mix them up and use whatever vegetables you have on hand or choose your family's favorites. I enjoy this hearty chili with a sprinkling of shredded cheese or topped with guacamole and sour cream.

I'm often asked how I fulfill the various tastes and dietary requirements of different family members at mealtime, since not everyone chooses to eat low carb. This meal is a great example! My carb-loving husband (who is not diabetic) loves his chili over boiled potatoes. We usually keep some starchy side dish in the fridge to add to his meals, such as boiled potatoes, pasta or rice.  This arrangement works well for us. It's easy for me to stay on my low-carb diet, while still satisfying his desire for a starch...that way we're both happy!

Rainbow Chili
Makes about 10 cups

2 teaspoons coconut oil
1 pound grass-fed, organic ground beef
1 medium onion, chopped
2 celery stalks, chopped
2 carrots, chopped
1 cup chopped red cabbage
1 cup chopped yellow summer squash
2 cloves garlic, minced
1 can diced tomatoes (14.5 oz.)
1 can organic black soy beans (15 oz.), drained and rinsed
1/2 teaspoon beef concentrate (optional)
1 teaspoon dried oregano
1 teaspoon sea salt, or to taste
1/2 teaspoons ground black pepper, or to taste
1-1/2 teaspoons chili powder, or to taste
1 to 1-1/2 teaspoons ground cumin, or to taste
1/16 teaspoon cayenne pepper, to more if you like it hot
1-1/2 cups to 2 cups beef broth (until desired consistency is reached)

Heat the coconut oil in a heavy Dutch oven. Brown the ground beef. Add the onions, celery and carrots and sauté, stirring occasionally, until the onion becomes translucent. Add the remaining chopped vegetables, garlic, tomatoes, beans, beef concentrate (if using), salt, pepper, herbs and spices. Stir to combine and sauté briefly. Add enough beef broth to reach the desired consistency. Taste and adjust seasonings to taste.  (I'm a wimp and like my chili mild, but if you like yours hot, you may need to add more chili powder, cumin and cayenne.) Cover and simmer for at least 30 minutes, stirring occasionally, before serving.

Nutritional Information per cup: 166 calories, 7.3 g carbohydrate (3.5 g dietary fiber, 2.6 g sugars), 9.6 g total fat (3.7 g saturated fat, 0 g trans fat), 28 mg cholesterol, 478 mg sodium, 48.6 mg calcium, 273 mg potassium, 13.3 g protein.  Net carbs per serving: 3.8 grams

Recipe by Kathy Sheehan, copyright 2016
All rights reserved. Please do not duplicate without author's permission.

Thursday, January 21, 2016

Italian Turkey "Poppers" with Marinara Dipping Sauce


These delicious turkey meatballs are so easy to make and are fun to pop into your mouth!  Sometimes eating a food in a different way makes it more interesting.  By using the marinara as a dipping sauce, instead of pouring it on top, I can better control the amount I eat to keep the carb count down.  Another reason I enjoy eating them this way is that I don't miss the pasta.  The meatballs become the star of this meal.  The addition of turmeric and chopped spinach makes them extra healthy and it's a great way to sneak another serving of vegetables into the picky eater of your family.  These "poppers" would make a wonderful appetizer for game day, a potluck or party, too!

Italian Turkey "Poppers" with Marinara Dipping Sauce
Makes 4 servings

1 pound ground turkey
1 cup finely chopped frozen spinach, thawed
2 cloves garlic, minced
1/2 teaspoon Italian seasoning
1 teaspoon dried oregano
1 teaspoon dried parsley
1/2 teaspoon onion powder
1/2 teaspoon ground turmeric
3/4 teaspoon kosher or sea salt
1/2 teaspoon black pepper
1 tablespoon tomato paste
1 tablespoon coconut oil
1-1/3 cup marinara sauce, no sugar added

In a large mixing bowl, mix together the ground turkey, spinach, garlic, seasoning, salt, pepper and tomato paste. Heat the coconut oil in a large, heavy skillet over medium heat.  Use a small cookie scoop or drop 24 rounded tablespoon-size meatballs into the heated pan and sauté on all sides until cooked through.  Meanwhile heat the marinara sauce in a saucepan over medium-low heat.  Serve the meatballs with the marinara as a dipping sauce.

Saute meatballs in a heated skillet.
Nutritional Information per 6 meatballs and 1/3 cup sauce: 297 calories, 8.5 g total carbohydrate (2.5 g dietary fiber, 3.8 g sugar), 18.4 g total fat (5.3 g saturated fat, 0 g trans fat), 88 mg cholesterol, 889 mg sodium, 126.5 mg calcium, 300 mg potassium, 22.8 g protein.  Net carbs per serving: 6 grams

Recipe by Kathryn Sheehan, copyright 2016

Saturday, July 18, 2015

Prosciutto Wrapped Zucchini with Pesto and Mozzarella


I've seen many recipes for prosciutto wrapped asparagus spears, but never zucchini.  In this recipe, I created a small hollow down the center of the zucchini and filled it with pesto and firm mozzarella before wrapping it with the prosciutto and sauteing it in a skillet.  The prosciutto becomes crispy and encases the filling nicely.  This makes a wonderful side dish or, if cut into squares, a perfectly delightful appetizer or snack!  If you're looking for another creative way to enjoy your vegetables, I highly recommend you give this recipe a try.

Prosciutto Wrapped Zucchini with Pesto and Mozzarella
Makes 4 side dish servings or about 12 appetizers

1 medium zucchini (about 8" long and not too fat)
2 tablespoons pesto (homemade or store bought)
firm mozzarella, cut into 1/4" x 1/2" sticks
prosciutto slices (about 3-4)
coconut oil (or oil saved from frying bacon)
Optional garnishes for appetizers: basil leaves, grape tomato halves, small mozzarella balls

1.  Wash and dry the zucchini.  Cut a thin portion off one side to create a flat surface (so the zucchini will not roll when placed on that side).  Repeat on the opposite side.  Cut the zucchini lengthwise down the center, between the two flat surfaces.  Set the zucchini halves with the seed sides up and, using a spoon, scrape down the center of each zucchini to remove the seeds and create a hollowed out space.

2.  Spread 1 TB of pesto down the center of each zucchini half in the hollow space.  Top pesto with mozzarella sticks just the length of the hollow space (do not let cheese extend beyond this space).  Wrap each zucchini half with the sliced prosciutto, being careful to overlap and encase the filling completely.

Saute prosciutto wrapped zucchini in skillet
3.  Heat the oil in a skillet to medium-high.  Place the zucchini with seam side down into the pan and saute until the prosciutto is browned and crispy.  Turn over and repeat with second side.  You may also wish to brown edges, as well.  Remove from pan and drain briefly on a paper towel.  Cut each zucchini into serving size pieces.  To serve as a side dish, cut each zucchini half into 2 pieces.  If creating appetizers, cut each zucchini into small squares and top with suggested garnish (as pictured) and secure with a toothpick.

Nutritional Information per side dish serving (1/4 recipe): 106 calories, 2.5 g carbohydrate (0.6 g dietary fiber, 1.5 g sugar), 8.4 g total fat (3.3 g saturated fat, 0 g trans fat), 14 mg cholesterol, 381 mg sodium, 115.3 mg calcium, 128 mg potassium, 6.7 g protein.  Net carbs per serving: 1.9 grams

Recipe by Kathryn Sheehan, copyright 2015

Friday, April 10, 2015

Grain Free Plain and Pizza Waffle


Pizza Waffle

I've gone hog wild using my old, 33-year old waffle maker!  I discovered how to make grain-free waffles using nut butter as a base, so no flour is needed.  I've created plain and pizza flavored!  (Pizza variation on the basic plain recipe is listed below.)  I'll be creating other flavors, so be on the lookout in future posts.  For someone that hasn't eaten a piece of bread, or a waffle, in over 1-1/2 years, this recipe is like performing a magic trick!  The plain version makes a wonderful bread substitute.  Just top with your favorite sandwich filling, such as chicken salad, and eat as an open-face sandwich.  The pizza waffle is a favorite, especially for a quick lunch or dinner.  As pictured here, I topped mine with uncured, nitrate-free pepperoni cut into slivers that were heated in a skillet, shredded Parmesan and chopped tomatoes seasoned with Italian herbs.  It is to die for!  The waffles can be made ahead and stored in an airtight container.  To crisp them back up, just toast or place them briefly on your heated waffle iron so that it fits on the squares like a puzzle.  Also, if you don't have a waffle maker, either of these recipes can be made into pancakes and cooked in a skillet.  Have fun with these!  I know I have!

Grain Free Basic Plain Waffle
Makes about 3 or 4 waffles (6-8 servings)

1/2 cup almond or cashew butter, room temperature
2 large eggs
2 tablespoons non-dairy milk, such as almond, coconut or flax
1/2 tablespoon apple cider vinegar
1/8 teaspoon salt
1/4 teaspoon (two drops) molasses
1/4 teaspoon baking soda
non-stick vegetable spray or melted ghee (clarified butter), if needed

1.  Mix all of the ingredients in a mixing bowl and beat vigorously with a fork until a smooth batter forms.  The batter should have the consistency of pancake batter, thickened but pourable.  If additional liquid is needed, add 1 TB of non-dairy milk at a time until desired consistency is reached.  (If the batter is too thick, it will work fine but might not make a total of 4 waffles.)

2.  Heat waffle iron to a medium setting.  If needed to prevent sticking, spray both sides of the waffle iron with non-stick vegetable spray or brush lightly with melted ghee.  Ladle the batter onto the waffle iron and close the lid.  Cook until waffle is golden brown.  Carefully remove from waffle iron and serve immediately or place on a wire rack to cool completely, then store in a airtight container.  Repeat with remaining batter.

3.  To reheat a cooled waffle, either toast lightly or carefully fit the waffle back onto a heated waffle iron (make it fit like a puzzle) and close the lid.  Only reheat the waffle for about 20 seconds or until crispy.

Nutritional Information per serving (1/2 waffle, no topping):  129 calories, 5.2 g carbohydrate (0.3 g dietary fiber, 0.6 sugars), 10.4 g total fat (2.2 g saturated fat, 0 g trans fat), 155 mg cholesterol, 121 mg sodium, 33.5 mg calcium, 145 mg potassium, 5.1 g protein.  Net carbs per serving: 4.9 grams

Pizza Waffle Variation:  Omit the molasses and add 1/2 teaspoon Italian seasoning, 2 teaspoons tomato paste, 1/8 teaspoon garlic powder, 1/8 teaspoon onion powder and freshly ground black pepper.  The batter should have the consistency of pancake batter.  If additional liquid is needed, add 1 TB of non-dairy milk at a time until desired consistency is reached.  Proceed with step 2 to make waffles.

Recipe by Kathy Sheehan, copyright 2015.

Friday, October 17, 2014

Easy Vegetarian Chili


I made a new discovery (I love it when that happens)!  I finally found a bean that fits into my very low carb lifestyle: Black Soy Beans!  For the past year, I've been avoiding beans because most beans are too high in carbs, usually around 23 g carbs per 1/2 cup serving.  Even if you subtract the fiber, they weigh in at about 17 net carbs...still too high.  Recently, while browsing a low carb cookbook from the library, I saw the ingredient "black soy beans" multiple times, so I just had to investigate.  To my surprise, I learned that black soy beans are an extremely low 7 g total carbs per 1/2 cup serving, with 6 g fiber.  That's an amazing 1 net carb per serving!  I tried them, tested my blood sugar to see how my BG reacted and I knew immediately that this is a bean I can work with. My blood sugar didn't rise at all.  So, into my kitchen I went and started cooking. This extremely easy vegetarian chili is a complete meal-in-a-bowl and was a huge hit at a recent church supper.  The black soy beans provide all the essential amino acids (so they are a complete protein source) and they taste exactly like regular black beans without the carbs.  This recipe is dedicated to my little sister -- enjoy!

Easy Vegetarian Chili
Makes about 10 servings

2 tablespoons coconut oil
1 medium zucchini, cubed
3 small carrots, cut into small chunks
1 small onion, chopped
1 cup frozen chopped spinach or kale
1 jalapeno pepper, chopped
1 green or yellow pepper, chopped
2 cloves garlic, minced
2 teaspoons chili powder, or to taste
1 teaspoon ground cumin, or to taste
2 teaspoons dried oregano
28 oz. Marinara Sauce, no sugar added
28 oz. crushed tomatoes, no sugar added (no sodium, if desired)
2 cans (15 oz each) organic black soy beans, drained and rinsed (I buy Eden's brand)
1 cup plain tomato sauce, no sugar added  (no sodium, if desired)
1 cup water (or more to achieve desired consistency)
Salt and pepper to taste
Dash or two of hot sauce, optional
Shredded cheese for topping, optional (omit for dairy free)

1. Heat coconut oil in a dutch oven or heavy pot, add chopped vegetables and saute until beginning to soften.  Add herbs and spices and saute for another minute.  Add beans, marinara sauce, crushed tomatoes, plain tomato sauce, and water.  Allow to simmer, covered for about 40-45 minutes or until carrots are cooked through.  Season with salt, pepper and hot sauce (optional) before serving.  Top with shredded cheese, if desired (omit for dairy free).

NOTE:  This makes an excellent crock pot recipe!  Just saute the vegetables in a skillet, add them to the crock pot with the remaining ingredients and cook on low for 4-6 hours (or high for 2-3 hours), until carrots are cooked through.

Nutritional Information per serving (optional ingredients not included): 212 calories, 22 g total carbohydrate (9 g dietary fiber, 9.6 g sugar), 9.3 g total fat (3.1 g saturated fat, 0 g trans fat), 0 mg cholesterol, 793 mg sodium, 109.3 mg calcium, 603 mg potassium, 11.3 g protein.  Net carbs per serving: 13 grams

Recipe by Kathy Sheehan, copyright 2014


Friday, September 26, 2014

Supreme Pizza Chicken


I haven't had a slice of pizza for over 1-1/2 years, since learning that I have celiacs (an intolerance to gluten).  Not long after that discovery, I chose to go totally grain-free, which has made all the difference in reversing my diabetes.  I don't miss pizza itself, but the flavor of pizza is another matter.  This recipe tastes so much like the real thing that I feel like I just ate a slice!  I think the secret is the turkey pepperoni.  It adds zip to the sauce.  I think this easy recipe will become a family favorite!  If you are lucky enough to have any leftovers, cut up the chicken into bite-size pieces, stir them back into the sauce and serve over zero calorie, zero carb shirataki noodles.  It will be the best chicken cacciatore you'll ever eat!

Supreme Pizza Chicken
Makes 6 servings

2 lbs chicken pieces, skin removed (I used thighs and breasts)
2 TB coconut oil
1 cup strained tomatoes (I used Pomi brand) or plain tomato sauce mixed with 1 TB tomato paste
1/2 cup red wine 
1 small onion, chopped
4 oz. mushrooms, sliced
1-1/2 tsp dried oregano
2 cloves garlic, minced
34 slices of turkey pepperoni, cut into quarters
Salt and pepper to taste 
3 TB Parmesan cheese, shredded (shredded mozzarella can be substituted)*

1. In a heavy Dutch oven, heat coconut oil over medium heat.  Brown the chicken on all sides, remove to a platter and set aside.

2. To the pot add the wine, strained tomatoes (or tomato sauce thickened with tomato paste), onion, mushrooms, garlic, oregano and turkey pepperoni.  Return chicken to pot and turn heat to low.  Cover and simmer for 45 minutes.

3.  When chicken is done, remove it to a serving platter.  Turn heat to medium and boil sauce for about 10 minutes or until thickened to desired consistency.  Season with salt and pepper to taste.  Return chicken to pot to reheat briefly.  To serve, spoon sauce over chicken and sprinkle each portion with 1/2 TB cheese.

Nutritional information per serving: 324 calories, 6.2 g carbohydrate (1.2 g dietary fiber, 2.4 g sugar), 14.6 g total fat (7.1 g saturated fat, 0 g trans fat), 117 mg cholesterol, 585 mg sodium, 45.8 mg calcium, 473 mg potassium, 37 g protein.  Net carbs per serving: 5 grams

* For those with food allergies: To create a dairy-free version, omit cheese or substitute a dairy-free cheese product.

Recipe by Kathy Sheehan, copyright 2014

Tuesday, August 26, 2014

Eggless Avocado Scramble


Since learning about my sensitivity to eggs, I've had to be creative about breakfast.  No gluten, no dairy, no eggs -- that pretty much leaves my plate empty at a typical breakfast buffet!  Well, this recipe is hearty and makes me feel satisfied for hours.  Honestly, when I eat this for breakfast, I don't need to eat again for 6+ hours!  It's full of good-for-you, heart and brain healthy fat, fiber and tastes as creamy and delicious as scrambled eggs.  Did you know that avocados have twice as much potassium as bananas?  Also, they have a very low impact on blood sugar.  For this recipe, choose an avocado that is still slightly firm for the best results.  This flavorful dish is one I turn to often because it's so quick and easy to make.

Eggless Avocado Scramble
Makes 1 serving

1/2 slightly firm avocado, cubed
2 turkey breakfast sausage links*
1 TB ghee (or butter)*
1 tsp chopped parsley
2 cherry or grape tomatoes, halved and sliced
Salt and pepper to taste

1. If the sausage links are frozen, place them in a skillet over medium heat.  After they have thawed a bit, add the ghee to the pan.  Sauté the cubed avocado in the ghee until softened and beginning to brown slightly.  With a spatula, turn often and scrape the bottom of the skillet to prevent sticking.  Cut up the sausage links and combine with the avocado.  Add the parsley, sliced tomato and remove from heat.  Salt and pepper to taste.  Serve immediately.

* For those with food allergies: For a lactose and casein free dish, use ghee (clarified butter) instead of butter.  If gluten is a problem for you, be sure to choose GF breakfast sausages.  I use Applegate Savory Turkey Breakfast Sausages, which are gluten and casein free.

Nutritional Information per serving (entire recipe): 327 calories, 10.8 g carbohydrate (7.2 g dietary fiber, 1.6 g sugar), 28.9 g total fat (8.9 g saturated fat, 0 g trans fat), 42 mg cholesterol, 348 mg sodium, 16.4 mg calcium, 570 mg potassium, 10.6 g protein.  Net carbs per serving: 3.6 grams

Recipe by Kathy Sheehan, copyright 2014

Sunday, June 15, 2014

Bolognese Sauce over Shirataki No-Carb Noodles


Zero net carbs, 15 calories per serving, gluten free noodles that can actually aid in blood sugar control?  I'll admit, I was skeptical.  Shirataki noodles sound too good to be true, but I'm an adventurous cook and always on the lookout for low carb ways to eat my favorite foods, so I gave them a try.  The verdict?  Very good!  You can find them in Asian markets or in your grocery produce section with tofu or vegetarian products.  They come in a water-filled pouch and are made from a high fiber root vegetable called konjac.  (The noodles also come in a variety that has been combined with tofu, but those have more carbs and a few more calories per serving.  I suggest purchasing the noodles that are soy-free.). When you open the package, strain the noodles in a fine mesh strainer and run hot water over them.  You can either boil them for a few minutes or dry pan fry them to improve their texture to be more like wheat noodles.  Simply spray a dry skillet with non-stick cooking spray and sauté for a few minutes on medium high heat until most of the moisture has evaporated and the noodles are dry.  Use them in recipes or top with your favorite sauce, like the meat sauce recipe below, which is one of my family's favorites.  The noodles are bland, have no flavor of their own and will take a backseat to the flavor of the other ingredients in the dish.  The best part is that they are quite filling!  By using these magic noodles, the carbs in this traditional pasta dish were slashed dramatically, from over 50 grams per serving to a mere 10 net carbs, including the sauce!  I'm amazed and delighted by this new find!

Low Carb Bolognese Sauce
Makes 6 servings

3 Tablespoons olive oil
1/2 onion, chopped
1 pound grass-fed ground beef
3 teaspoons minced garlic
26 ounces chopped tomatoes, with liquid (I use Pomi Italian tomatoes)
2 Tablespoons tomato paste
2 teaspoons dried oregano
1 teaspoon dried basil or 1 TB fresh, chopped
1 Tablespoon dried parsley or 1/4 cup fresh, chopped
1 bay leaf
Salt and pepper to taste

1.  In a large Dutch oven, heat the oil and add the chopped onion.  Add a dash of salt and sauté until onion is soft and translucent.  Add the ground beef and break apart into small pieces, stirring until the meat is cooked and no longer pink.  Add the garlic and sauté until fragrant.

2.  Add the tomatoes, tomato paste, herbs, and bay leaf.  Stir to combine. Cover and reduce heat to low.  Simmer, stirring occasionally, for 40 minutes.  Remove the cover and continue simmering for another 20 minutes or until thickened.  Add salt and pepper to taste.  Remove bay leaf and serve over boiled or dry pan fried shirataki noodles or your favorite pasta.

Nutritional Information per serving (for sauce only): 261 calories, 9.1 g carbohydrate (2.7 g dietary fiber, 5.2 g sugar), 18.4 g total fat (5.7 g saturated fat, 0 g trans fat), 50 mg cholesterol, 172 mg sodium, 23 mg calcium, 88 mg potassium, 15.4 g protein.  Net carbs per serving: 6.4

Recipe by Kathy Sheehan, copyright 2014

Tuesday, April 29, 2014

Zucchini "Pasta" Primavera


This "pasta" dish is not pasta at all!  It is a delicious, creamy primavera with pancetta over zucchini noodles.  Using a spiral slicer, mandolin or box grater (shred lengthwise), it is easy to create vegetable noodles (see my earlier post to learn how).  Using vegetable noodles (by themselves or mixed with a little gluten free pasta) is one of my greatest carb-lowering tricks.  My pasta-lovin' non-diabetic husband was completely satisfied with this amazing meal and didn't miss the carbs, at all.  I think you'll agree and, like me, return to this healthy recipe again and again.

Zucchini "Pasta" Primavera
(Makes 4 servings)

1/2 TB olive oil
2 large zucchini, made into noodles (about 6 cups)
3 oz. pancetta, diced (omit for meat free version)
1-1/2 cups asparagus, cut into 1" pieces
1-1/2 cups broccoli florets
1/2 large onion, chopped
3 cloves garlic, minced
2 plum tomatoes, diced
1 tsp dried oregano
1/4 cup fresh parsley, chopped (or 1 TB dried)
1-1/2 cups almond milk
2 TB gluten free flour
1/3 cup sour cream (for a dairy free version, use Tofutti)
1/4 cup grated Parmesan cheese (for dairy free, use finely crushed macadamias)
Salt and pepper to taste
2 TB shredded Parmesan cheese (optional topping)

1.  This dish comes together quickly, so have all the vegetables cut up and ready. In a large skillet, warm the olive oil over low heat. Add zucchini noodles, season with salt and pepper, cover and allow to steam until beginning to soften, stirring occasionally.  When noodles are just beginning to soften, remove from heat, drain and set aside.

2.  While the zucchini noodles are cooking, prepare the sauce in another skillet.  In a large skillet, cook pancetta over medium heat until fat is rendered and beginning to crisp.  (If not using pancetta, heat 2 TB olive oil.) Add asparagus and broccoli, sauté briefly and cover for a few minutes until vegetables are bright green and tender-crisp.  Using a slotted spoon, remove vegetables and pancetta to a medium bowl; set aside.

3.  Add onions and sauté until translucent.  Add garlic and oregano; sauté until fragrant.  Add gluten free flour and stir constantly until beginning to brown.  Remove from heat and add almond milk while stirring constantly, stir until smooth.  Return to heat and continue cooking and stirring until sauce boils and thickens.  Return vegetables and pancetta to pan.  Add the tomatoes, sour cream, 1/4 cup grated Parmesan cheese and parsley.  Stir until well combined.  Add salt and pepper to taste.

4.  Add the drained zucchini noodles to the skillet and stir until well coated with the sauce.  Serve immediately topped with shredded Parmesan cheese, if desired.


Nutritional Information per serving: 228 calories, 17 g carbohydrate (4.7 g dietary fiber, 7.2 g sugar), 13.4 g total fat (5.9 g saturated fat, 0 g trans fat), 28 mg cholesterol, 781 mg sodium, 346 mg calcium, 780 mg potassium, 13.2 g protein.

Recipe by Kathy Sheehan, copyright 2014


Sunday, January 19, 2014

Love Your Vegetables!


 It doesn't matter what diet you're on, the mantra is the same: Eat more fresh fruits and vegetables!  When I was first diagnosed with diabetes, that was the single, most difficult change I had to make.  Fruit was easy, although as a diabetic fruit is limited, but vegetables?  Not only did I not eat many vegetables, especially those leafy greens or cruciferous vegetables (like broccoli or cabbage), I struggled to eat more than one serving per day!  My attitude and eating habits have changed dramatically since those days, but not without a struggle, a few setbacks and a lot of creativity.

After winning the war against vegetables, I now admit I have a love affair with them!  I eat them at every meal, including breakfast.  I hide them in everything and sometimes I have fooled myself into believing that I'm not even eating them, when my entire plate is heaping with nothing but vegetables!  I even taught a cooking class in my community where I convinced other skeptics how to love their vegetables.  This blog is FULL of dozens of vegetable recipes, but in this post (and more to come later) I wanted to share some of my favorite toys that make incorporating more vegetables into my diet super fun, easy and delicious.  These tools, tips and recipe ideas just might make a believer out of you, too.


MY NEW TOY!


A Spiral Vegetable Slicer/Cutter: Inexpensive, no electricity needed, easy to use and clean, available online (Amazon or other sites) and as fun as playing with a Playdoh machine!  I use the Paderno brand, but there are others available. Usually several different blades come with it that quickly and easily make vegetable noodles, spiral ribbons of fruit or vegetables and curly vegetables for oven baking (think Sweet Potato Fries!)  One of my favorite ways to use this low-tech kitchen tool is to make vegetable noodles for either a main dish or side dish.  Vegetables I've used and recommend for noodles are: butternut squash, zucchini, parsnips, eggplant and carrots (if they're fat and big).  Quick Tip: Use any leftover vegetable or fruit pieces in your morning green smoothie.

RECIPE IDEA: Make zucchini noodles using a spiral slicer (plan on one per person, or two if they're small).  Cut any long strands into pasta-length; set aside.  Heat your favorite marinara sauce in a large saucepan.  Add the zucchini noodles and heat until noodles are cooked through and begin to soften, about 8-10 minutes.  Serve with grated Parmesan cheese.  (see photo at top of this post)

Carb Cutting Tip for Vegetable Skeptics: If a heaping plate of delicious zucchini noodles sounds too weird for you, try adding a small serving of your favorite spaghetti pasta cooked and drained according to package directions to the recipe.  (If you're watching gluten, choose a gluten free pasta.)  Cut the amount of pasta you'd normally use by at least half (or more) and add to the zucchini noodles and sauce at the end of cooking, stir until well combined and serve.  As you twirl both types of noodle onto your fork and eat, your taste buds will be fooled into thinking you're getting an enormous serving of naughty, carb-ladened pasta, when the truth is really that you're eating mostly healthy vegetables resulting in a minimal spike to your blood sugar!

LOVE YOUR VEGETABLES!